In this post you’re about to learn how to write SEO content fast…
Specifically, you’re getting access to my tried and tested process I’ve been using for well over a decade to deliver incredible content that ranks.
Here are the 7 steps:
- Do keyword research.
- Build a blog outline using Google.
- Find a killer title.
- Write your draft quickly and efficiently.
- Edit your article.
- Add awesome royalty-free images.
- Master the hack to creating content even faster!
Ready to jump in?
Great!
Step 1: Keyword Research
If you're thinking about skipping this section because you already know what your post will be about, STOP!
If you blog without doing keyword research first, you expose yourself to an enormous risk:
You’ll miss out on a ton of additional keywords — gold nuggets — that you can use to fully optimize your article!
So…
Don’t do it!
Here’s what you should do instead:
First, get a good keyword competition checker.
KWFinder is the best option on the market, but it isn’t free…
You’ll need to invest and get yourself an account to take advantage of all its cool features.
It’s worth every penny — in fact, I’ve been using it every day for over 3 years now!
But there’s a silver lining:
KWFinder offers a free 10-day trial here, which means you can sign up now, use it as you follow this guide!
Next, follow this process:
Once you’re logged in, search for a generic topic idea.
In this example, my idea is to write a post about speed reading… so my starting topic statement is ‘how to speed read.’
Enter it and then check the stats that KWFinder presents you with:
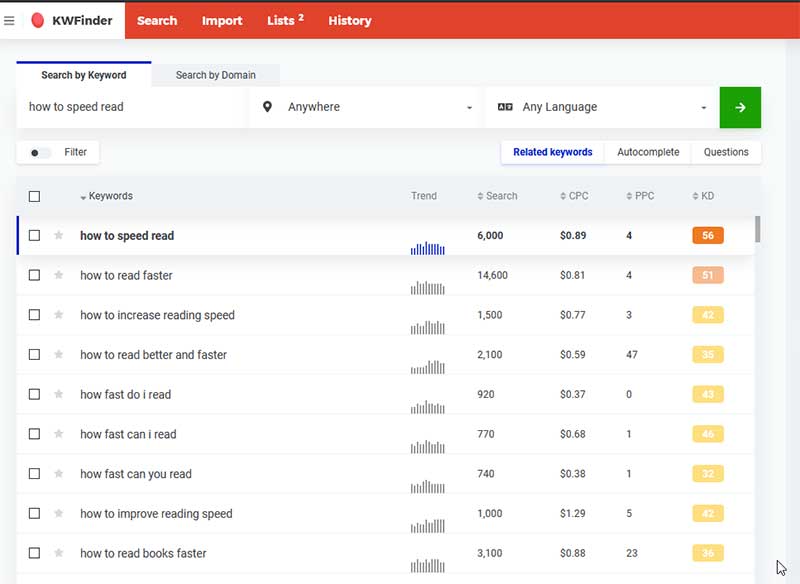
6,000 people a month search for ‘how to speed read’ — That’s awesome!
But the competition score is 56 — no bueno!
You want to target phrases with a Keyword Difficulty score of less than 30 (right hand column with heading KD) if you’re new to the SEO game.
With ‘How to speed read” showing a difficulty of 56, that means it’s going to be a challenge to rank for this phrase.
So, what can you do?
Sort the list by keyword difficulty and look for a long-tail variation of this phrase with lower difficulty
For a full tutorial on how to find low competition keywords — check out this deep-dive post for help on how to find it!
One more tip:
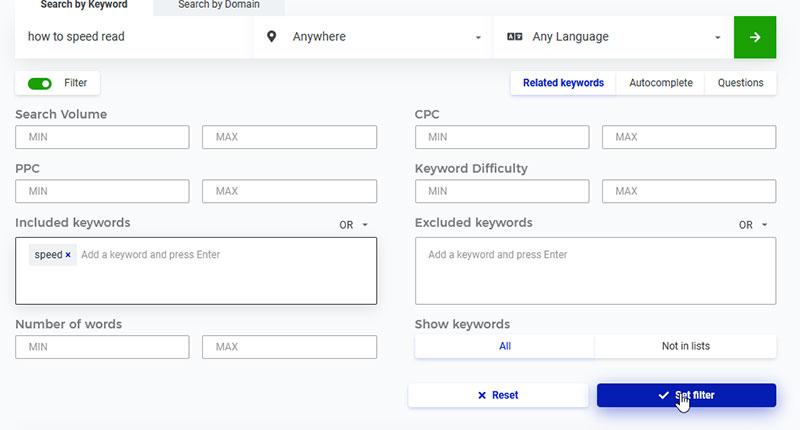
After you’ve found the perfect main keyword, filter your search results:
First, click the “filter” button on KWfinder.
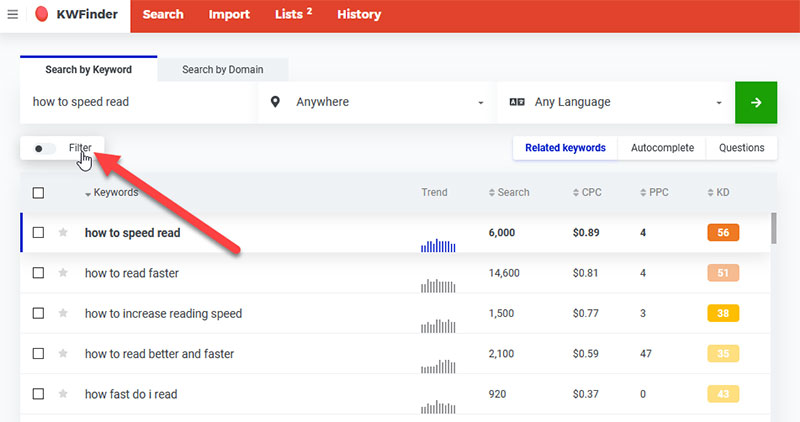
Next, enter a specific word (or two) in the ‘included keywords’ search box (speed in my example below), then hit “set filter.”
What are you looking for?
Additional keyword phrases that you can rank for with this single article.
This will make your article:
- More thorough
- More helpful to your readers, and ultimately
- Rank for more keywords for a broader range of search queries, to get more traffic!
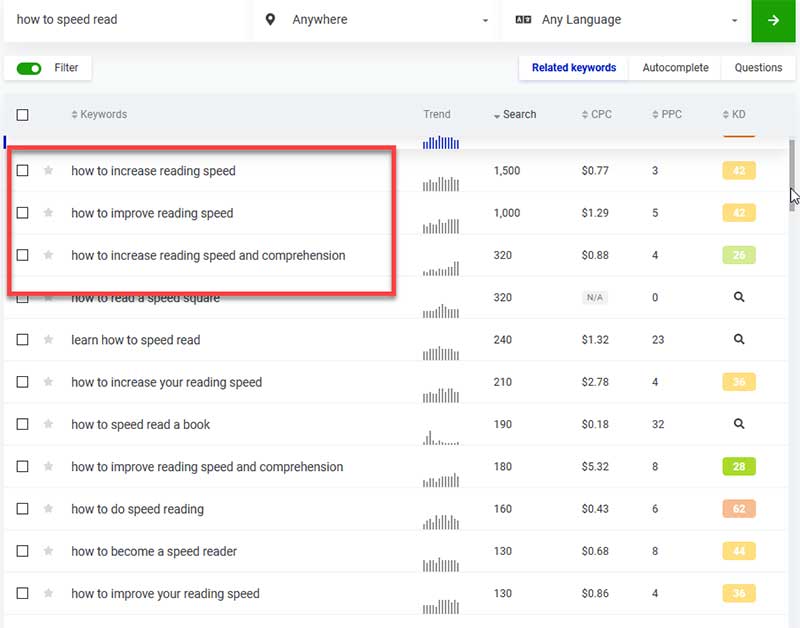
Here are some examples of filtered keywords that’ll help your article rank for more related searches:
Once you’ve found these:
- Check the boxes next to your main keyword and all the other related additional phrases.
- Click the ‘Export’ button.
- Click the ‘Copy to clipboard’ link.
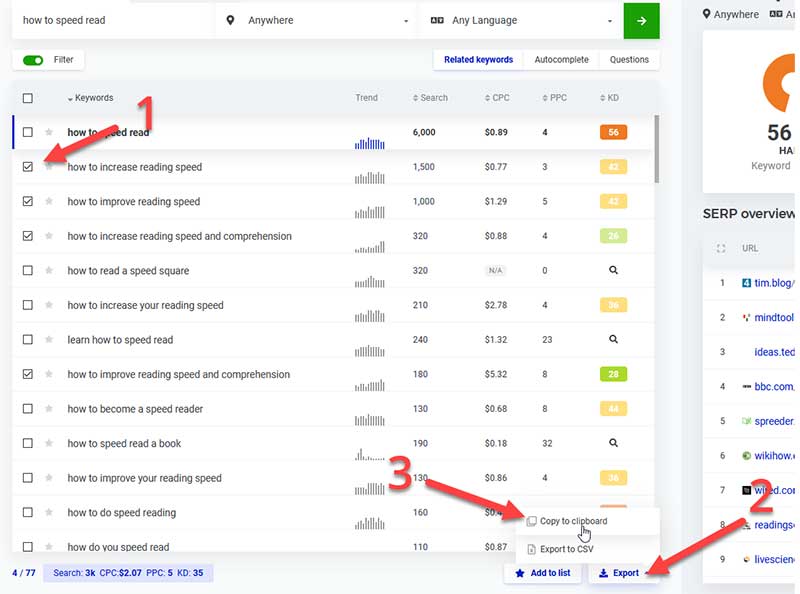
Now paste those copied keywords into a doc/notepad — you’ll be using them in the next step, outlining…
Here are the additional “keyword” ideas that KWFinder found for this ‘how to speed read’ post:
- How to speed read
- How to increase reading speed
- How to improve reading speed
- How to increase reading speed and comprehension
- How to improve reading speed and comprehension
- How to practice speed reading
- How does speed reading work
- How to increase my reading speed
- How to learn quantum speed reading
- How fast is speed reading
- How fast do speed readers read
Aim for a list that looks similar to this one!
Step 2: Build Your Blog Post’s Outline Using Google’s Data
Here’s how to get cracking on the outlining process:
- Open an incognito browser window.
- Go to Google.com — don’t search from your browser!
- Enter your post’s main keyword, but don’t hit search… yet!
- Look at all the Autocomplete suggestions.
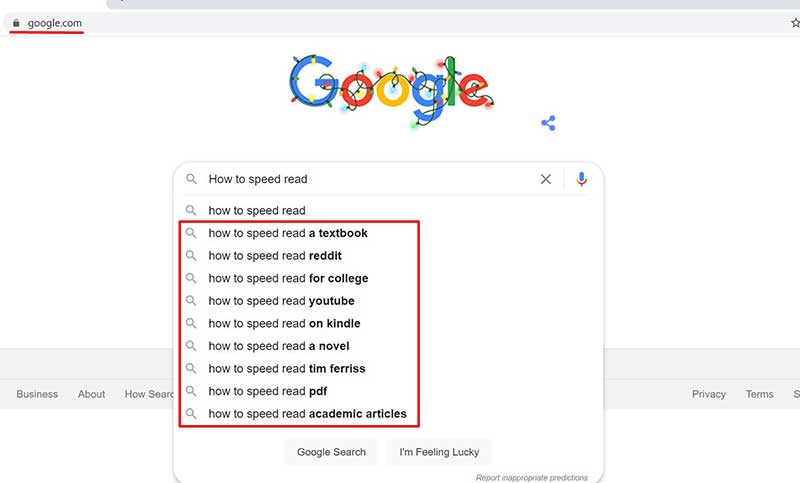
Carefully review Google’s “autocomplete” recommendations and exclude the ones where searchers of those phrases aren’t looking for your blog post.
In this example, the people that type in ‘How to speed read Reddit,’ ‘How to speed read YouTube’, or ‘How to speed read Tim Ferriss’ are looking for something far more specific than your article. Don’t waste time targeting them!
This principle is called search intent.
If you’d like to learn more, here’s a free deep dive tutorial on YouTube that covers this lengthy topic!
Now add the filtered autocomplete phrases to the same doc/notepad you’ve used to collect your KWFinder keywords.
You’ll have a list similar to this:
- How to speed read
- How to increase reading speed
- How to improve reading speed
- How to increase reading speed and comprehension
- How to improve reading speed and comprehension
- How to practice speed reading
- How does speed reading work
- How to increase my reading speed
- How to learn quantum speed reading
- How fast is speed reading
- How fast do speed readers read
- How to speed read a textbook
- How to speed read for college
- How to speed read on Kindle
- How to speed read a novel
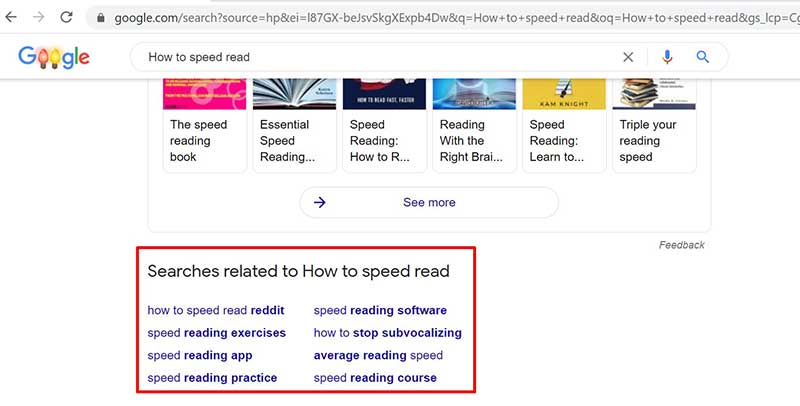
Next, head back to Google.com and then follow through with your primary keyword search.
Scroll down the Google results page to the ‘People also ask’ section, and add all the related questions to your list.
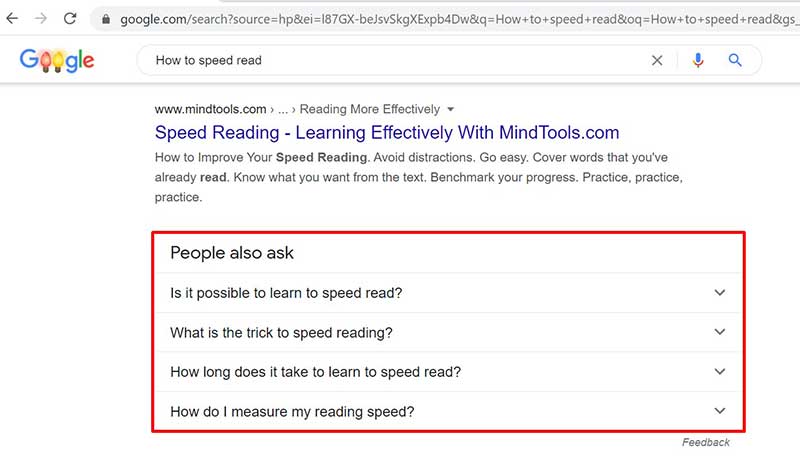
Then scroll down to the bottom of the search results page: look for the ‘Searches related to [your keyword]’ section.
Once you’re there, add any relevant search recommendation to your list of keywords!
Turn Your List Into an Actionable Outline:
You’ve done all the hard research; now it’s time to:
Review everything you’ve pulled together from KWFinder and Google… and then organize all these suggestions into a super helpful blog outline!
But pay close attention to these two warnings as you work:
Two Important Notes About Outlines
Not all of the topics you find will fit into the same article…
How do you know when this is the case?
Follow these two simple ‘checks’ when you’re preparing your outline:
- Is Google showing blog posts with titles similar to your primary keyword? Or are they completely different?
- Ask yourself: do you need over 1,000 words to explain these ‘mini topics’?
Here’s how to avoid mistakes.
Google each individual phrase you’re not sure about and check the SERP results!
Here’s an example using ‘speed reading software’:
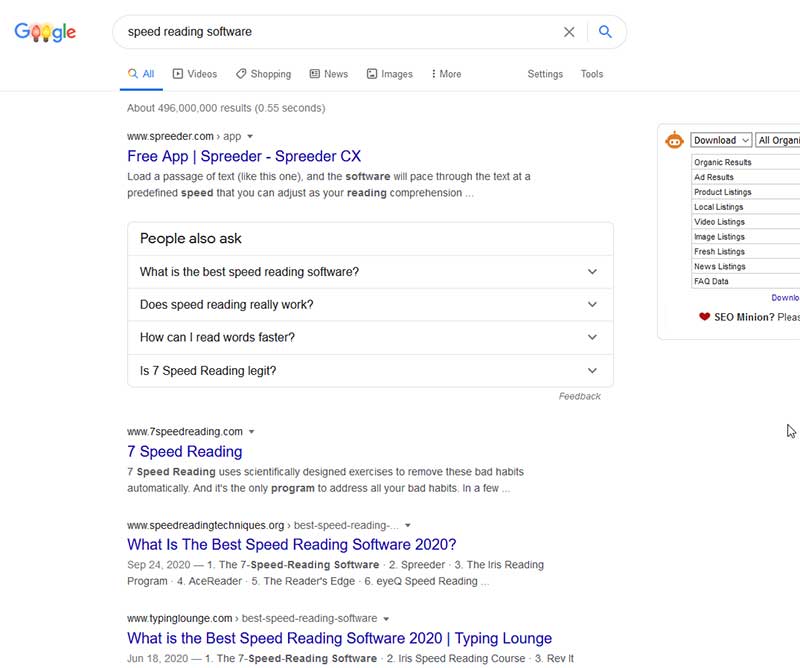
This keyword should not be in the final outline for my ‘how to speed read’ article.
Why?
Because the posts dominating the first page all have ‘speed reading software’ in their title…
This is likely happening because this topic falls under ‘check’ number two: does it require more than 1,000 words to explain?
So just leave it behind as you won’t rank!
Did you waste your time?
The exact opposite.
This “work” has helped you see how to further accomplish a ranking signal from Google by adding related content ideas to your blog.
This is how Google puts it in their SEO starter guide:
‘Cultivate a reputation for expertise and trustworthiness in a specific area.'
Add these ‘leftovers’ to Workflowy (or another free list tool), and you’ll have plenty of ideas for future ‘in a specific area’ articles for your blog!
Your completed article outline should look something like this:
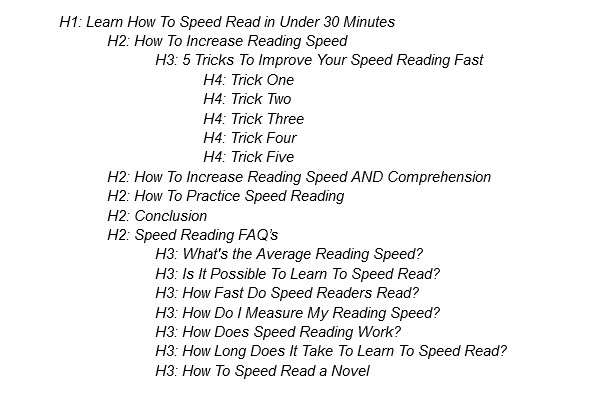 Do you notice all the H1, H2, H3, and H4 words?
These are called header tags.
Add Headers to Your Outline
Headers break your online content down into manageable ‘chapters.’ These help both Google and your readers better understand your article and absorb more essential concepts!
If you don’t know all of the ins and outs of headers and other ‘SEO rules,’ then open up this post in a new tab and read it next!
Now head back to your browser, but DON’T close the Google search result page…
There’s one more gold nugget to mine: the all-important title.
Step 3: Find a Killer Title for Your Post
Your blog post's title is likely the single most important element of your article.
If you get it wrong:
- Very few people will click on your blog post in SERPs, and
- The majority of those who do will bounce faster than a rubber ball.
All the other time you spend perfecting your content won’t matter at all!
But luckily, our good old friend Google is here to help, again.
How?
You find a killer title for your blog by not trying to reinvent the wheel. Carefully review what Google is already showing you and model what’s working on page one.
These are the best on the entire internet for your keyword because Google says so — their algorithm has spoken!
Here are two ways to accomplish this step.
- Either look at the top-ranking titles on Google to analyze who you need to beat.
- Use this title and meta description length checker tool I built for my team that speeds up the process.
The tool also shows you sentiment and power words, where you fall in line with the current ranking pages, and much more!
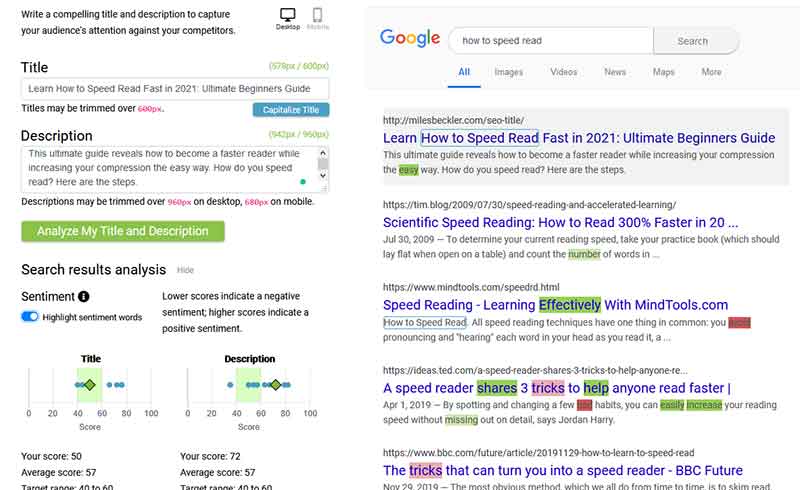
Now, write a title that CAN and WILL beat the competition! 💪
Next up:
How to write your article fast!
Step 4: Write Your Draft Content Quickly
How many words should your blog post be?
There are two answers to this question:
Let’s start with the short one:
- Aim for a word count of between 1,100 and 1,600 — this is the sweet spot!
And now the long answer:
Are you working in a competitive niche? Or are you extra ambitious?
Then, learn the data-driven way to figure out exactly how long your blog posts should be in this 10-minute YouTube video!
How do you write a thousand words, or more, fast?
You have two great options:
Option 1
Use free speech-to-text technology!
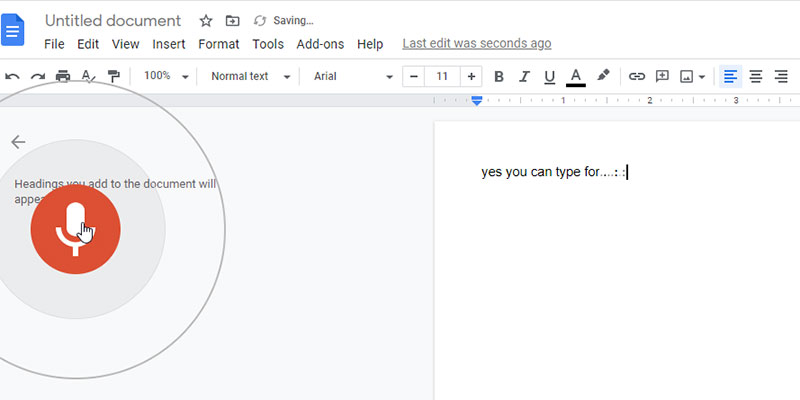
In Chrome and Google Docs, you can activate voice typing, like this:

Once you see a microphone pop up, click it!
It’ll turn red, and you’ll be able to speak out your words.
Don’t worry too much about editing at this stage; you’ll fix that efficiently in the next step.
Now, start dictating your blog post!
Option 2
If you’re managing a larger blog or a team, you’ll need a bit more help…
You should outsource your blog post writing to a freelance writer!
Hiring writers frees up an incredible amount of time and allows you to scale content quickly.
If you’re growing a team, or you don’t want to write your posts yourself, click here to learn the two best ways to hire professionals at reasonable prices!
Now, get your blog post draft written and when you’re done, move on to:
Step 5: Edit Your Article
Nothing beats editing with fresh eyes!
So give yourself a break and let your first draft sit overnight!
Once you’re refreshed, reread your article and:
Use a Couple of Super Handy Editing Tools
Gone are the days of struggling for hours and hours…
Editing is now as easy as running your blog post through some software and getting easy-to-implement recommendations.
So, what tools should you use?
Here are the best two for grammar, spelling, and sentence structure:
- Grammarly if you’re a beginner, or
- If you’re a more experienced writer, ProWritingAid — my wife, Melanie, absolutely loves it!
Both of these options are excellent and have 100% free plans, so just pick the one you like best!
Here’s how to use them:
Start by signing up for one of the services.
Then simply copy and paste your article into:
- Grammarly’s online editor, or
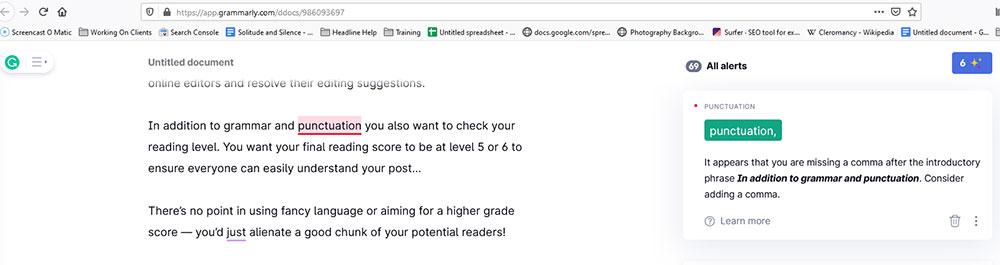
- ProWritingAid’s online editor.
Both programs will present you with their editing suggestions — work through them and resolve them one by one!
But there’s one more editing step—your post’s reading level.
You want your final reading score to be at a level of 5 or 6 to ensure everyone can easily understand your post…
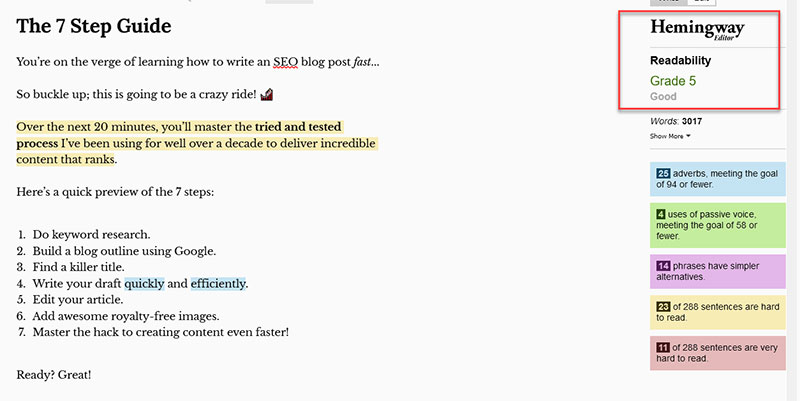
But how do you figure out your reading score?
Use the Hemingway App, a fast and free online tool!
Next up, the final two steps:
- Adding images
- A hack on how to improve your post writing speed
Step 6: Add Awesome Royalty-Free Images To Your Post
You should ‘pimp' all of your posts with some visuals that break up the different sections.
No matter how well written your content is, you can’t make posts without images — but don’t get trigger happy and download the first cool image you come across!
All images come with a HUGE warning:
You need to use royalty-free images or your own images — that’s it!
If you use random images from Google, Amazon, or stock photos you didn’t pay for, you’re opening yourself up to a whole world of pain…
The corporate owners of these pictures have huge legal teams that will sue you.
And you don't want that, ever!
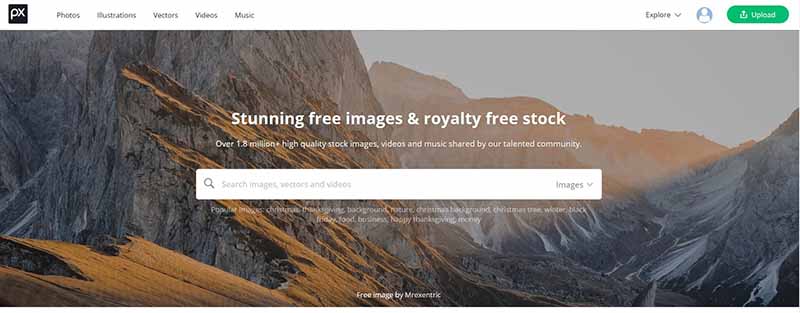
Instead, head over to Pixabay and pick from one of their nearly 2 million royalty-free pictures!
Now pay very close attention:
Before uploading any picture to WordPress, you need to take time to understand the importance of three image attributes:
- Filename
- Title
- Alt text
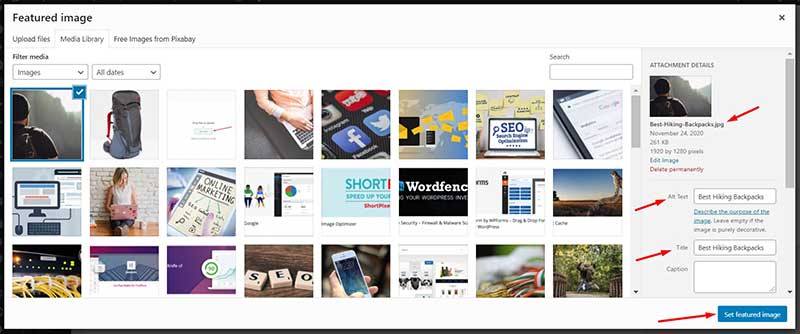
Google uses all these text strings to understand what’s happening — it doesn’t speak image, yet!
So what should you write in these fields?
Keep it simple:
Make the filename, title, and alt text of each image similar to the words of the header, underneath which you're placing the picture.
It’ll give you a nice SEO boost.
Now go ahead and upload your images to your blog post…
And then publish your post to your site — your SEO optimized article is now live for the world to read!
Congrats!
But don’t just sit on your hands; there’s one more thing to learn:
Step 7: Master the Hack To Creating Content Even Faster
A great blogger is a master of speedy content creation!
Sounds good — but how do you get to that level?
Simple:
The same way you’ve learned anything in life so far… be it the piano as a kid, driving as a teenager, or woodworking as an adult:
You practice it over and over again until you can do it in your sleep!
When it comes to blogging, practice means writing and publishing a ton of quality posts — ideally a couple every week!
You’ll know this step is complete when you’ve internalized this seven-step process and don’t need to work off a checklist as you prep your articles.
And always remember:
It’s only through top quality content that you’ll dazzle your readers, dominate Google, and gain a cult-like following!
So don’t waste any more time: head back to ‘start’ and write another blog post NOW!
And then, when you’re done with your second, do it again and again!
Struggling for motivation or ideas?
Take the 90-day challenge!
Whenever you need to write blog posts fast, you should take the 90-day content marketing challenge.
It’s really straightforward:
Just brainstorm a bunch of ideas, and then write a blog post every single day for 90 days straight.
It’s based on the ‘practice makes perfect' principle, so keep at it and don’t give up!
The results will be breathtaking:
90 blog posts in just 3 months — enough to kickstart your content creator journey!
Summary: How To Write a Blog Post Fast
You’ve just learned how to write blog posts fast, so let’s conclude this article fast so you can get straight to work!
As always, thanks for reading, and congrats on picking up this vital blogging skill!
But don’t let your knowledge rust:
Put this 7-step process into action, use it to level up your blog, grow a wider audience, and turbocharge your online revenue! 📈