For the first time ever, I'm revealing my team's SEO secret weapon, Surfer SEO…
Not only will you learn what it is, but in this Surfer SEO review I'm going to show you EXACTLY how to use Surfer, step-by-step, too.
If you are a blogger, content marketer or search engine optimization specialist… This post will hand you the most exciting competitive advantage I've seen in over a decade of driving traffic online.
Now, it's not the only tool around that can help you use AI to optimize your content for search.
If you'd like to learn how SurferSEO stacks up vs. FraseIO, click here.
What is Surfer SEO, and what can it do for you?
Great question.
You surely know by now that Google is constantly changing it's algorithm…
For years, Google has been trying to figure out how to analyze your content (and your competitors' content) to measure which post delivers more value on the specific topic… Not just who has more backlinks.
Today, the Google Algorithm is using AI and Machine Learning to evaluate your content and my content to compare their ‘quality' through it's “Natural Language Processing” (NLP) system.
Google monitors this through the structure of your content, specific datapoints on word count, synonym count, headings and more.
Their ultimate goal is to demote backlinks as such a major ranking factor and increase a ‘quality analysis' through this NLP system.
Which means, two things…
- First, most of your competitors haven't caught on to this, yet… So you have a unique opportunity to get first-mover advantage and a competitive edge over them with Surfer.
- Second, there is a new era of SEO tools required to help content marketers understand EXACTLY what Google's AI, Machine Learning and NLP expect from a top ranking pages.
This is where Surfer SEO comes in…
Surfer shows you all of the key metrics you need for every post, to make sure you have a PERFECTLY optimized post, every time…
You'll get exact data on what Google wants to see, like…
- how many words your blog posts need to have,
- how many headings you should have,
- If your headings should be H2’s, H3’s,H4’s etc!
- exactly which terms and keywords you should be using
- exactly how many times to use keywords for the perfect keyword density
- how many words should be bolded
- And more!
Surfer SEO is only Half the Story Though!
The key to succeeding long-term in this game is to understand that your plans can always be better.
You need to write for two audiences, always… the people in your audience, and the algorithms.
And lately, a new tool has entered the scene that has literally transformed the experience for my team and I on both of these fronts.
It's called SurferSEO.
As far as easy on-page SEO tools are concerned, SEO Surfer is like the ‘Megatron' of the optimization universe.
It is, to put it in the simplest terms, an easy smart content editor that helps you to build highly optimized blog posts in real time… figuring all metrics and doing all SERP analytics research at the touch of a button, fast!
I’ve seen the results of this tool being used first-hand on my affiliate market case-study site (view the month one post here), where it is being used as a data driven analysis tool, on-page SEO guide, and a content structure tool to help improve the rankings month by month.
But it has also been used to optimize posts on my own site!
What’s the other half of the story?
The other half of the story is you…
Will you show up for your future, consistently write blog posts that rank, get to 100 optimized blog posts as fast as possible and change your life?
I have been creating almost all of my content for the past six months on Surfer and it is a truly incredible tool that is packed with features.
Surfer SEO will tell you everything you need to know to rank your blog posts, only you can commit to putting in the work.
Using SurferSEO To Craft Highly Optimized Blog Posts, Every Time
If you want to follow along with these steps (and trust me, you will want to)… Click here to try SurferSEO out for just one dollar.
Step 1: Find A Keyword And Generate A Content Editor
Start by finding an awesome keyword.
(Note: Surfer SEO cannot, and does not guarantee first-page results. It just helps so much with ranking factors that when you use it correctly, that tends to be what happens!)
Then, you go to the Content Editor, and enter that keyword into the bar. Choose your country, and go!

The keyword for this post was ‘Surfer SEO.'
The machine will think for a minute, performing an analysis of all ranking factors… then it will give you the option to click on the completed keyword results below the search bar.

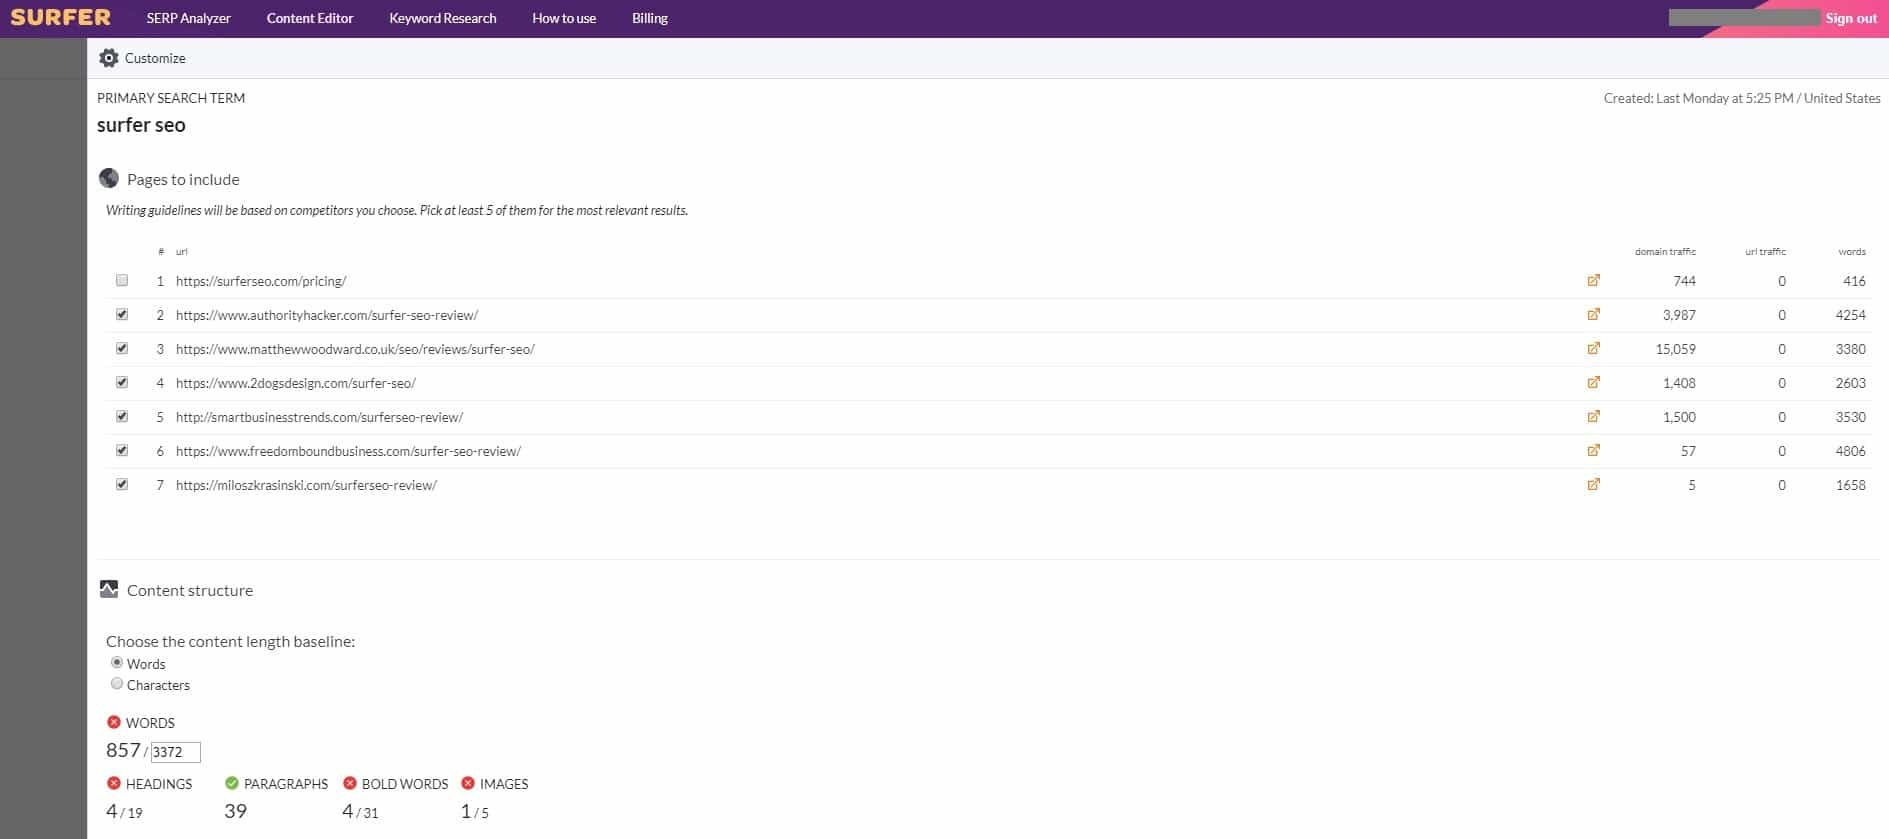
Once you click on this, you will be taken to a place where you will see your top 10 competitors for that keyword, based on the analysis of all search and ranking factors. It will look like this.
Step 2: Choose Your Content Editor Options
There are a lot of things that you can do here. But for the sake of brevity, and to show you just the bare-bones of how you can use this powerful SEO tool to improve your search factors and search rankings, and help you to beat your competitors at the on-page SEO game… you are going to learn the basics.
Now, this is the part where you will have some choices to make about what ranking factors you will use to generate the on-page content editor.
Here are the steps.
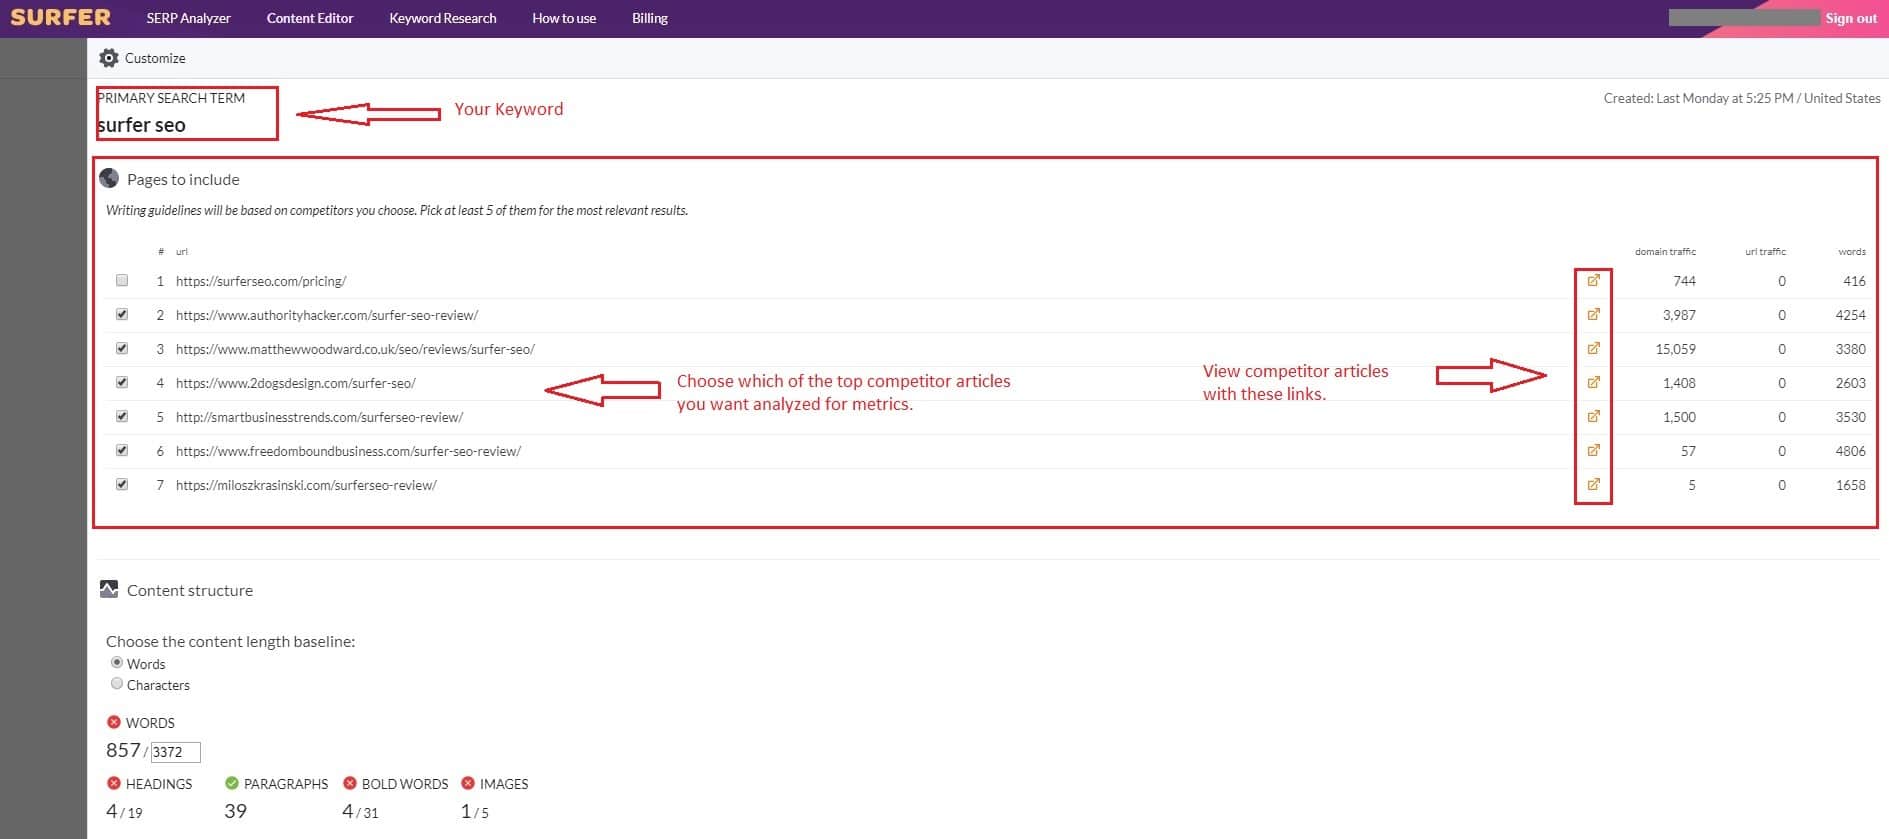
Step 1: Look at the top competitor posts that are ranking for that keyword. You can view them in new windows by clicking the little ‘link' button to the right, as illustrated in the image above.
Now, you need to perform an analysis on these posts.
You want to filter out posts that are not niche blog posts. In other words… product pages on website storefronts, home pages for businesses, etc. You do not want to choose these options, so unselect them by clicking on the boxes. You also want to keep from selecting options that come from forums like Quora, Reddit, etc.
Other examples of sites that you want to avoid are sites with truly massive amounts of non-niche related domain authority, like Wikipedia.
It is common for forums to show up in the search engines, but they will not give you the proper metrics, data, or keyword factors for a well-optimized post… because they are forum threads.
Also, sometimes, a post might contain a truly, almost unrealistically high word count, which is displayed right on your SurferSEO panel.
It is important to note that all of the posts you select will be averaged out to contribute to the final word count.
So, if you don't want to write a 5,000 word article on a topic, you might want to exclude super-long posts from your selection criteria as well.
But you also want to be careful about doing this! If you exclude a top-performing post only because of its word count, you might miss the mark on ranking factors and SEO metrics data, and your on-page rankings might suffer.
You want to select true, authority-niche blog posts published by other writers/bloggers in your niche, that are actually relevant to your keyword and topic, because those are the metrics that hold the key to helping you improve your rankings.
For best results, you really want to take full advantage of all of the on-page seo data metrics that are factored in when you select as many of the top performing blog posts as possible.
In other words… if all 10 competing blog posts meet your criteria, select all 10, because that will give you the best data!
This is probably the step that takes the most thought, because making the right choices here, on which content to include for your data metrics, will literally set the tone for how much your metrics help your post once you publish it.
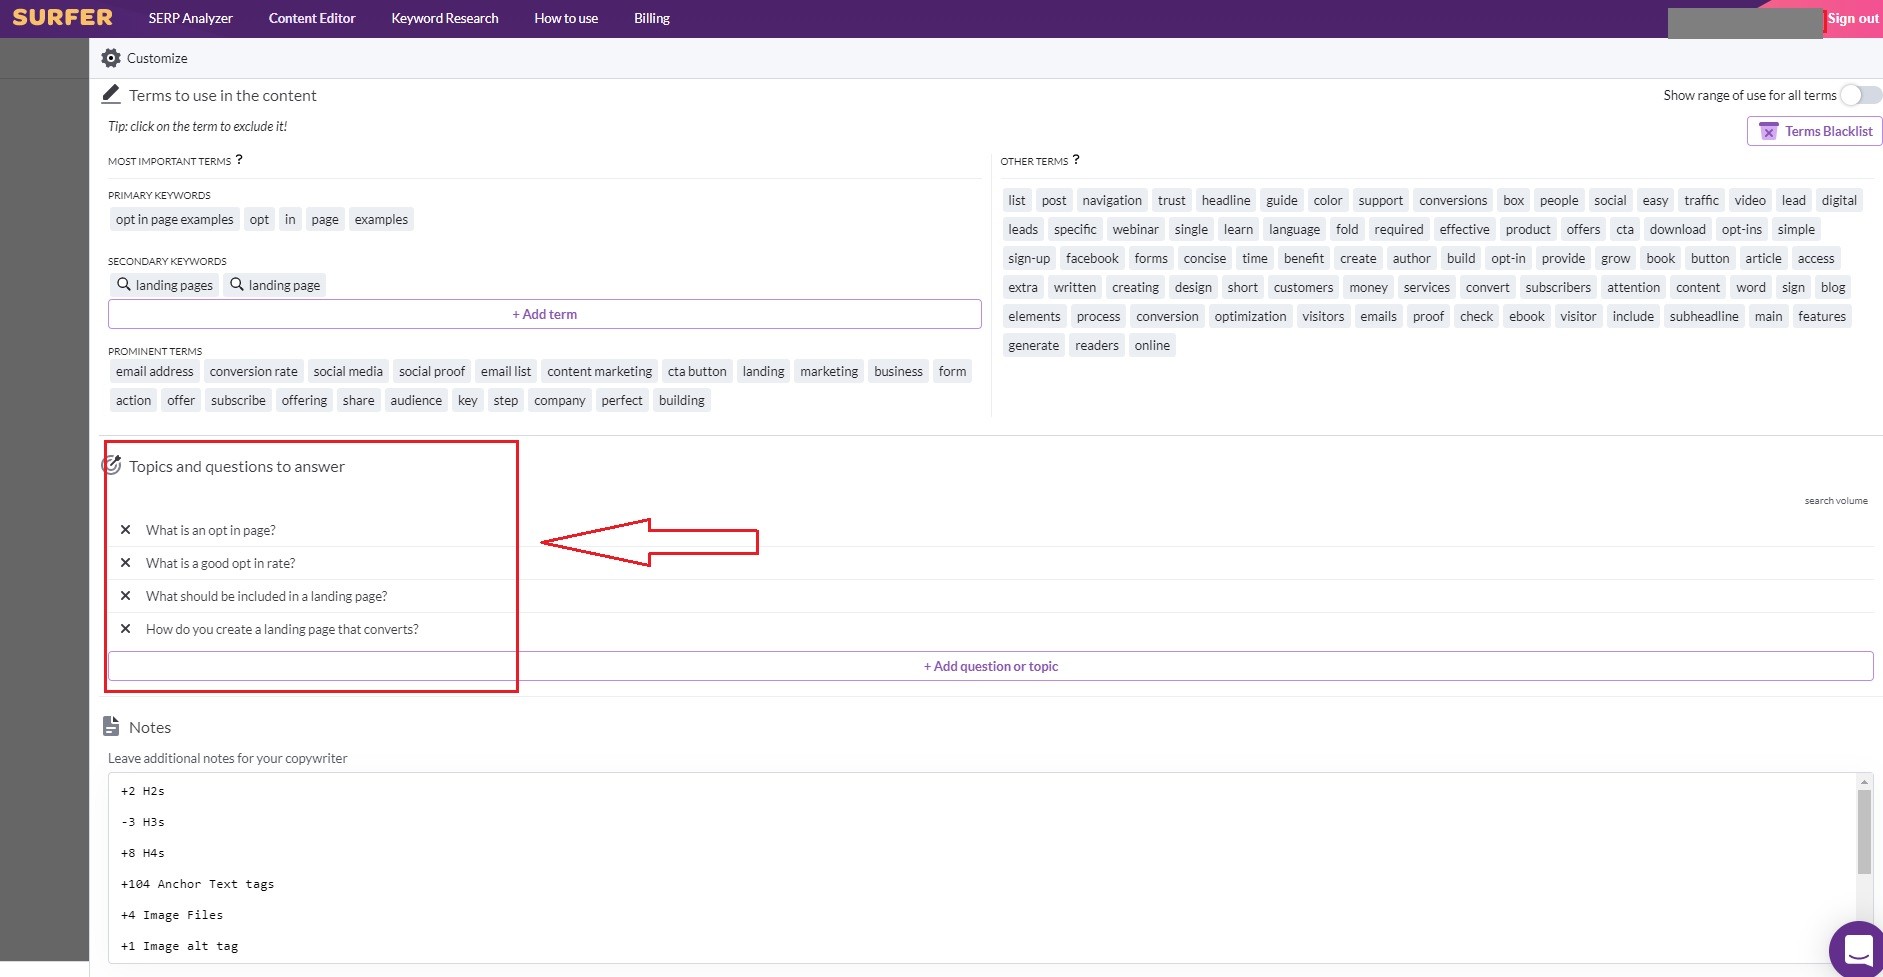
Step 2: You can also add Topics and questions to answer to your content editor here, based on suggestions made by SurferSEO. If there are any suggestions, Surfer will display them, along with information on how often those queries are searched.
It is recommended that you choose the best of these, that will fit well within your content, and include them in your SurferSEO Editor before you finalize it.
This keyword (Surfer SEO) didn't bring up any recommended topics or questions… but here is what it looks like when they do pop up.
If you perform this entire step well, and craft a catchy title and meta, you will greatly increase your odds of ranking at the top spot on Google with your optimized blog post! That is the power of Surfer SEO.
Step 3: Find The Number Of Headings (And Other Metrics You Plan To Include In Your Blog Post)
Now, you need to grab the number of headings to include in your post.
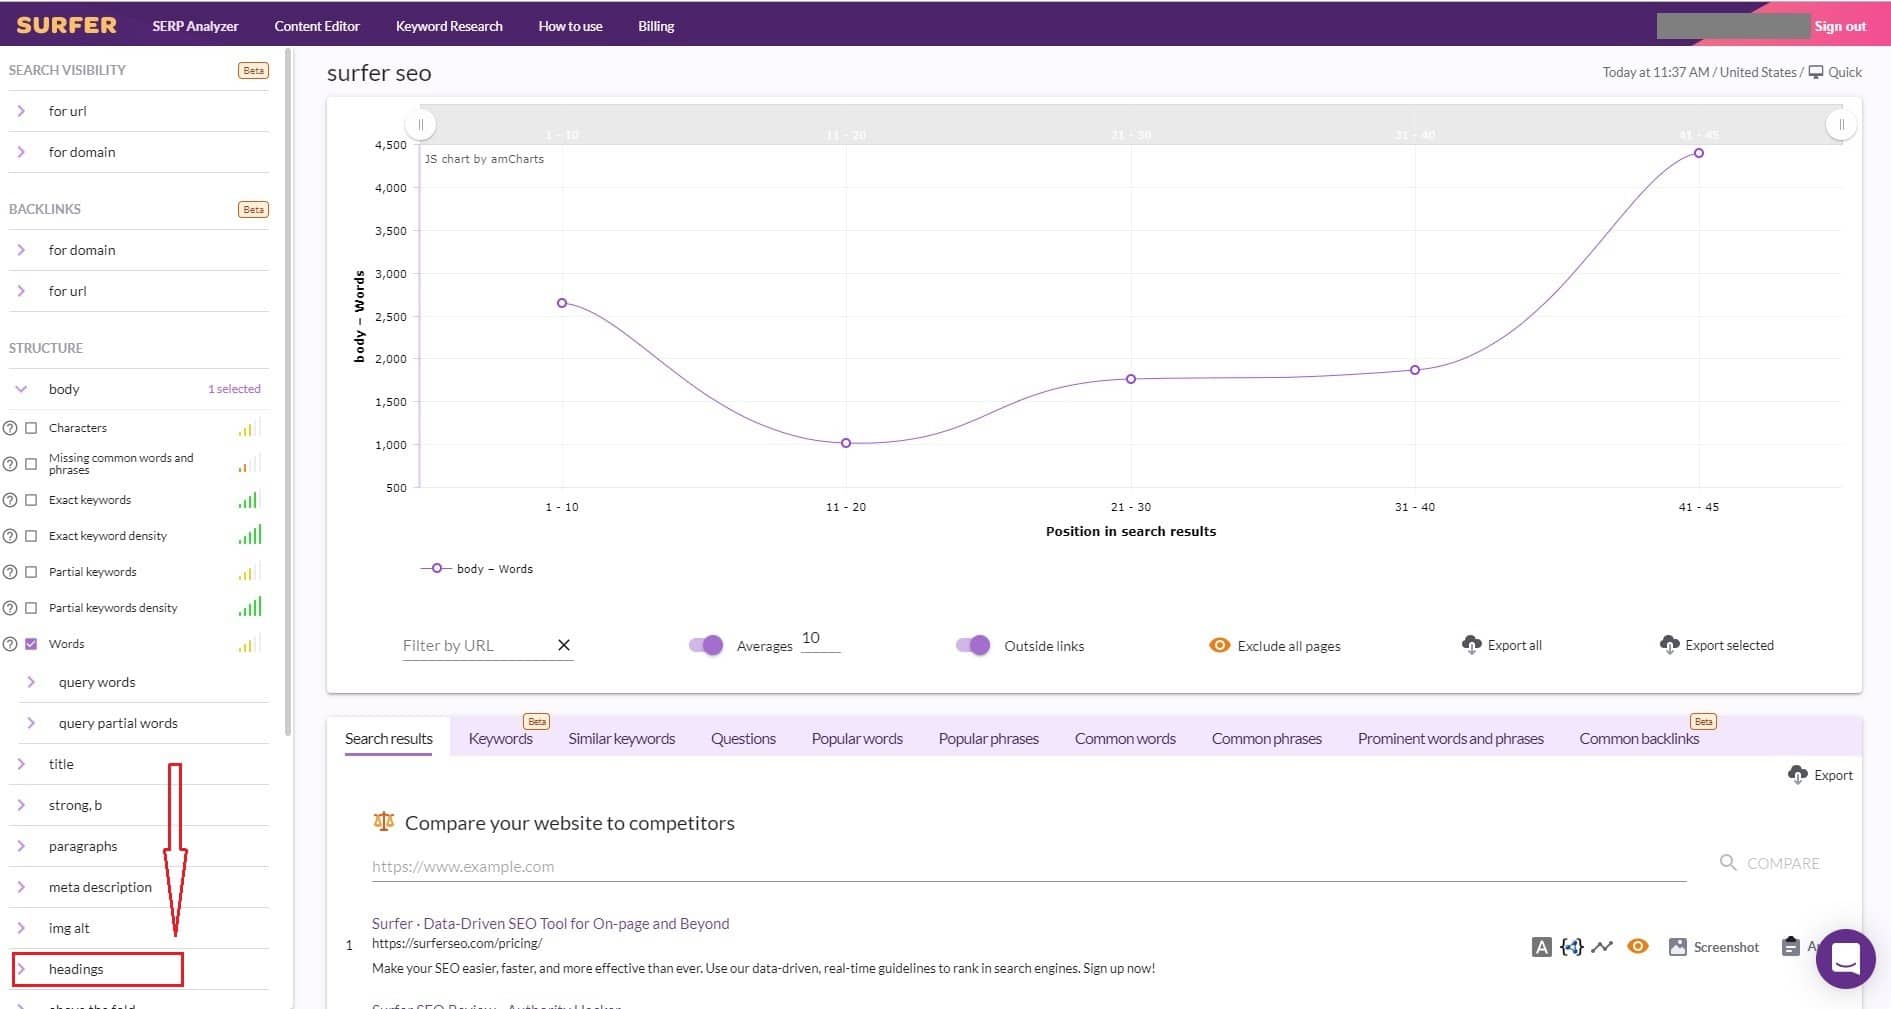
Open Surfer SEO in another window, and go to the Serp Analyzer.
When you type in your keyword, Surfer SEO will perform an analysis… and then you can click on the result, and you will see the data. It will look something like this.
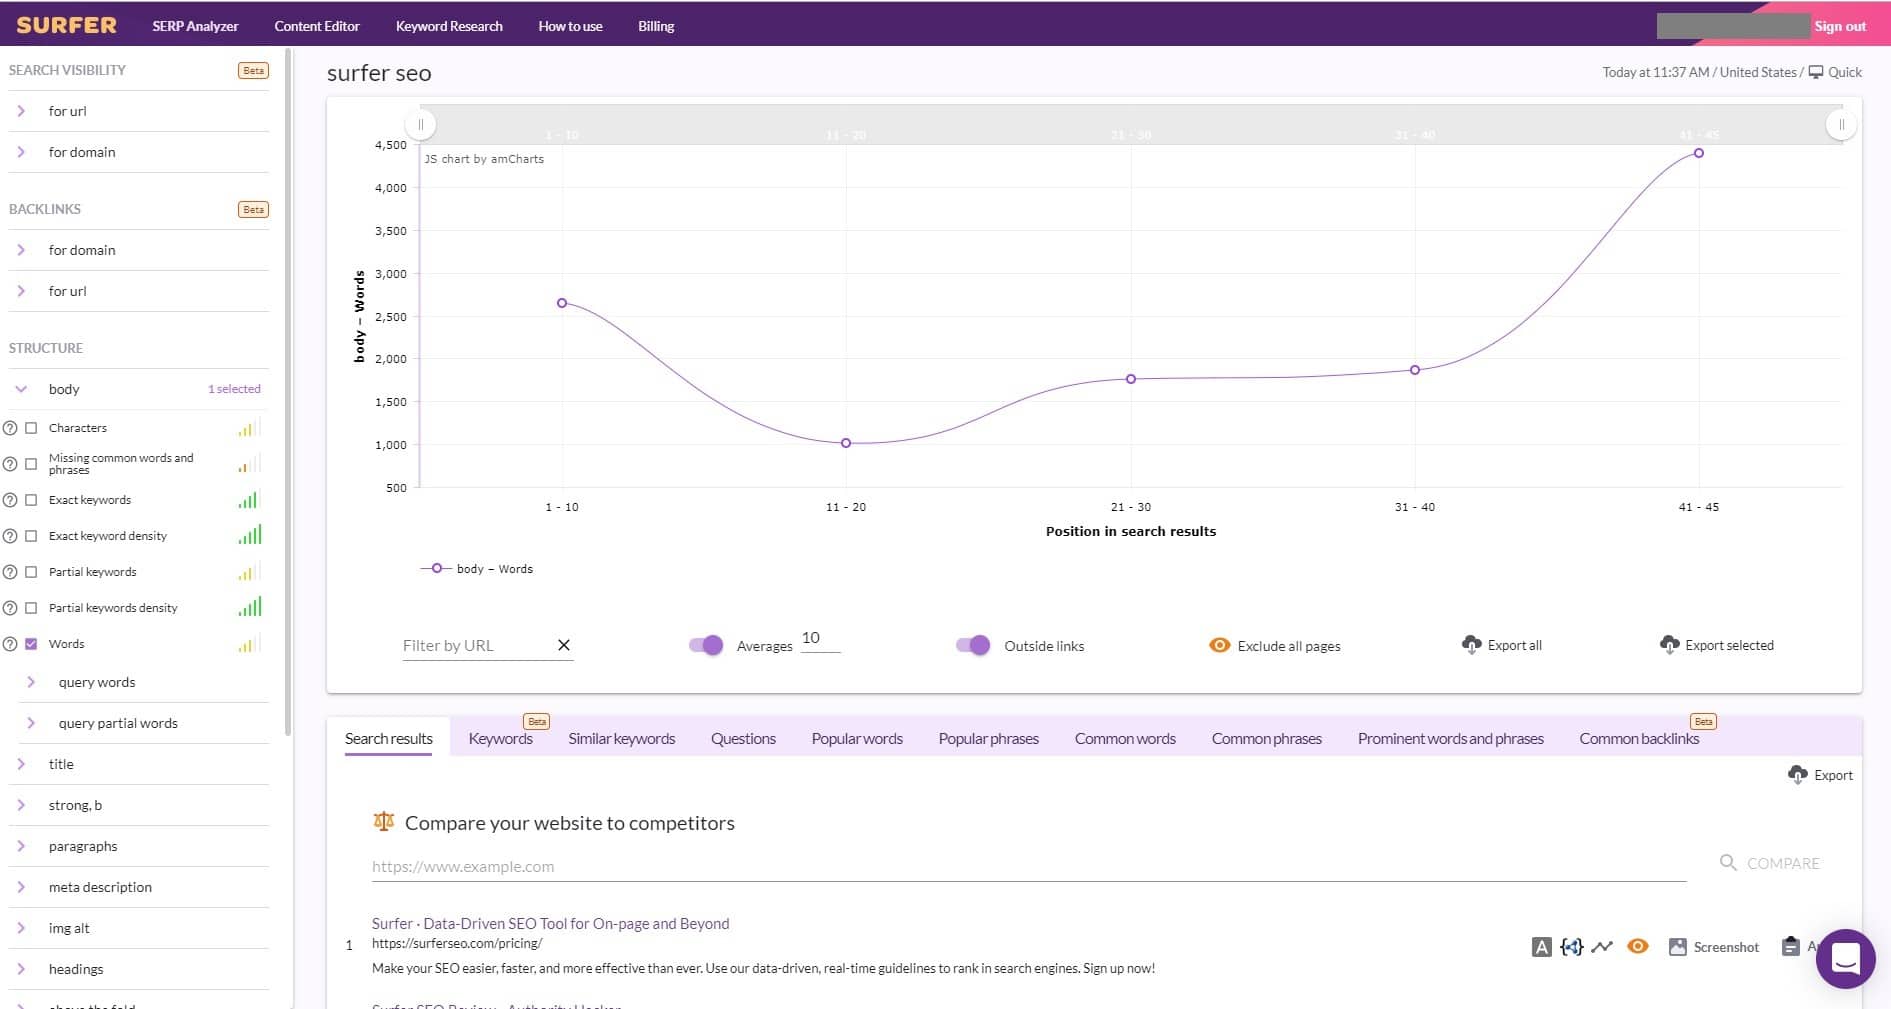
Keep In Mind That The SERP Analysis Is Insanely Powerful
If you want to get really in-depth with your analysis, you can literally fine-tune your blog posts down to every technical detail.
You can be as specific about this as you want. But for the purposes of this how-to, you are going to learn the most important steps to optimizing your blog posts… and the first, most important step in the SERP analysis tool is finding out how many headings your post should contain.
Finding the number of headings that your optimized affiliate post, review, or article should contain is super simple on Surfer SEO. That's because the Surfer tools compare all of your competitor’s data for you, and figure out exactly what your heading density should be to give you the best odds of ranking number-one on Google.
Here's how you do it.
Step 1: Go down to the headings button and click on it.
Once you click on it, a drop-down menu will open up.
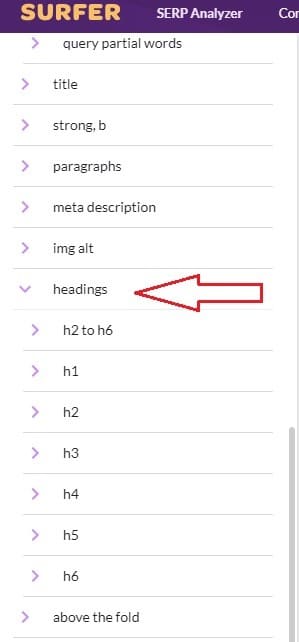
Step 2: Click on ‘H2' (you can skip H1 for now).
After opening the H2 dropdown menu, click on the box that says Number of Elements. Once you do this, a bar graph will start to chart how many headings you need to have in your post.
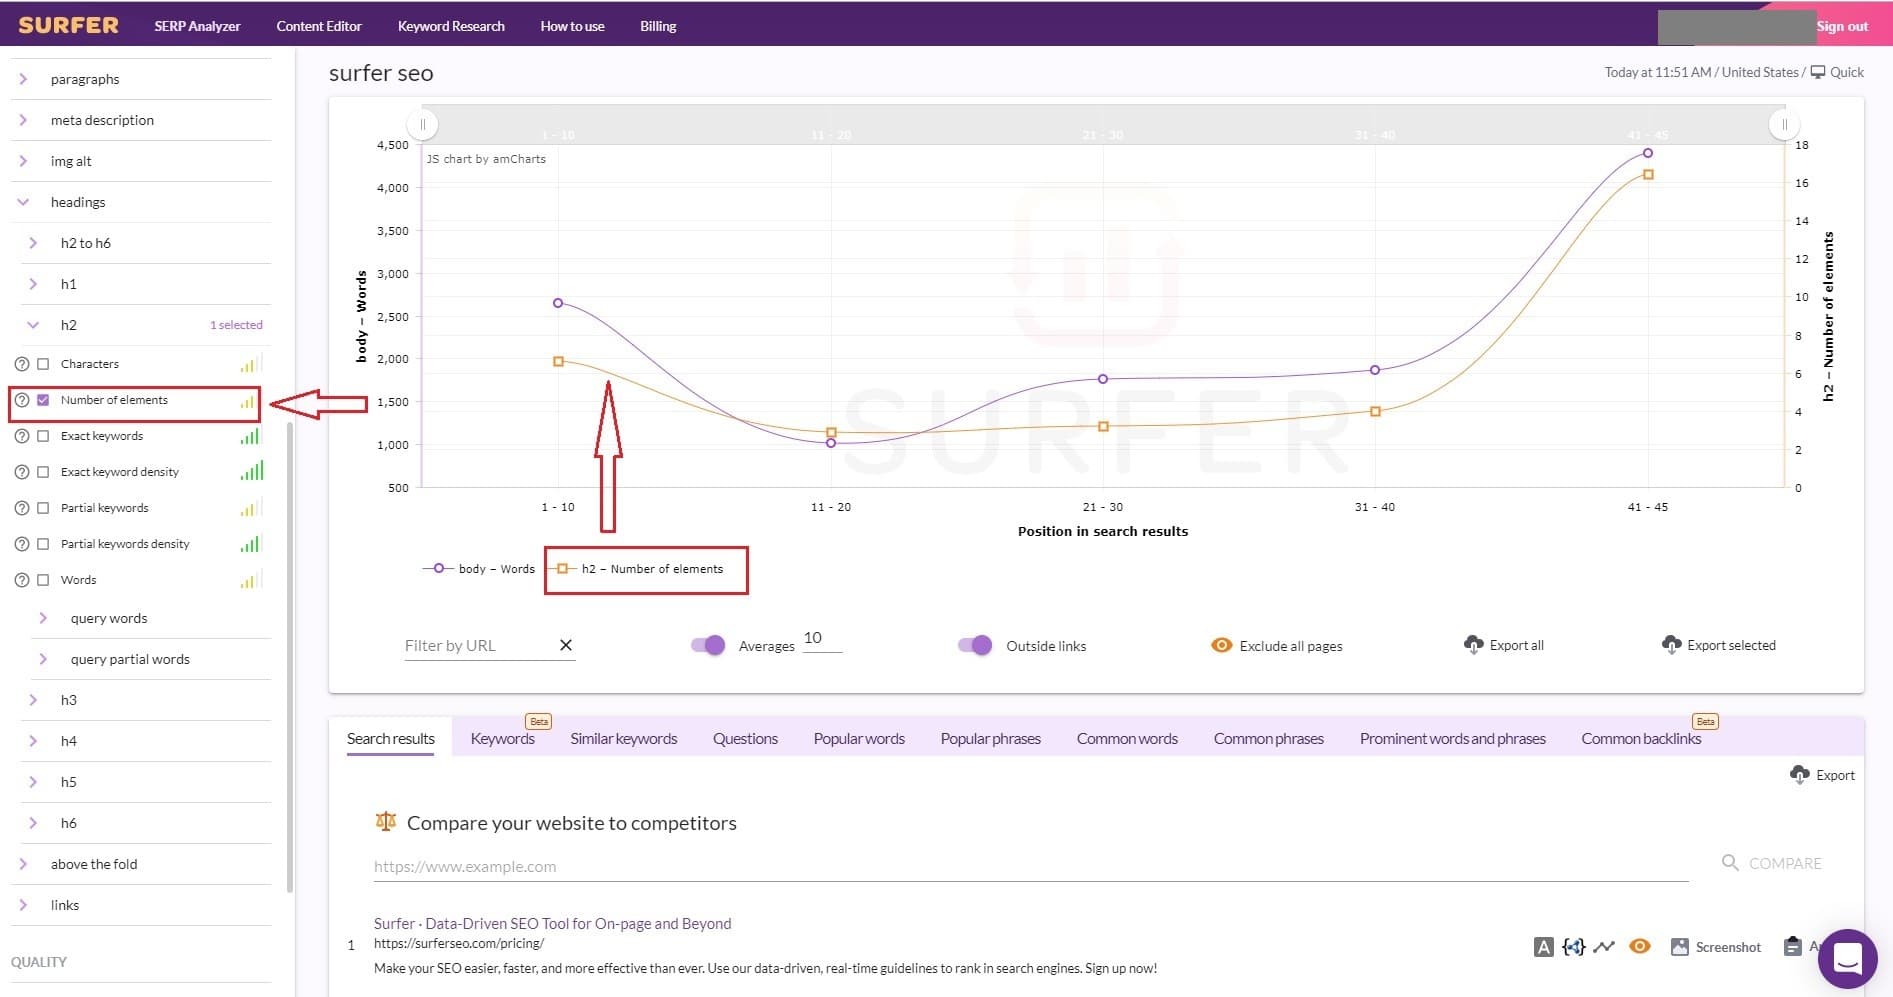
Step 3: Now, go through and select the number of elements for every other type of heading, H2 through H6. Once you have them all selected, they will all appear on the graph.
Step 4: Now, you need to hover your mouse over the far-left side of the graph to see exactly how many headings you need to have in your post.
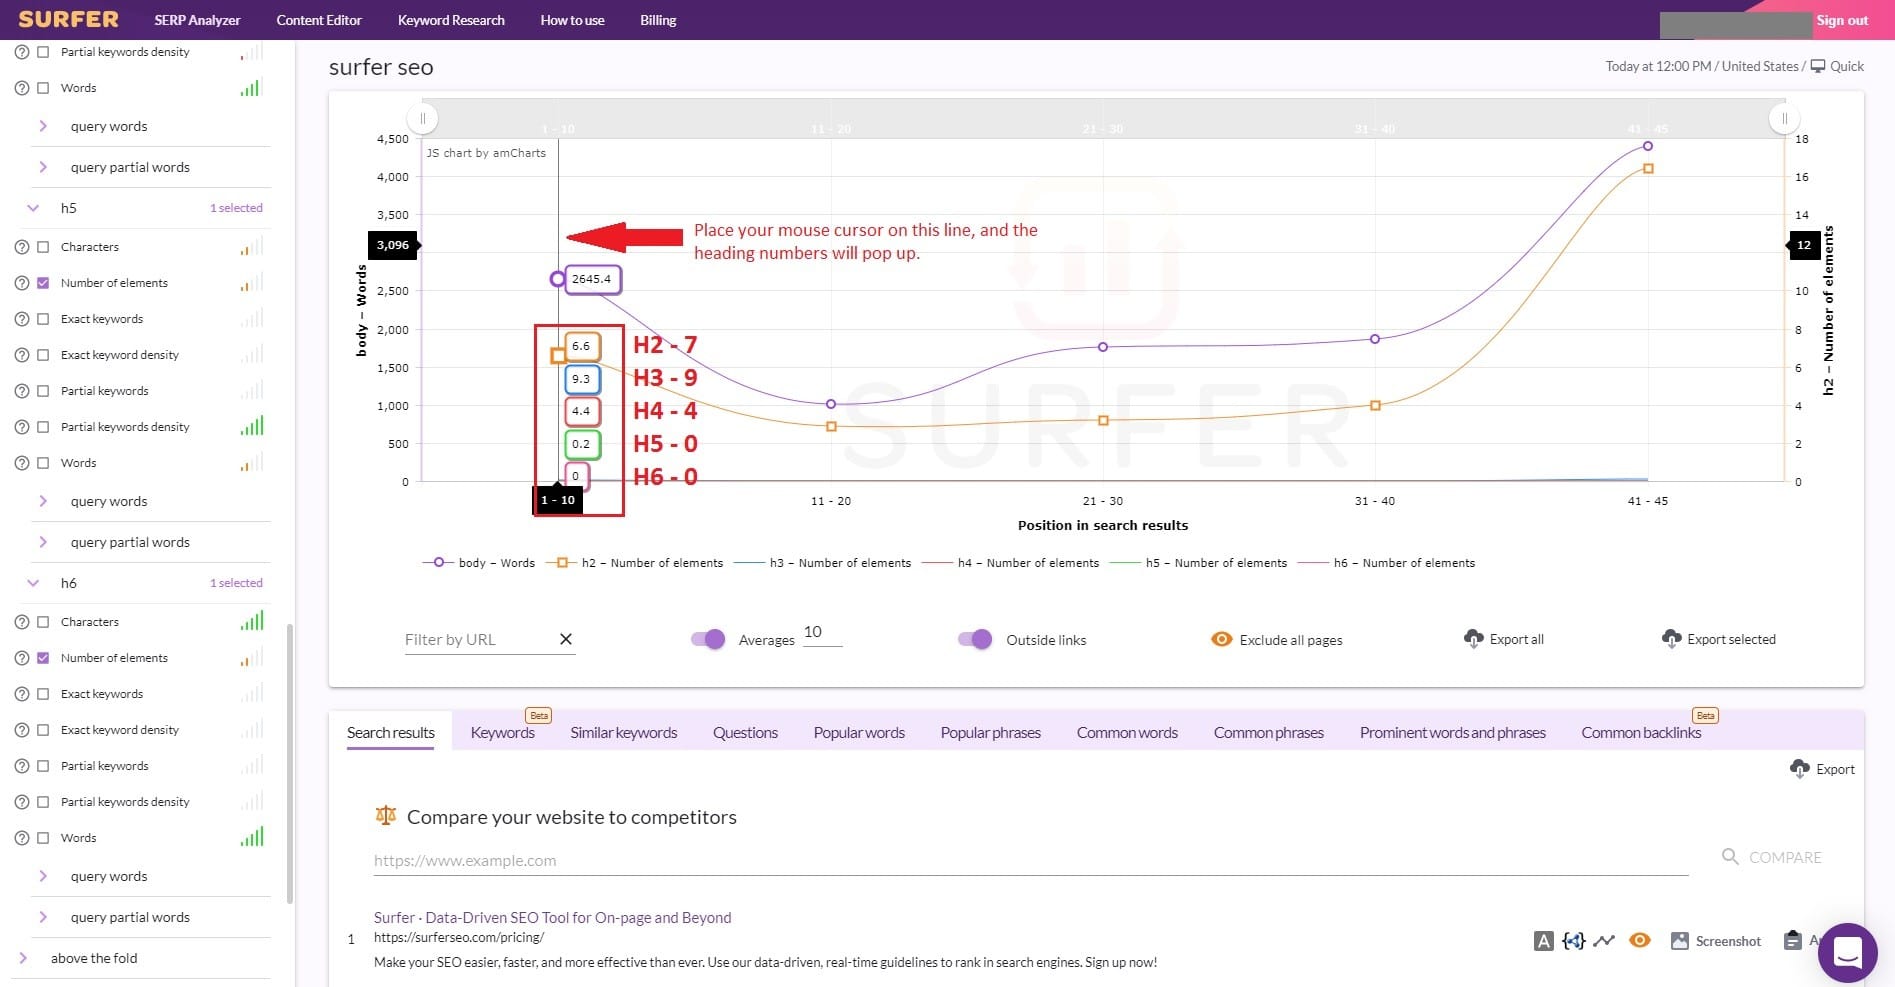
You will want to write these down, and round up to the nearest number. For example, this H2 was 6.6. So you round that up to 7, etc.
Step 5: Once you get these numbers from the SERP analysis, a great place to put them is in the ‘notes' section of the editor. You can find this by going back into the Surfer SEO on-page content editor tool you created before, and then scrolling all the way down to the bottom, to the ‘notes' section.
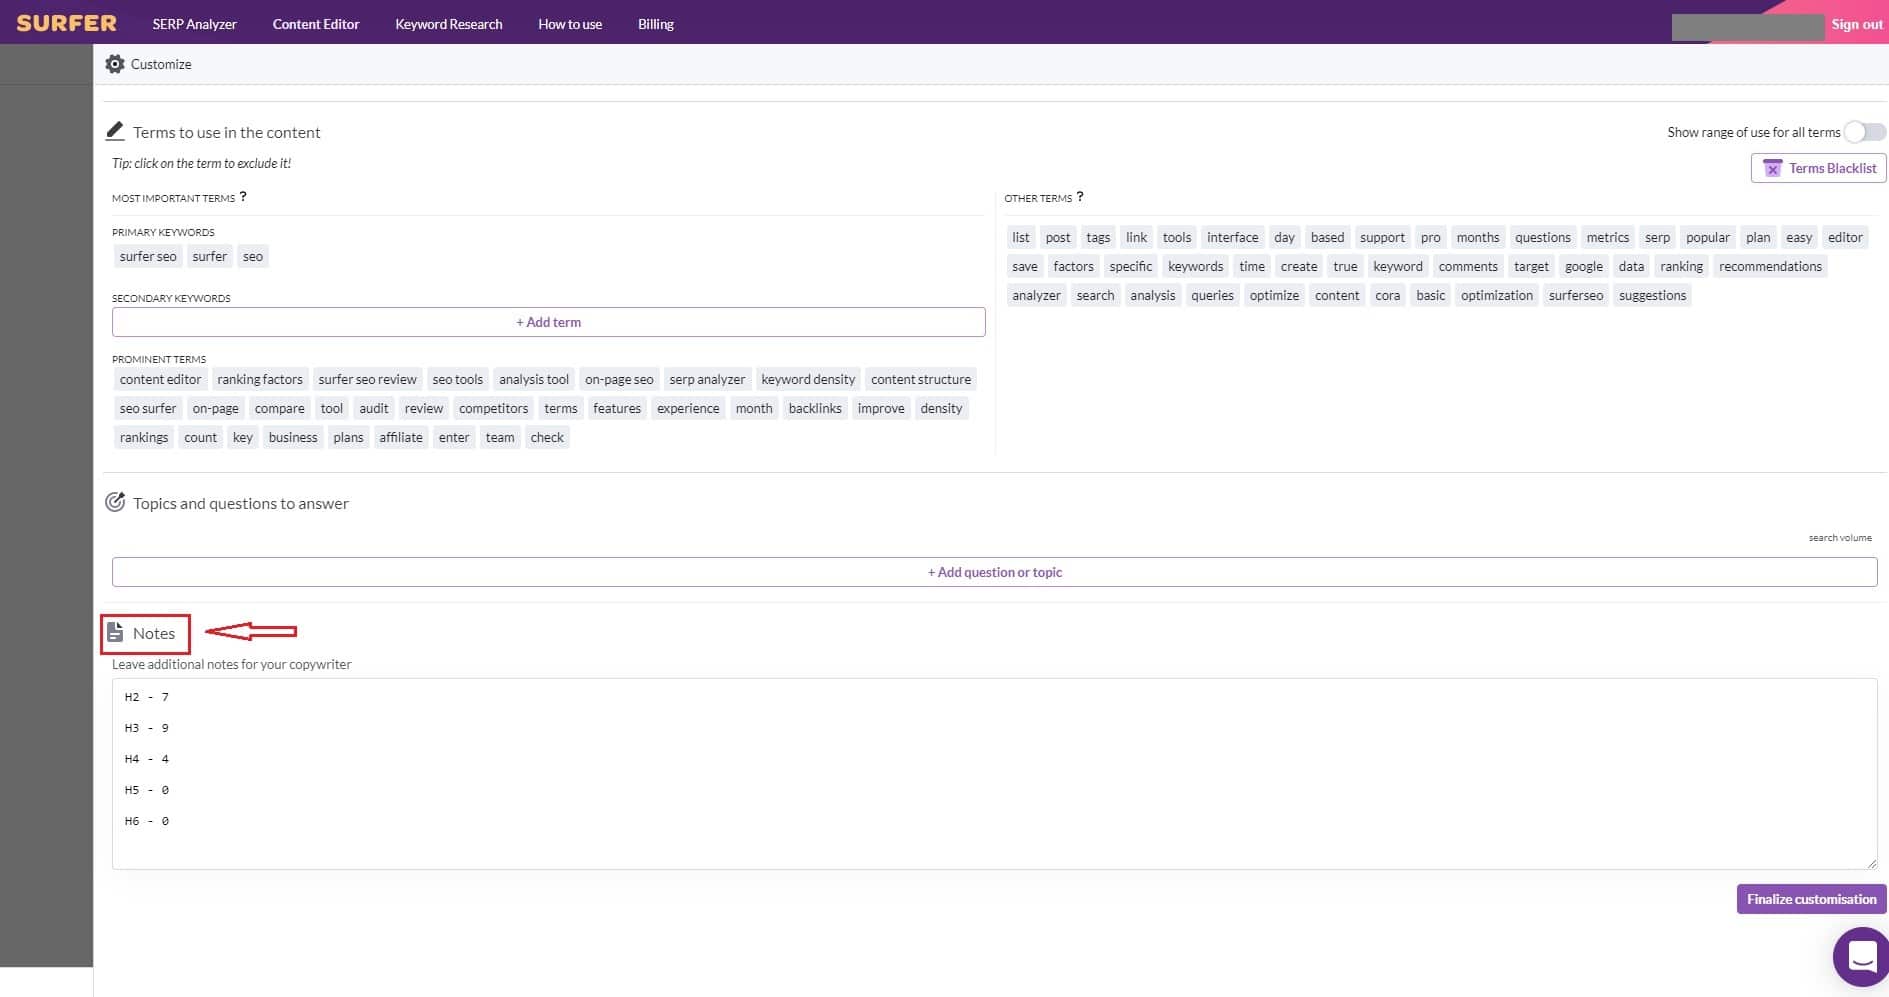
This will ensure that they are ready to go for whoever is going to be crafting the article.
As You Learn More About Surfer SEO, You Can Utilize More And More Of Its Powerful Features
The SERP Analysis on-page seo tools give you powerful metrics and data that you can use to compare your own metrics (how to do this is below) to the posts your top competitors are ranking with in the search results.
By choosing to use this tool to select the perfect number of headings, you will take a huge step forward in increasing your odds of ranking at the top. But that is truly only the beginning of what this tool can give you.
Unlike other tools, you can get as in-depth with your posts as you want, measuring everything from the number of paragraphs, to the number of times your keyword shows up in each paragraph, to the number of times partial keywords are supposed to show up in headings, paragraphs, etc.
You can get so in depth with this.
You now know the basic idea of how to do it, though… and even though you may not choose to use every metric at your disposal, it is highly recommended that you at least use the headings from the SERP analyzer, because that is a very important metric that seems to hold a lot of power in how Google ranks content.
Alright, onto the final step…
Generate Your Surfer SEO Content Editor On-Page Tool
To generate the actual smart Surfer content editor, you just click Finalize Customization at the bottom-right corner of the screen. After that, you will be able to generate a link that you can use to access the editor at any time. You can even send this link to other writers, and check on their progress by clicking on the link and viewing it yourself.
Step 4: Use Surfer SEO To Craft An Awesome, Optimized Blog Post
Now, it's time to fire up the Surfer SEO smart editor tool that you just created to actually craft your post. This is where the magic really happens.
Generate your link, click on it, and open up the editor to get started.
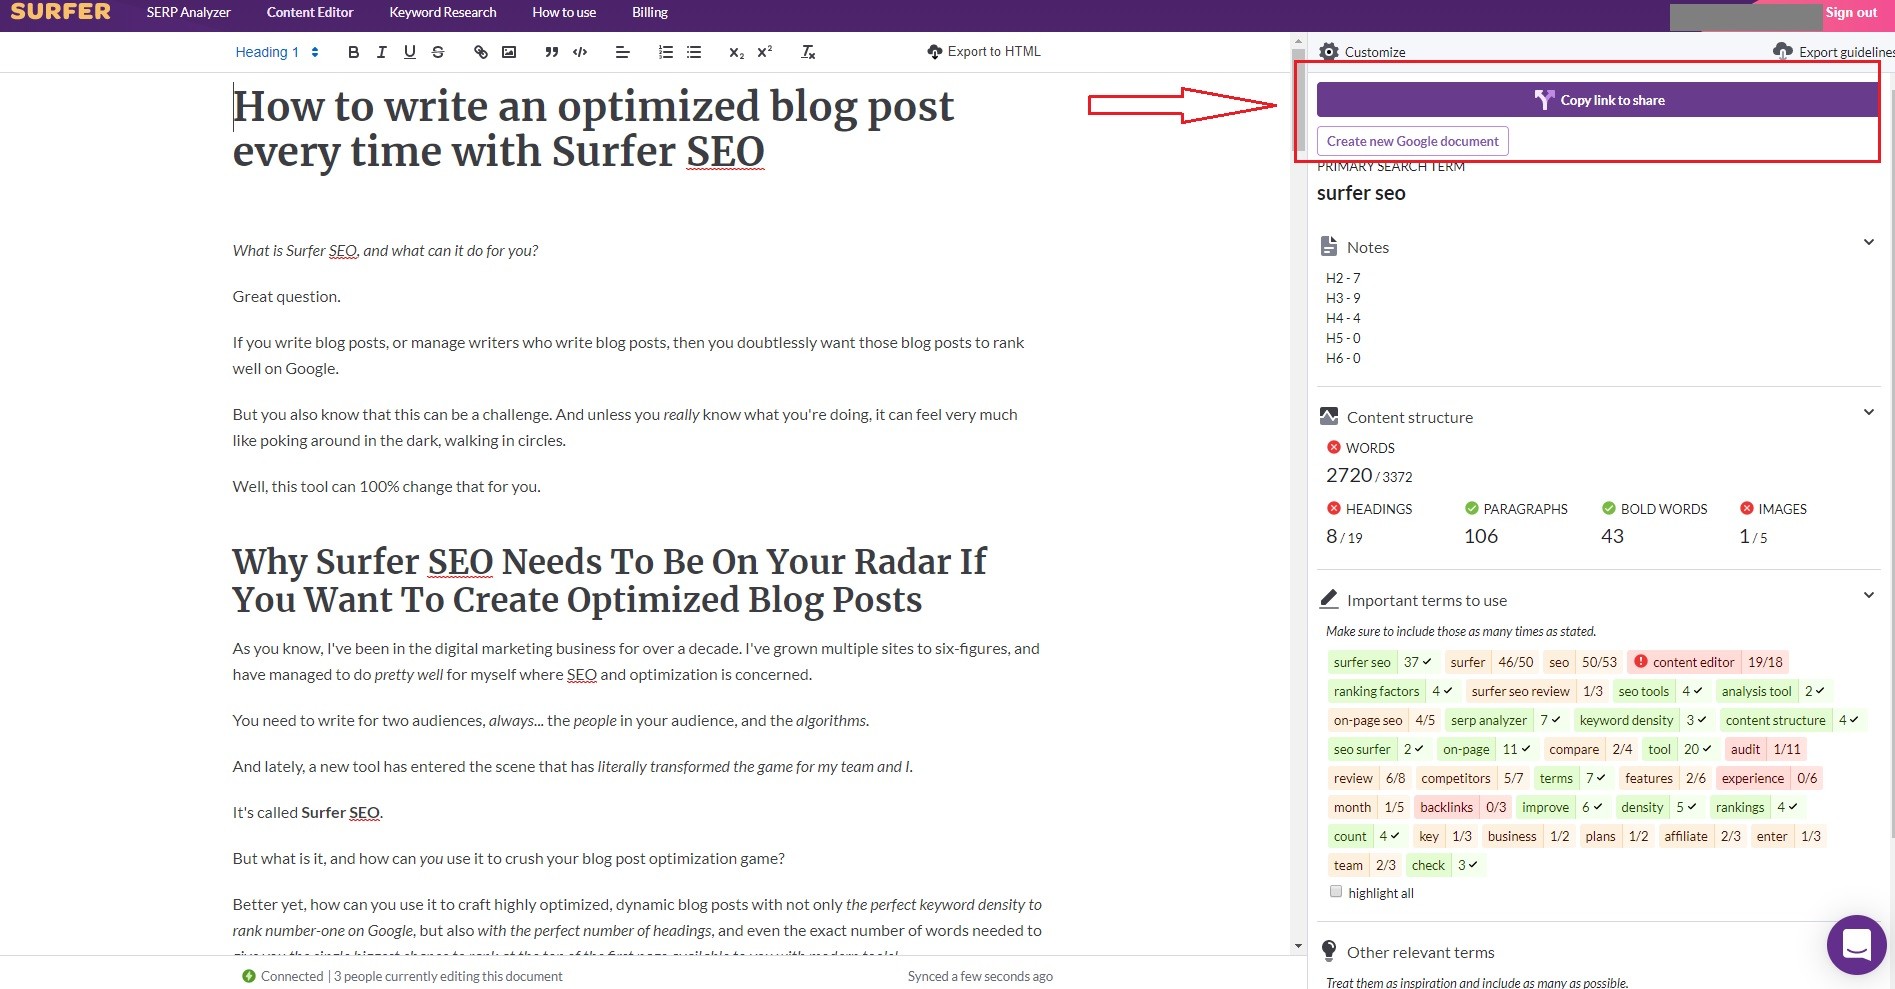
Step 1: Review the editor and check the metrics, features, terms, keywords, and content structure that you plan to use in your post.
You can view this information along the right-hand-side of the editor tool.
The first thing you will see at the top are your notes. By now, these will at least contain your headings… so you can see how many you need in one-easy glance.
The next thing you will see is the Content Structure. This section tells you how many words you will need, gives you some basic heading information, tells you when you have enough paragraphs, bold words, images, etc.
As a general rule, you will want to green all of these out. This is part of the power of Surfer SEO. It shows you in real time how many of these on-page ranking factors you are hitting, so you will always know what you still need to add.
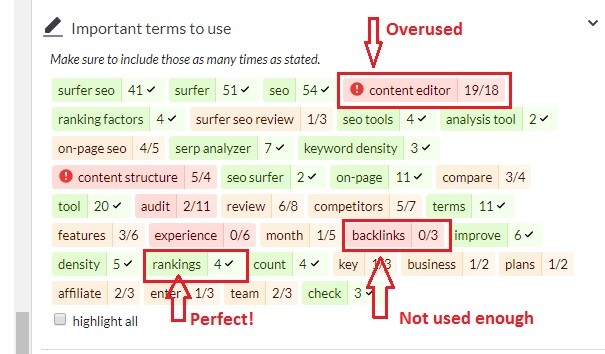
The next most important thing to take note of is the Important Terms To Use section.
This contains a number of keyword terms, which are basically keywords that you will want to use at the density specified by Surfer SEO according to the keyword usage data.
This is very important! You want all of these to be green before you complete your blog post!
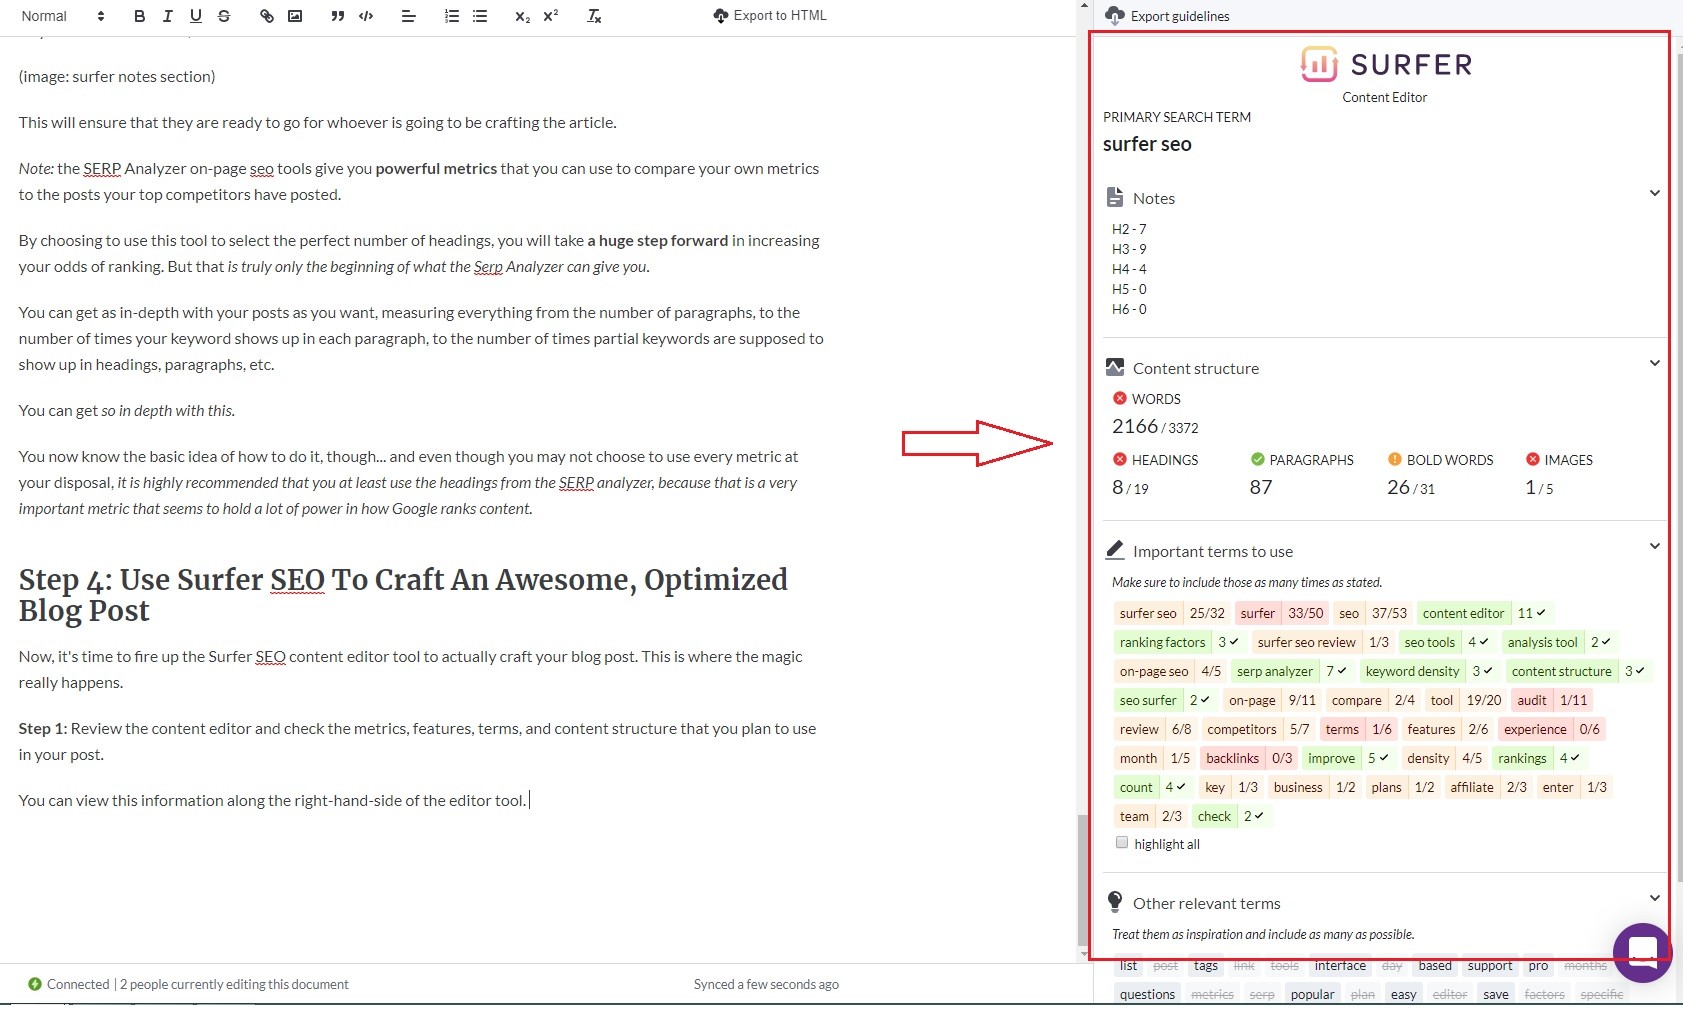
If you scroll down the right hand sidebar a bit further, you will come to a section called Other Relevant Terms.
This section does not have an SEO requirement, and these do not qualify as keywords. But it does help to improve the quality of your post by giving you other options for relevant terms to use. As you use these terms, they will automatically appear ‘crossed out,' to help you keep track of exactly what your post already contains.
If you had any ‘questions to answer' in your Surfer SEO Editor when you set it up, they will also appear at the right hand side, along with the rest of the data and keywords. But since there were no questions based around this query yet, this section was not populated.
When this section is populated, it will look like this.

Step 2: Changing Content Editor information in Surfer SEO after you have created the editor is pretty easy.
You can easily make changes, if you want, by going back to your Surfer SEO Content Editor panel, selecting the keyword that you are working on, and then going back into the Content Editor options.
You can make any changes you want to make, scroll to the bottom of the screen, and click Finalize Customization.
All of the changes you made will now be reflected in the links generated for that specific keyword setup.
Step 3: Start crafting an awesome, dynamic blog post using all of these awesome tools at your disposal.
You can type your article in Google Docs or in another Word Processor, and just paste your content into Surfer SEO to do an audit… but it is actually really recommended that you write the content directly into Surfer SEO, to make sure that you are hitting all of your metrics, making full use of the features, and to allow you to compare what you are writing with what metrics you need to hit to green out all of your terms and content structure specifics.
There are a range of basic Word Processor tools along the top bar of the editor.
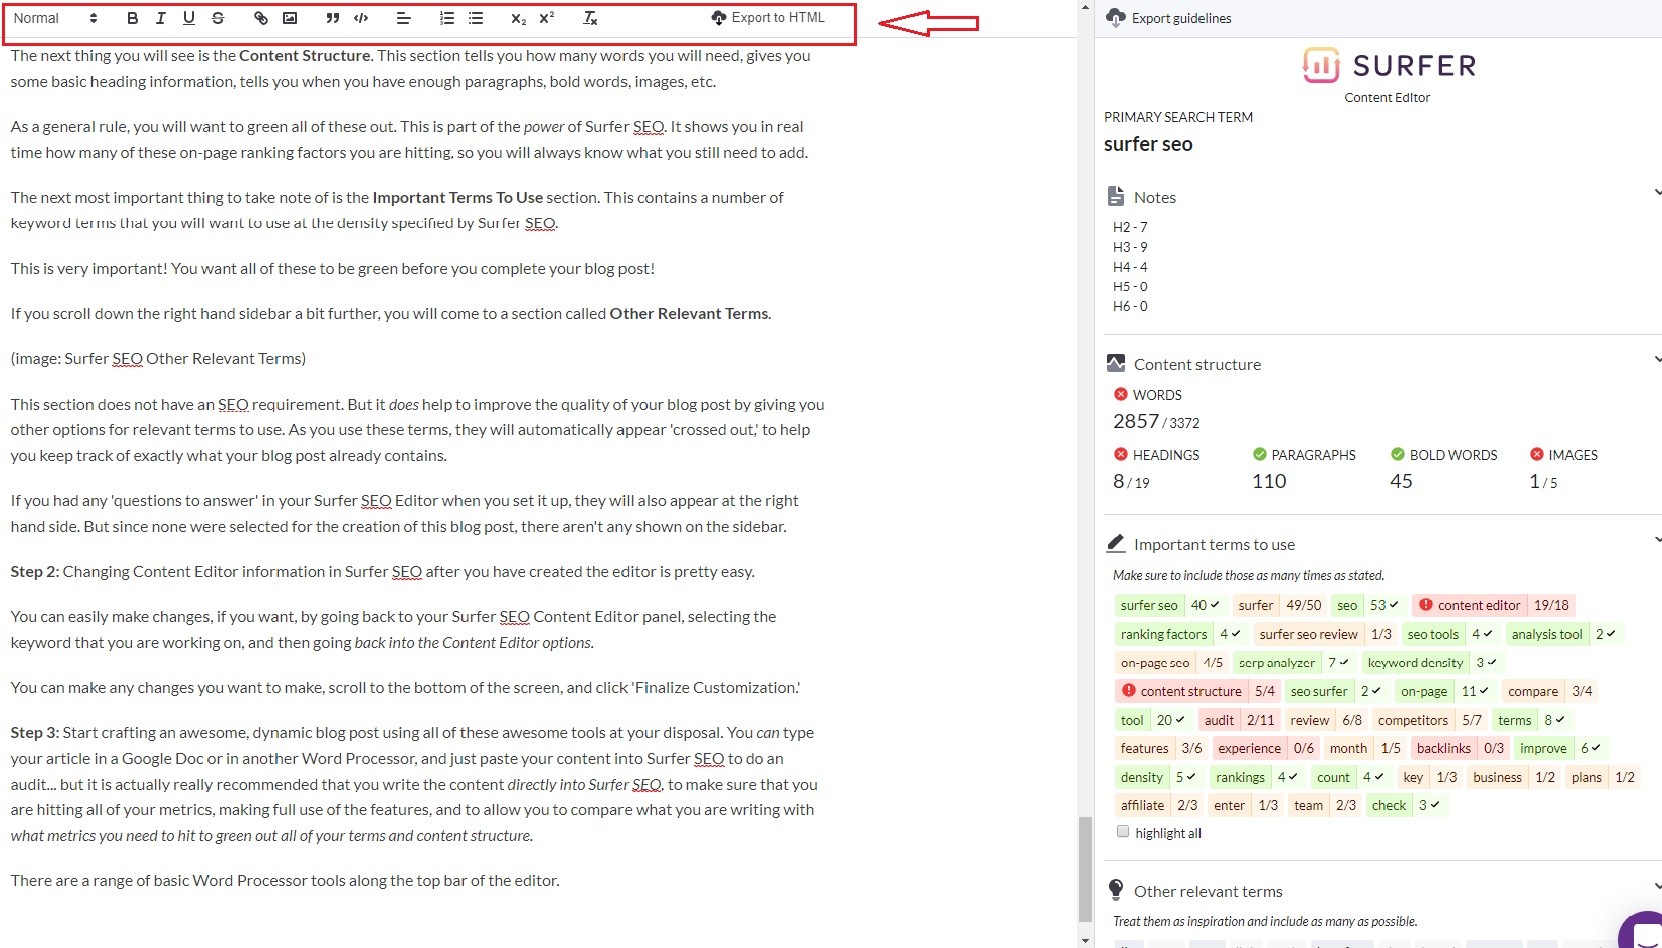
These tools allow you to create your headings. You can also bold, italicize, underline, or strike-through text, embed links, insert images, create quotes, make bullet points and numbered lists… pretty much anything you might need to get the job done.
This is the creative part. I have found that the best way to utilize Surfer is to write the post directly in the editor, keeping an eye on the Important Terms To Use so that you can stick those terms in wherever they seem relevant.
Step 4: After you've written your article, make sure that all of your metrics are greened out. This means using more important terms if you haven't used enough, and deleting some of the ones that have been overused.
Step 5: Your content is now ready to export! You can choose to export it as an HTML. Or, you can do what my team does, and copy the entire text and paste it into a Google Doc.
Here, it is sent through the entire process of making sure that it is whipped up into perfect shape by two different editors, a link/image person, etc. before it is finally submitted to the publisher to be published on the website.
Surfer SEO Pricing
When it comes to Surfer SEO cost, the tool actually offers 6 different pricing plans, but the most popular and affordable plans are as follows: Hobby, Basic, Pro, and Business.
The Hobby Plan costs just $29 per month, gives you 5 SERP queries every day, and gives you 5 Smart Content Editors a month. This is a great beginner plan!
It will still let you audit and check content, though… albeit, it takes into account only about 250 search factors, instead of the usual 500 factors!
The more expensive plans, obviously, give you better audit power and the ability to generate more blog posts.
The Basic plan costs $59 per month and includes all SEO tools like SERP Analyzer tool (15 queries per day), Content Editor (25 per month), Backlinks and Visibility Reports (25 queries per day), and Keyword Research tool.
One of their most popular plans, Pro, costs $99 per month and includes all basic features and Analyzer tool (50 queries per day), Content Editor (100 per month), Backlinks and Visibility Reports (100 queries per day), and Keyword Research. This plan probably gives you the most value for your money.
The Business plan often used by digital marketing agencies costs $199 per month and includes all Pro features and SERP Analyzer tool (100 queries per day), Content Editor (300 per month), Backlinks and Visibility Reports (300 queries per day), and Keyword Research.
My Official Surfer SEO Review… Should You Buy It And Use It?
If you care about SEO, and really want to level up your optimization game and experience incredible jumps in your on-page search rankings, all while creating amazing blog posts that are filled with the proper keywords at the perfect density every time, then Surfer SEO is a no-brainer.
This tool has revolutionized the way my team and I approach content creation. Before this on page analysis tool, it was easy to spend 4 hours researching the metrics to get this kind of information for just one blog post. Often, that work just didn't get done… because, let's be real…
There just aren't enough hours in the day to do that at scale. And unless you want to spend a bunch of money, it isn't practical to hire someone to do it for every single post, either.
Now, thanks to Surfer SEO team… hours of work are saved at the touch of a button, and everything is generated in a smart editor that shows you exactly what you need to do to craft the perfect post in real-time, as you work.
It Is Absolutely 100% Insanely Valuable, And I Cannot Imagine Going Back To Working Without It
This tool is so powerful that it is going to change the game for bloggers everywhere. I foresee that five years from now, the top-performing bloggers are going to be the guys and girls who chose to use Surfer SEO NOW. That is how powerful it is.
Try SurferSEO for $1, an almost free trial!
Using Surfer SEO To Level-Up (Up-Do) Existing Content
One of the best things about Surfer is that you can also use it to level-up and optimize existing content.
If you have content on your business, review, or niche affiliate website that needs to have an SEO audit done to help you beat your competitors, here is how you do it.
There are two different things to do to complete this process. You want to do an actual Competitor Comparison in the Analyzer, and you also want to dump your content into the Editor to facilitate making the actual changes.
First, It Is Recommended That You Perform The Competitor Comparison
Here is how you perform this function.
Step 1: Go to the SERP Analyzer, enter your keyword or select it from your list if you have already entered it before, and go to the Analyzer page.
Scroll down until you get to the part that says Compare your website to competitors.
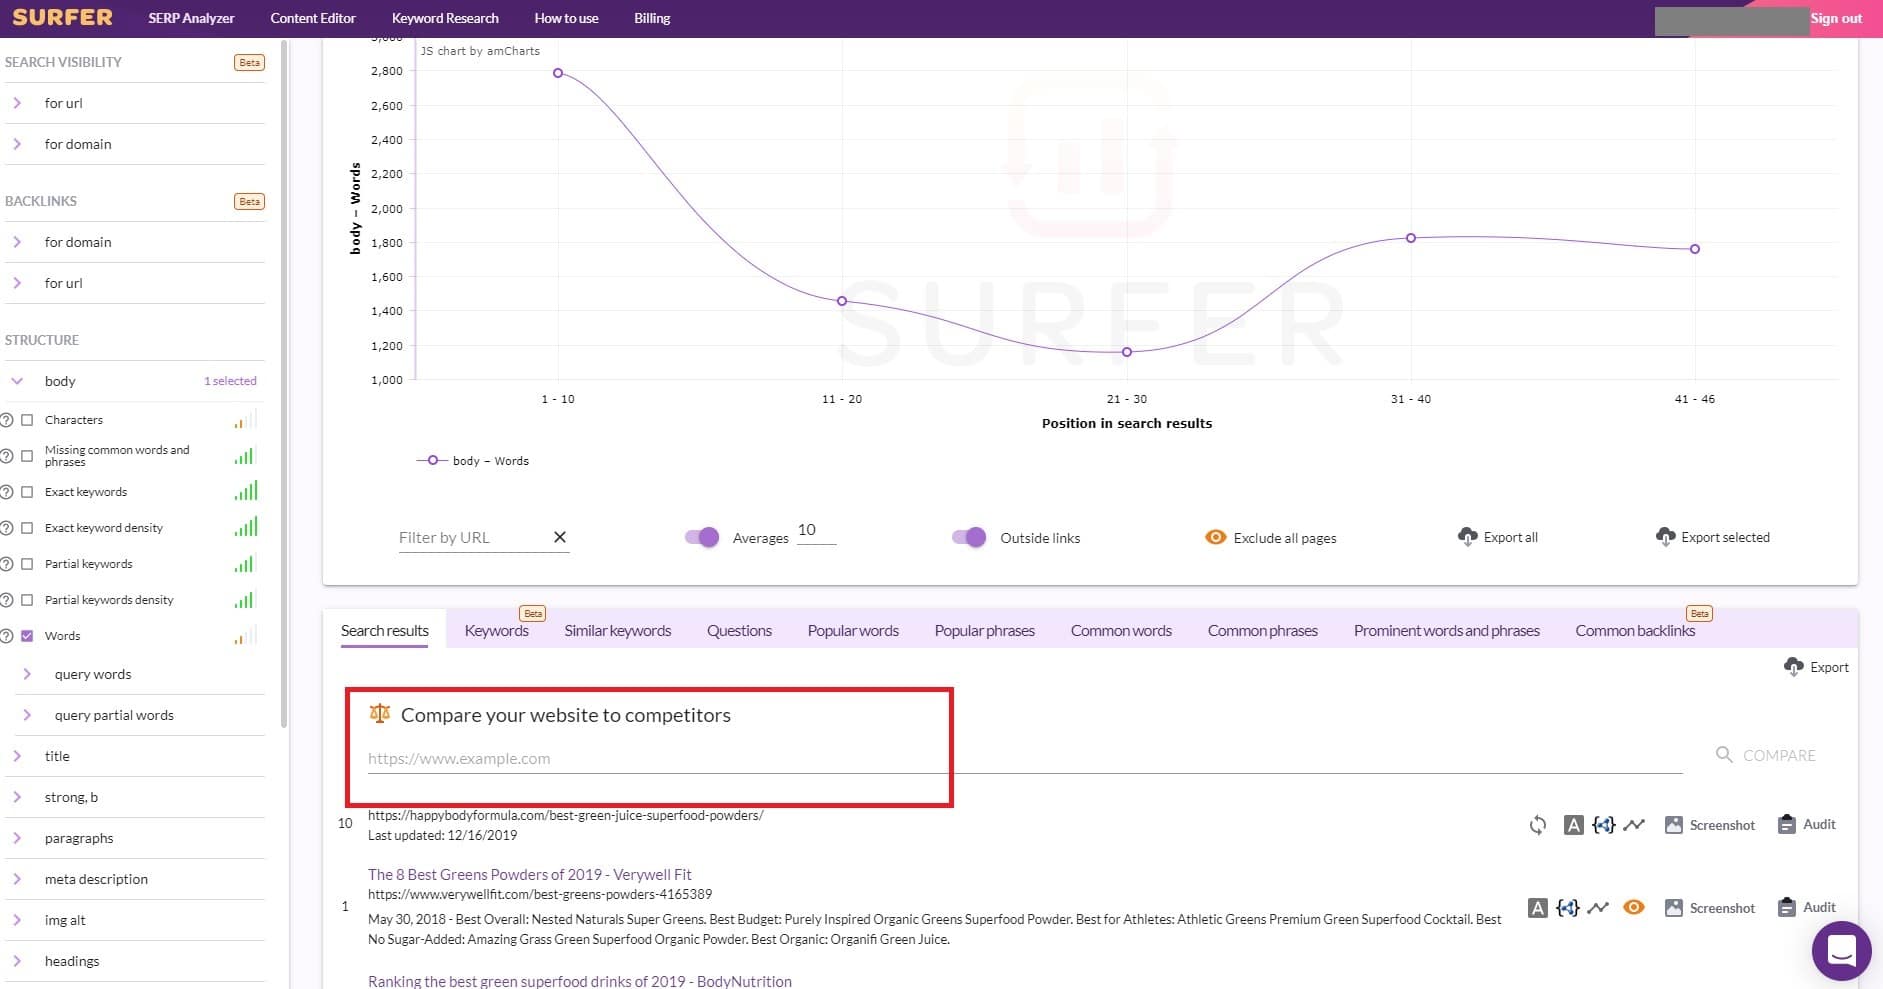
Step 2: Grab the URL of the post you want to audit, and paste it onto the line.
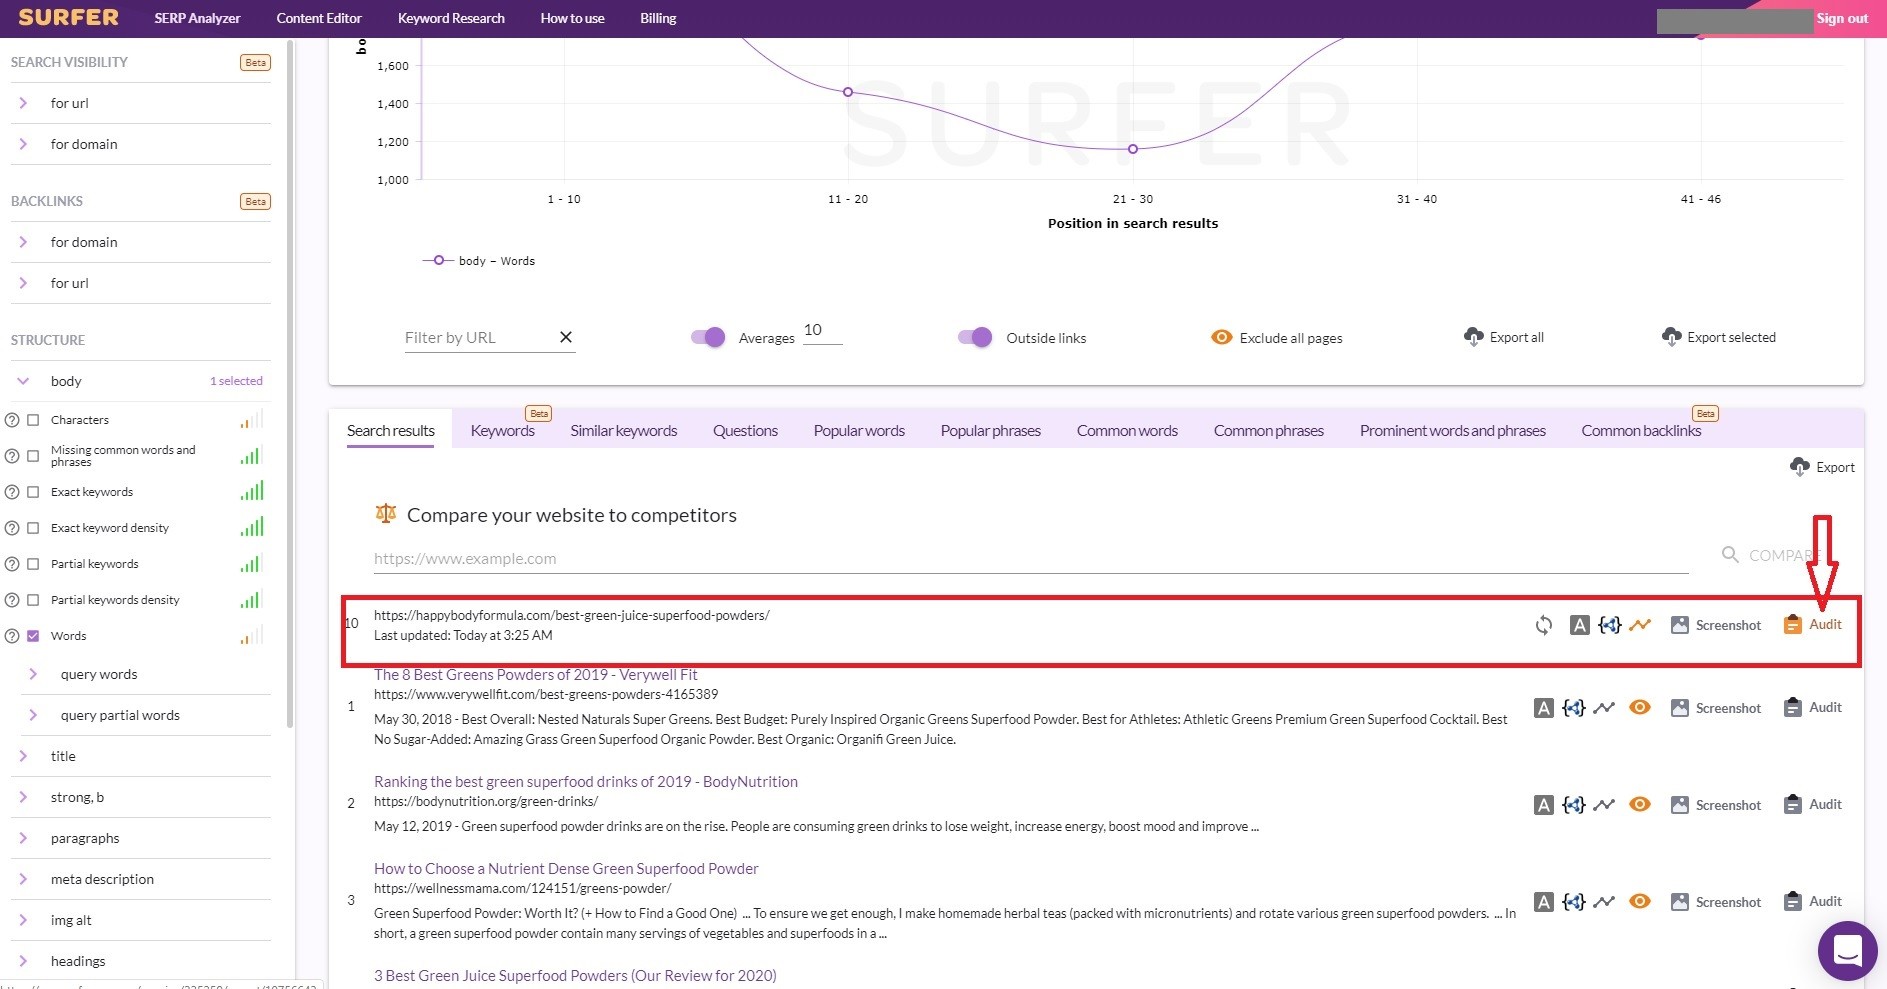
Step 3: Next, hit the ‘Compare’ button to the right of the line.
This will bring up a bunch of information about your current article. But it will also give you the option to ‘Audit’ it. That’s what you want to do next.
Step 4: Find the ‘Audit’ button to the right of the website URL that you just entered, and click it.
Once you click on the ‘audit’ tool button, you will get a huge checklist telling you, in detail, everything that you need to change about your post to start improving your rankings and search traffic.
Here is just the very top part of what you will see when you get these results.
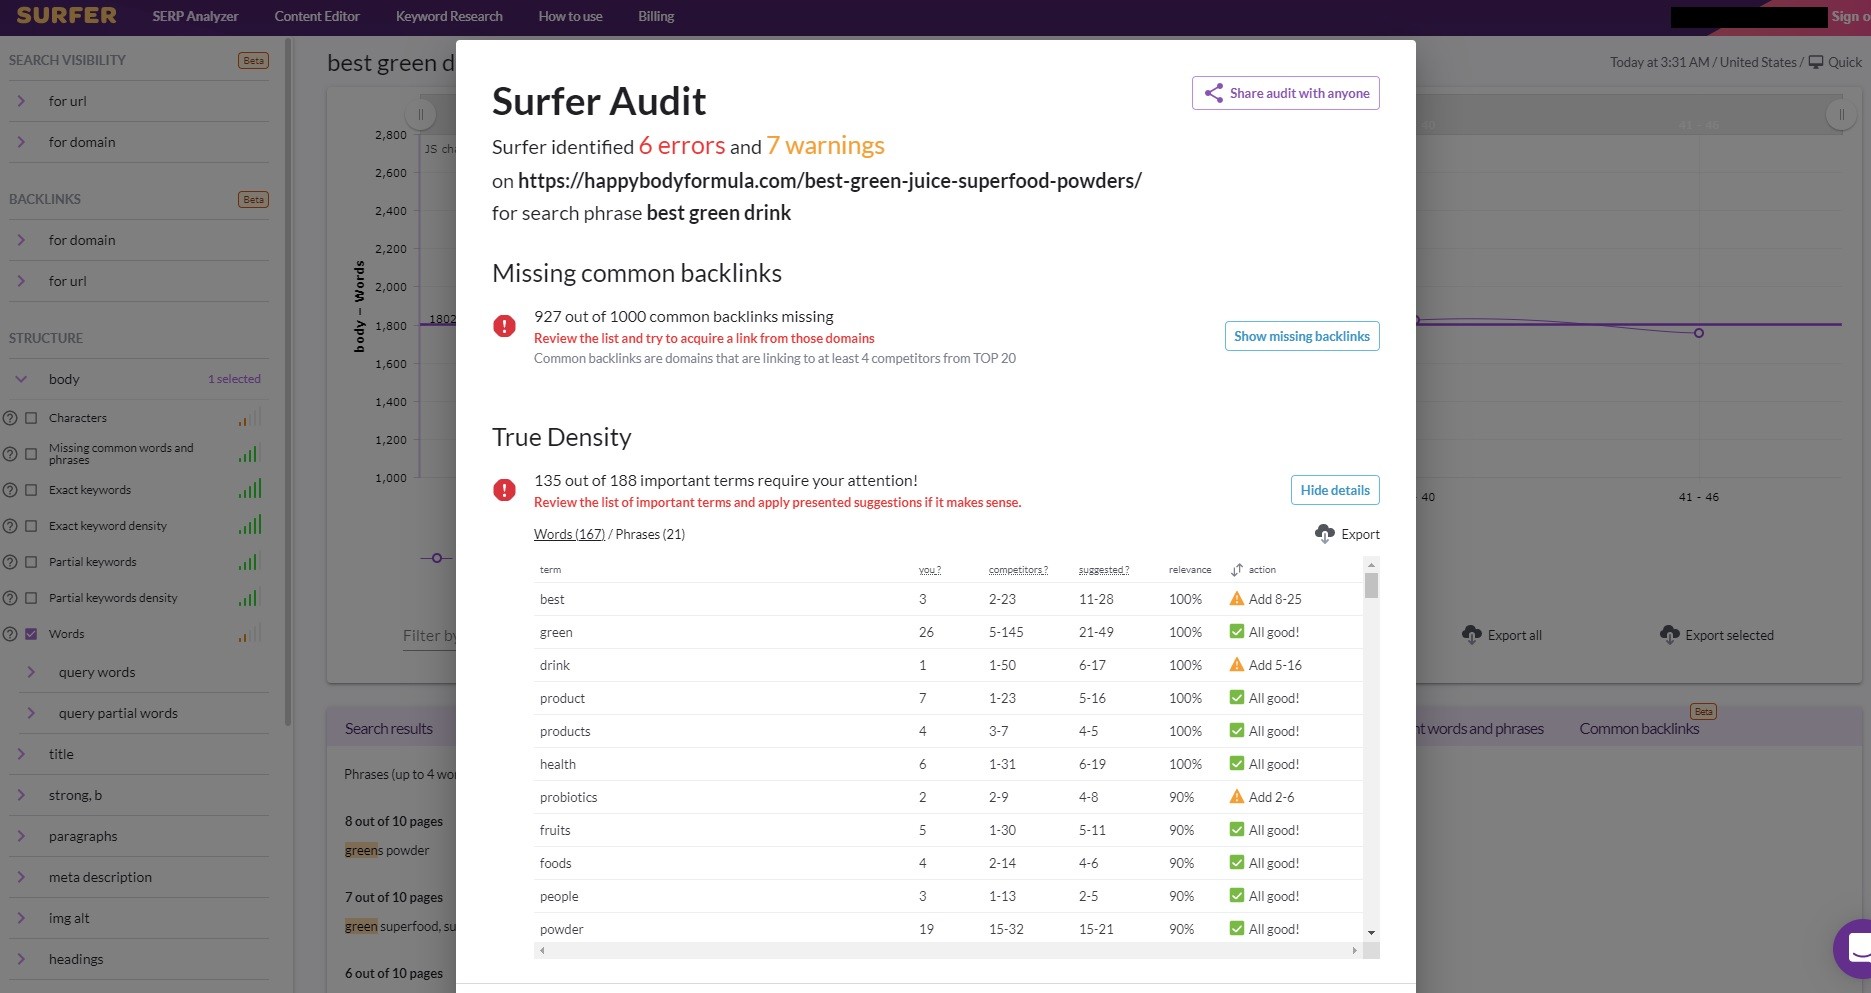
Basically Surfer SEO offers a checklist of everything that needs to be changed in order for your post to start ranking better… and you can just go from top to bottom, fixing all of the issues.
Here is just a quick list of some of the things it checks for…
- Backlink sources
- Keyword density and term density
- Word count
- Partial keywords
- Number of elements
- Characters in title and meta
- Time to first byte
- Page speed
And each one of these can be further broken down, some of them containing dozens of sub-categories that you can look at, check, and see what needs to be fixed.
The good news is that SurferSEO does all of this literally at the click of a button.
And it is literally hyper-specific… telling you exactly what to add or take away, right down to each and every partial keyword and the exact number of times it should be included!
This kind of research would literally take days to conduct on your own.
But thanks to Surfer, it is lightning fast.
The bad news is that it might take you some time to make the adjustments if your metrics are way off.
But… another element to this is that Surfer also helps you with that… by giving you the Content Editor to help you spruce up your content after an audit.
Here is how you move on and start fixing your blog content optimization issues with the Editor.
Step 1: Create An Editor
Using the keyword of the existing post or page that you want to level-up, create a Content Editor and run a SERP Analyzer on it.
Enter the keyword into both of these tools, and follow the steps outlined above to set up your Surfer SEO Content Editor, exactly as you would if you were going to create a brand-new post based on that keyword.
Step 2: Copy Your Text
Go to the web page or post you wish to level-up (audit) and copy all of the text.
Then, go back to your Surfer SEO Content Editor and paste all of that text into the editor.
Step 3: Perform Your Audit
Now, take a look at your metrics to perform a visual audit of what is going on.
Surfer SEO will instantly tell you what needs to be adjusted. You should look at content length, figure out how many headings it should have, look at the important terms to use and treat them as important keywords, and also look at any other relevant metrics that you want to include.
The more optimization metrics you choose to use, the better! Get as in-depth using the SERP Analyzer as you can. The more you delve into it, and the more metrics you make use of, the better your experience will be at trying to perform a successful data audit and truly level-up your content, giving you the best chances of succeeding at getting top-page rankings for your seed and LSI keywords.
Then, fix/rework everything that needs to be fixed and/or reworked to get all of the optimization factors greened out!
Step 4: Once You Are Done With Your Adjustments, Re-Publish Your Content
Once you get done leveling-up that content, republish it on your blog.
And boom… you’re done!
You can eventually do this for all of your keywords.
Keep in mind that, if your audit only revealed a few minor changes, it won’t really benefit you to copy and paste all of your content into the editor.
That is why it is a really good idea to do the SERP Analyzer audit first, and then assess whether or not it would be worth it to run everything through the Content Editor.
But either way, once you go all through the SERP Analyzer checklist and fix all of the issues for your keywords, you will be ready to re-publish your blog with these new changes… and you will literally start to see mobile or desktop results immediately!
It will now be fully edited, and you'll be able to sit back and keep an eye on it. With everything you’ve learned about Surfer SEO, if you did your audit and adjusted your on page factors correctly, you should absolutely experience a significant jump in your Google search rankings almost right away!
This Is Truly Only The Beginning Of What Surfer SEO Tool Can Do For You…
Surfer SEO is a massively effective and in-depth tool. What you have learned in this guide is a very simple and basic run-through of only the most prominent tools in the system.
There is so much more to Surfer SEO than could ever fit into one review (especially if you want to stay within the recommended word-count)!
It is truly an incredible tool.
Surfer SEO Review Conclusion
Hopefully this Surfer SEO review helped you to understand how to use Surfer SEO to build an awesome, highly optimized post and level-up your existing content.
If you've never taken a look at it, do so. Using Surfer SEO has been an experience that has changed the game for my own blog, and it can do the same for yours.
I definitely recommend Surfer SEO to all those who want to improve their website's ranking on Google.
Have you ever used Surfer SEO for on page SEO analysis, keyword analysis, backlink analysis and content optimization? Leave a comment below and let me know what you thought about the experience.
Also drop any additional questions you might have about how to use Surfer SEO, and I'll make sure to answer them for you!
Let's keep the conversation going.
Until next time, be well!
Oh and before I forget…If you are really serious about growing an online business and changing your life for good, then you should check out my free course that reveals the 7 step process that took me from $50,000 in student loan debt to a million dollar business online.