In this in-depth guide, you are going to learn how to advertise successfully with Google Ads without spending more money than you absolutely must.
There are two main concerns that anyone who is interested in using Google Ads should be aware of.
- You can spend a lot of money on it, though you don’t have to
- If you don’t know what you are doing, it can be a big waste of time and money
So in this article, you are going to get an inside look at exactly how to go in and set up your own Google Ads campaign, the way the professionals do it.
Of course, every campaign is different. But in this post, you are going to learn the fundamentals and the basics.
If you want more leads, more conversions, more traffic, and more money coming into your business, then running Google Ads might be an excellent way to accomplish your goal faster.
In this article, you are more specifically going to learn to set up and run Google’s equivalent of a Facebook conversion campaign.
This system is awesome in Facebook because it has the ability to leverage Facebook’s own machine-learning to dial-in the campaign automatically… and Google has built out a very similar system in their ad campaign tool that is super-powerful and works almost the same way.
But you can’t just waltz in and expect for it to work perfectly. You have to know what you’re doing.
So let’s get started.
Who Are Google Ads For?

This is a really good question that needs to be addressed before you even get started on an ad campaign.
Now, keep in mind that this is more of an advanced-level training on the topic, so it is going to be assumed that you have already done your homework and figured out that Google Ads is actually a good choice for you and your business.
Google Ads is not a one-size-fits-all solution to advertising, and there are many types of businesses and business models that it simply isn’t ideal for.
With that being said, let’s look at the two best examples of business models that can really benefit from it.
Immediate-Need Local Businesses
Any local business that could be in high-demand in a time-sensitive fashion at any given moment could really, really benefit from Google Ads.
Some great examples of businesses in this category include…
- Plumbers
- Mechanics
- DUI Lawyers
- Towing Companies
- Heating And Air Technicians
- Etc.
Any business that could have local clients looking for them with urgency could really, really leverage Google Ads to their advantage.
Imagine, for example, that someone’s plumbing suddenly springs a leak… and it is flooding their basement.
This is a very time-sensitive issue. They can’t just let that go. They need to call someone pronto.
So what are they going to do? They are going to get out their phone and look for plumbers nearby who could get the job done fast.
If your local business fits into this category, but isn’t using Google Ads, you will certainly be at a disadvantage when competing for customers in this type of scenario.
Niche Physical Products and Local Services
This category could include businesses like…
Solar Panel installers
Dual pane windows
Organic hemp t-shirts
Etc.
If you are wondering why Google is so good for advertising these types of businesses, the answer is keywords.
Google Ads allows these businesses to really target their audience/customers based on their awareness level.
The awareness level of a given customer is indicated by the keywords they are using.
So if you can get your ads in front of the types of people who are searching for a product in your niche based on the keywords they are using, and use the right kind of messaging, odds are good that you are going to get some leads and sales… because Google Ads can literally bring your ideal customers to your doorstep/website.
Why Are Google Ads So Effective?

Google Ads are effective because, when used correctly, they can help you to get your ads in front of the best possible audience.
It is, truly, the ultimate shortcut to get to the page-one search engine results for your most valuable keyword phrases.
It can take a long time to achieve number-one search engine results organically. But with Google Ads, you can super-speed this process and start getting those leads and sales today.
Keep in mind that Google Ads is not meant to replace organic SEO. That is not the way to think about it. It is, rather, a great tool that can work in-conjunction with a quality organic SEO strategy.
Of course, you have to pay for them. That is the trade-off.
But, if you do it correctly, you can save some money and do it relatively cheaply. But we will talk more about that in a moment.
Note: Google Is Quick to Give Out $100 Free to New Customers
There are A LOT of $100 coupons available for Google Ads for new customers.
So if you are helping local businesses with SEO, or trying to get your feet wet in Google Ads, then be aware that when you verify a new business through the ‘Google My Business’ process, you will generally get one of these $100 coupons sent to you.
$100 can pay for a third of an awesome one-month Google Ads campaign. Or, you can run a great campaign for 10 days to really get some traffic moving through your site with that kind of money.
Either way, there is a lot of value here… and it can give you the opportunity to practice and help you to learn how to set up Ads without spending any of your own capital.
In any case, let’s move on and talk about the process. This is a pretty in-depth guide, so just stick with it and go over it as many times as you need to.
But as with all great journeys, this one also begins with a single step. Let’s get started.
Step 1: Choosing The Right Keywords

By the time you are reading this guide, it is going to be assumed that you have already done your keyword research.
It is also going to be assumed that you know how to do general keyword research, as this is a more advanced tutorial.
But there is still going to be a bit of information here for you to keep in mind as you go through this process with Google Ads.
As you know, keyword research is of monumental importance for organic SEO, but it is STILL incredibly important when setting up a Google Ad campaign.
In fact, if you don’t want to waste your money, this is probably one of the single most important parts of the process.
Use ‘Buyer Intent’ Keyword Phrases

So, the first thing to keep in mind here is that you want to target the keyword phrases that contain buying intent-related words.
This is especially important if you’re focused on ecommerce and selling physical products.
So, you are looking for phrases that contain words like buy, coupon, shipping, installation, deal, discount, affordable, best, etc.
These are usually ‘buying phrases,’ which means that customers are more likely in the buying-frame-of-mind when they use these words.
As a general rule, these are the kinds of phrases you want to get your ads out in front of.
For example, if someone types “buy hemp t-shirts” into Google, you can have a pretty good idea that they are interested in spending money on the right product.
They know what they want. They are motivated. They are online looking for it.
And if you have the right type of hemp t-shirt on your website, there is a chance that you could make that sale.
But only if you are showing up on the first page of Google!
And that is why Google Ads can be so useful. They can fast-track you to the first page of Google, putting you in the perfect position to make that sale.
Some other examples of keyword phrases that contain buyer intent include phrases like…
- Hot tub with free installation
- Best BMW mechanic in Tulsa
- Where to buy an affordable glass coffee table online
- Affordable kitchen remodeling in Tulsa
- Etc.
Note: Tracking The Conversions Generated By Your Google Ads Is Very Important
![]()
Before you get much further in this tutorial, it is important to this process that you are able to track your conversions created by your Google Ads.
Once again, this is an advanced tutorial, so it is assumed that you know how to track your conversions. But just in case you need a little bit of direction on this, here are some basics that are important to know.
This Google Ads process is a lot like running a conversion-based campaign on Facebook. But Facebook uses a pixel and custom-conversion that you are going to have to create for yourself in Google Ads.
In Google, you are actually going to use either…
- Conversions tracked through Goals and Analytics
- A snippet of code to the thank-you page or the order-is-complete page
You are essentially going to want to use either a Google Ads tracking script, Google Analytics and Goals, or UTM Tracking parameters in your links.
Personally, I would recommend that you use Google Analytics and Goals. Though, with that being said, if you are comfortable with getting into the head-tag within your page and adding a snippet of code, the Google Ads tracking script is also really easy.
You Need To Know Your Cost Per Lead
Another thing that is assumed before you start trying to run Google Ads is that you already have an offer that converts.
And it is also assumed that you know what your cost per lead is as well.
You are going to have the most success with Google Ads if you have some kind of metric to measure it against.
So if you don’t already know what your average cost per new customer is, have your margins dialed in, and know what your conversion rates are on your sales pages, know that it may be a bit premature in the game for you to be thinking about running Google Ads.
You really need to know what your key performance indicators are right now, so that you will have some kind of an idea for what you are looking at when you do start to analyze the data from your first run with Google Ads.
Why is this important? Well, the biggest reason for this is because Google Ads can be an expensive testing ground if you are not sure what you are doing.
Of course, you have to start somewhere. But knowing your keywords, knowing your KPIs, knowing your conversion rates, having an offer that already converts… these are all pretty standard things to have in place before you step out into this area.
Step 2: Setting Up Your Goals In Google Analytics
Alright. The next part of your Google Ads journey takes you right to setting up your Google Analytics.
And you are going to be shown how to do this in what is essentially a series of steps. So let’s get started with it.
Here’s a video walkthrough of every step in this post. Definitely watch, there are a TON of steps to launching your Google ad campaign.
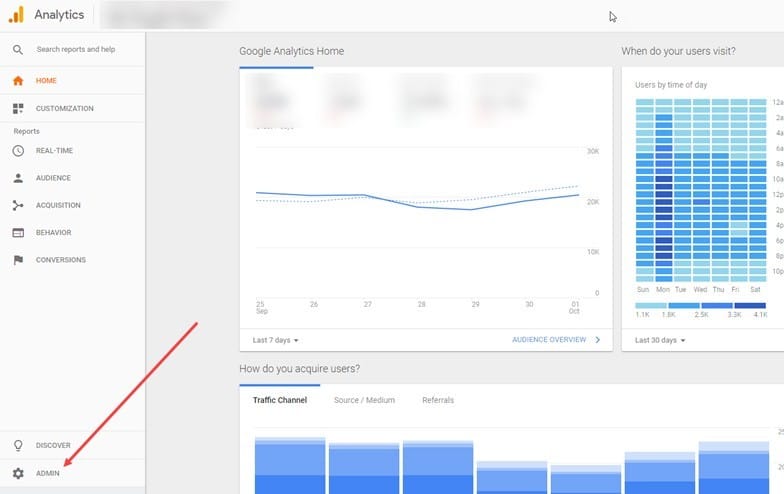
1: When you are in your analytics account, you want to make sure that you are under the right website (It should be your website, and it should be shown at the top of the screen).
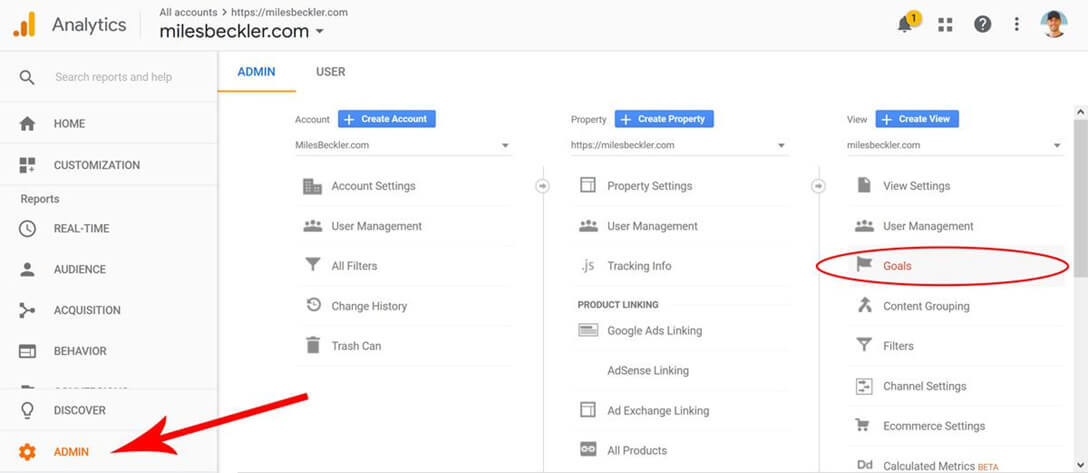
2: Down on the bottom-left hand side of the screen you will see the ADMIN button, with a little gear symbol.

3: When you click on the ADMIN button, the screen expands.
4: On this page, in the third column all the way to the right, there will be a button called GOALS. It will have a little flag next to it. Click that button.
5: On the next screen, there will be a big red button that will say NEW GOALS on it. Click that button.
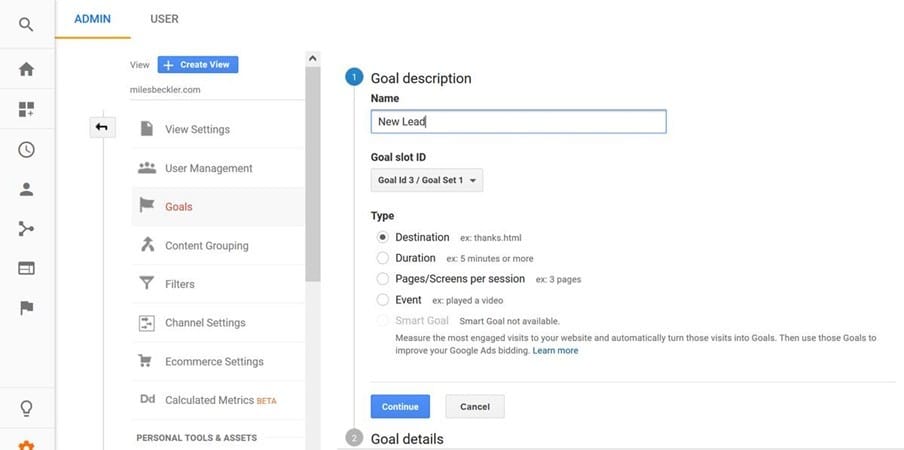
6: Under the Goal Description, name your goal. Make sure to make it relevant so that you can tell different goals apart. But if this is your first goal, you will obviously know what it is anyway.
7: Under TYPE, choose DESTINATION.
8: Click CONTINUE.
9: You will now enter the GOAL DETAILS screen.
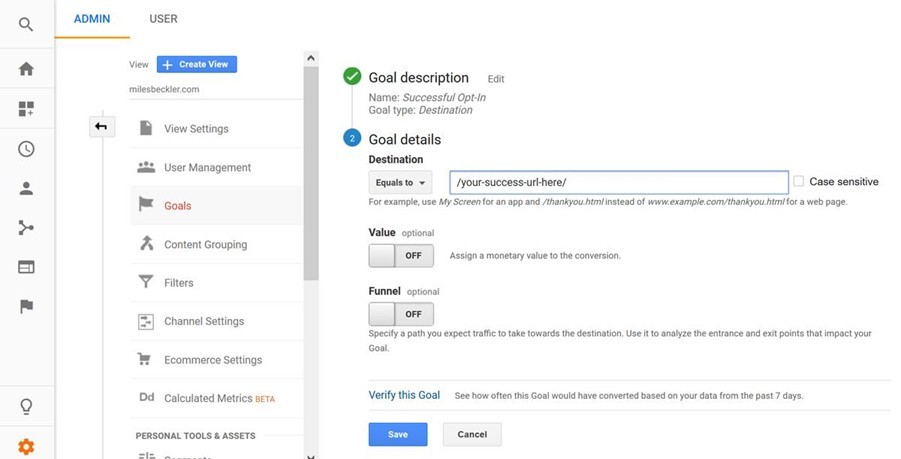
10: The first thing you need to do here is fill in the destination, which is the URL that the user will reach when your goal has been achieved. This means that if a user enters your landing page, and that landing page has an opt-in, you want to enter the URL of where they go after they opt in. Generally, this is your one time offer page. That is what should be displayed after your opt-in page.
Don’t put the entire URL into this section. Leave off the https, the www, and your root domain. Google already knows what that is because you’ve already configured your analytics account. So you just want the forward slash that comes after the dot-com, or the dot-whatever the top level domain is, and then the actual page.
The best way to do this without making any errors is just to grab the address right from the URL bar.
11: You don’t really need to worry about Values or Funnel steps here. If you do have a value, if this is an ecommerce purchase, if you’re running a free-plus-shipping campaign and they’ve clicked on the first part to get your add-to-cart function, or they’ve purchased and you do have a value, obviously you can enter that. But it is not required to move forward.
12: Click SAVE to move on.
Step 3: Linking Google Ads, Analytics, And Goals
Alright. You have your goals set up in analytics now. Next, you want to link your Google Ads, your Analytics Account, and your Goals.
If you don’t have a Google Ads campaign set up yet, you do need to set that up. If you need to do that, it can be done at ads.google.com. But for the sake of this tutorial, it will be assumed that you have already completed this step.
1: Log into your Google Ads account.
2: Along the top navigation bar, you will see a wrench icon that will say TOOLS underneath it. Click it. When you do, a drop down page will appear.

3: Under the MEASUREMENT column, you will find an option for GOOGLE ANALYTICS. Click on it.
4: When you click on this, you will actually be sent right back to Google Analytics. And once you get there, you will want to go to the lower left hand corner of the screen and click on the ADMIN button. At this point, it might seem like you are going in circles. But you actually need to do this in a specific order so that your Ads account picks up that this is your Analytics account.
5: After hitting the ADMIN button, look at the center column. There is a button under the Product Linking section called GOOGLE ADS LINKING. Click on that button.

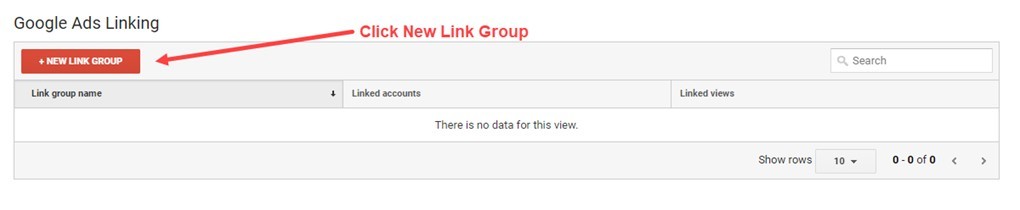
6: After clicking on this button, you will be taken to a page where you will create a new link group. There is an orange button near the top left hand side of the screen that says + NEW LINK GROUP. Click on that.
7: On the next page, you are going to want to Title your link group. Generally you just want to use your website name as the title, since what you are linking is a website property from Analytics with a website-specific Ad account.
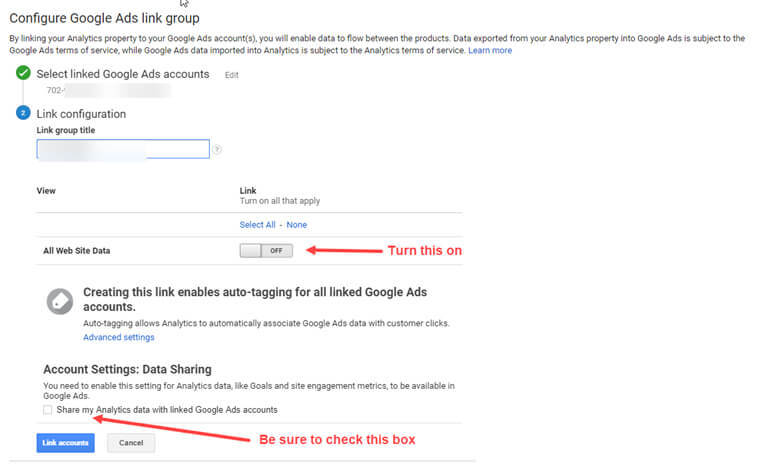
8: After this, turn on the ALL WEB SITE DATA button.
9: Toward the lower part of the screen, click the box that allows Data Sharing under the Account Settings portion of the screen. This essentially tells your Analytics account that it’s okay to share all of the data that Analytics gets with your Ad account.
This is how Ad campaigns are going to pick up on the conversion goals.
10: Now click the LINK ACCOUNTS button, the one in blue at the bottom of the screen.
11: Click DONE.
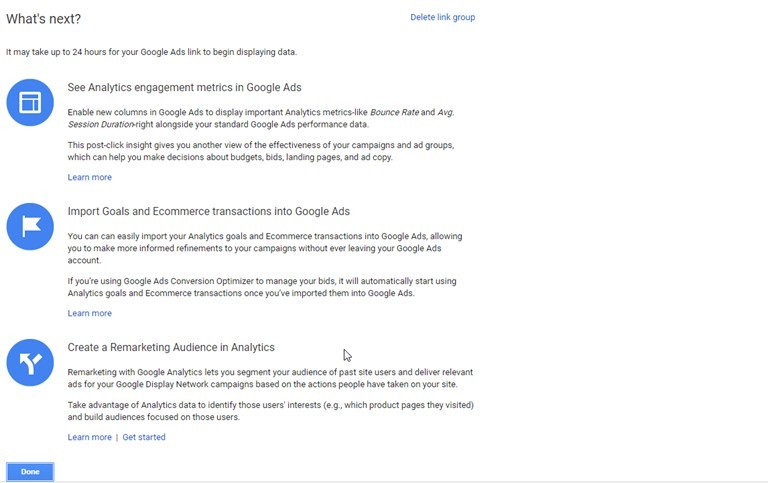
And now, you have all of these connected so that they can talk with each other. Now, the goals that you have in Analytics can be read by your Ad account… so when someone clicks on an ad and achieves a goal, Google is able to look at the profile of that individual and go find more people like that for you, which can be an amazing thing for your conversions!
Step 4: Set Up A Conversion Action Inside Google Ads
This is the next step. And to get started with it, you are going to go back to ads.google.com.
1: Once back inside, click on the TOOLS icon (the one with a wrench).
![]()
2: Under the Measurements column, click on CONVERSIONS.
3: Once the conversion actions page opens, you want to click on the little floating ‘+’ Icon. It is basically a little ‘plus sign’ bubble that is just floating on its own. This is what you click to create a new Action.
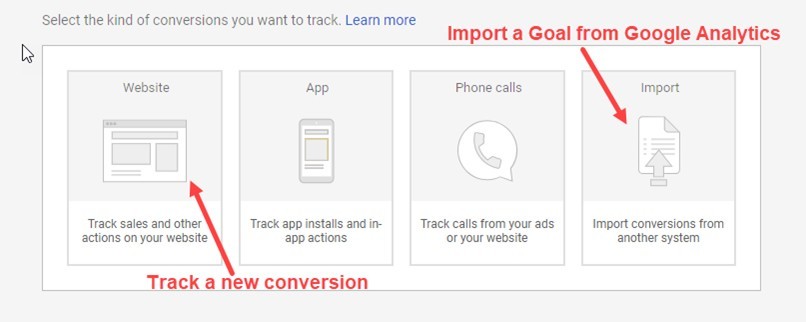
4: This is where you are going to be defining the actual ‘action’ that you want to leverage to optimize your campaign. If you want to use a website-based action, where you go and install the snippet of code from Google and install it in the head, then you will want to choose the WEBSITE option here.
On the other hand, if you want to use a goal that you have just set up (importing a goal from Google Analytics), then you will want to choose the IMPORT option.
At this point, if you have already been following along and completing the steps in this tutorial, the easiest way to proceed is to select IMPORT. But if you are running an ecommerce site, or if you want to track sales and revenue within Google Ads itself, or if you don’t have Analytics up and running, and you have just kind of been reading along and bypassing the other stuff, waiting for this moment… then you can click the WEBSITE option, and go on to get that snippet of code that you need to install.
For the sake of this tutorial, I am not going to go through that aspect of it, simply because getting that snippet and installing it will be different on every system.
For the rest of this tutorial, it is going to be assumed that you have chosen to IMPORT that Google Analytics goal that you created earlier on.
So, click IMPORT.
5: This is the page where you select the new option. Now, if you just set up a goal, that should show up here as an option. So here, you select the goal that you want to import. It is also really recommended that you focus on ONE goal here.
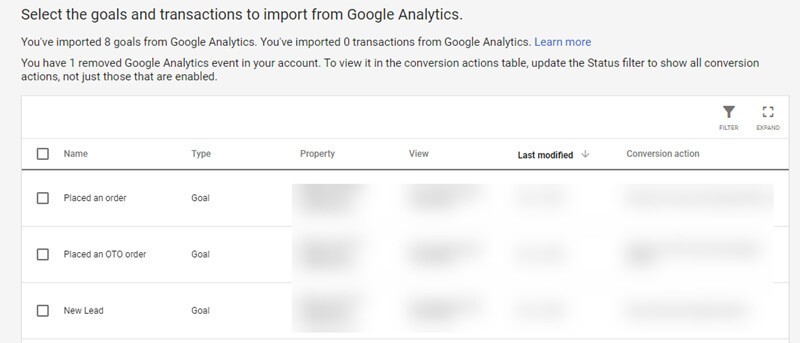
You really want to keep your Ad account focused. You want to keep Google focused on one goal.
You may want to make some tweaks to this in the future. But for right now, you want to select the goal option you have most recently created, and then click DONE to go right back to your conversion actions page.
6: At this point, you will see all of your goals that you have imported right on the actions page. So now, you want to choose the option that you just imported by clicking on it. This will open the details page.
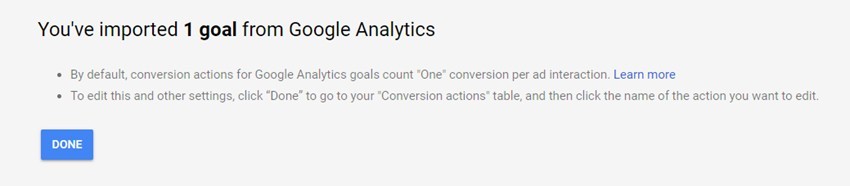
7: Next, click EDIT SETTINGS.
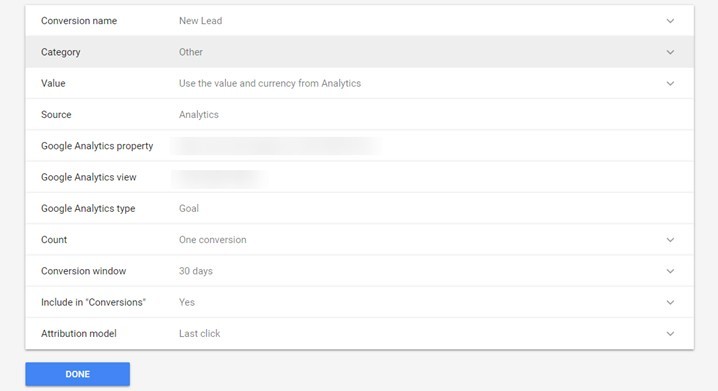
8: Inside of this page, you can see the settings within the Ads manager of the goal. You created an Analytics, right? Well, here you refine it because in Analytics it is super simple. It is just like “this is the URL.” At this point, you probably haven’t even put a monetary unit on it!
So you need to fill in a bit more information.
9: On the top of this page, you want to select CATEGORY, and choose the appropriate category. For instance, if your goal is ‘lead generation,’ you will want to choose that. But whatever your goal is, you need to choose the appropriate category that is equivalent to what you are doing.
10: Next, you have the option to change the COUNT. This is located directly beneath the GOOGLE ANALYTICS TYPE button. For the most part, on the COUNT option, you will want ONE CONVERSION chosen as the option.
This is because you most likely only want Google to track one lead going through. But, with that being said, if you have the type of business where a user might come back and purchase multiple times, maybe take the same action over and over, and if this type of thing makes sense for your business, then you can set the COUNT to track multiple goals being achieved.
But for the purpose of general lead generation, you only need to track them once. After they are generated as a lead, they should be moved on to the next step.
That is why, in most cases, you will want this option set to ONE CONVERSION.
11: The next thing you have the option to edit is the CONVERSION WINDOW. How long do you want to track for after that original click? How long do you want to give Google the ability to say that sale came from them?
The default is usually 30 days on this, but you can set it to whatever you want. You can set it to 7 days if that makes the most sense for your business. It is not really that big of a deal. But generally speaking, if you know that you have a longer sales process, you can extend that out.
Whereas, if you have a shorter sales process, where people should be clicking and buying within a day, then you may want to bring that back to narrow it down and keep it shorter.
12: Once these edits are complete and to your liking, click DONE.
And now, the whole conversion setup… the whole mechanism that’s going to identify the types of individuals within an audience that are taking the action you want, and then going and bringing you more people like that… that’s all done.
This is a very powerful step to get you to the point of being able to leverage the AI that essentially runs the Google Ads platform and algorithm for your business’s benefit.
Another thing that this will allow you to do is to create a really hands-off type of campaign. It is going to optimize itself over time, which is really the best way to go, because you don’t want to spend a lot of time fiddling inside of the Ad manager if you can help it.
Alright. At this point, it is time to move on and create your first ad!
Step 5: Creating Your First Ad
To begin this step of the process, you go right back to the main dashboard at ads.google.com.
1: Click on CAMPAIGNS

2: Once you click CAMPAIGNS, that little blue floating bubble with the ‘+’ sign will show up. Click that. That is how you begin the process of creating a new campaign.

3: On the next page, click the SEARCH option. You really want to show your ads based on keyword-relevant searches. That’s the whole goal of this. At some point, you can also experiment with Google’s Display Network option. That also works pretty well. But it is best to separate those out and create those as separate ad sets.
You would want to track them completely differently. For the time being, if you are new to Google Ads, it is highly recommended that you focus on keyword searches, because with keywords you have the ability to identify a certain level of user intent based on the words that they’re typing in when they search.
With the DISPLAY option, on the other hand, you are putting image ads on other people’s websites. There are a lot of variables with this option, and it is an even more difficult game to play.
Anyway. For the sake of this tutorial, it is going to be assumed that you clicked on the SEARCH option.
4: Once you click on the SEARCH option, you will enter a page where you will be asked to select a campaign type. Here, you want to choose the option that best describes your goal.
The three main options available here are SALES, LEADS, and WEBSITE TRAFFIC. You will almost always want to use LEADS, because usually that is what you are trying to create.
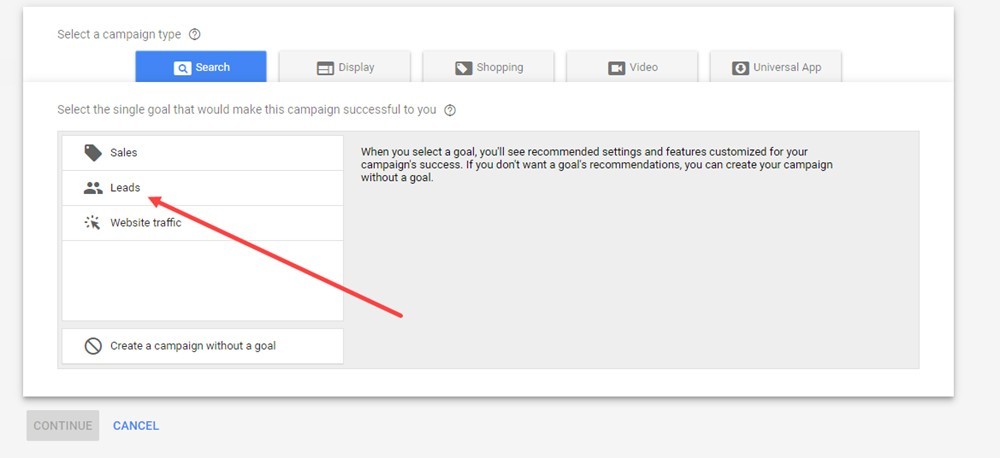
If you are growing an audience and trying to build traffic for a local business, you really want more leads. There are certainly exceptions to this, of course… but for the most part, leads are what you are ultimately after here.
For the purposes of this tutorial, it is going to be assumed that you chose LEADS as your option in this part.
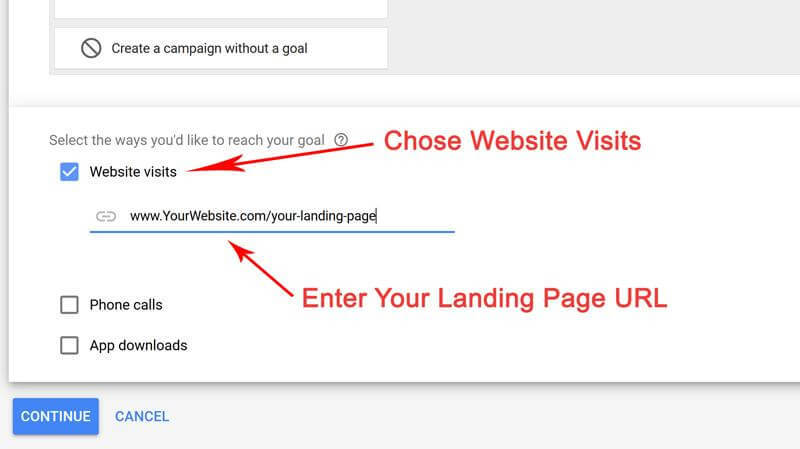
5: Once you choose the LEADS option, you will be asked to select the ways in which you would like to reach your goal. The main options here are WEBSITE VISITS, PHONE CALLS, and APP DOWNLOADS.
Here, you will most likely want to choose WEBSITE VISITS… though there are also some decent upsides to PHONE CALLS as well.
Let’s say, for example, that you are running ads for a local remodeling company. Well, you can use this feature to track how many phone-call leads you generate for the company through their Google Ads campaign with this feature, which is pretty cool.
Ultimately, you just want to think about the user behavior when choosing your options like this. Every campaign is a little bit different, and the most important thing to consider is how you can increase your odds of attracting your ideal customer the most.
But anyway, for the sake of this tutorial, it will be assumed that you chose WEBSITE VISITS, as that is kind of the most common online application for Google Ads.
6: Once you choose WEBSITE VISITS as your goal, you put in the landing page URL that your audience will be going to after they click on your ad.
7: Click CONTINUE.
8: This will bring you to a page where you will want to add a descriptive CAMPAIGN NAME on the General Settings page. You may end up setting up many different campaigns, so make sure to use descriptive names.
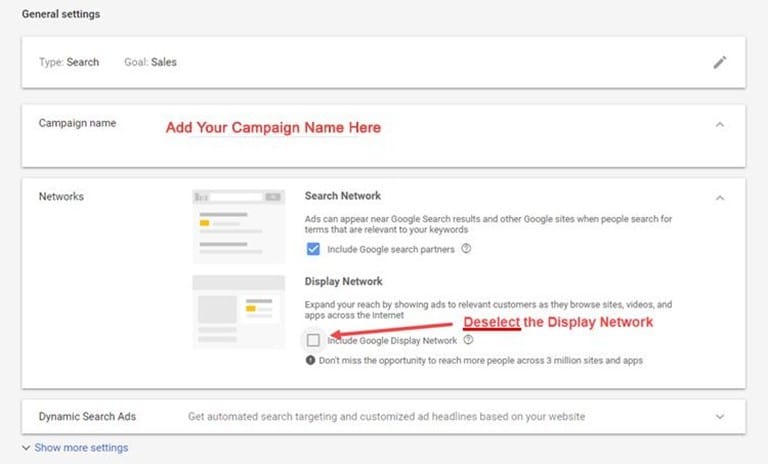
The better you get at organizing your campaign names and keeping them all straight, the better your experience will be when the time comes to look at reporting on the other side.
9: Uncheck the option for GOOGLE DISPLAY NETWORK. Google wants you to spend as much money as they can get out of you right away, and part of the motivation behind this tutorial is to help you find the most efficient ways to spend your money in Google Ads.
This tutorial is designed to help you hyper-focus your budget on the aspects of Google Ads that have the highest likelihood of bringing you top-quality customers.
And in the context of what you are doing here, it would not be efficient to lump Display Network in with everything else going on in this current campaign at the moment.
Later on, you may even want to split test DISPLAY NETWORK and SEARCH to figure out which one gives you the best return on your investment. But for now, it is going to be assumed that you are opting out of the DISPLAY part of this.
10: Next, scroll down until you get to the Locations section of the Targeting and Audiences portion of the page. Here, you can select the location that you would like to target.
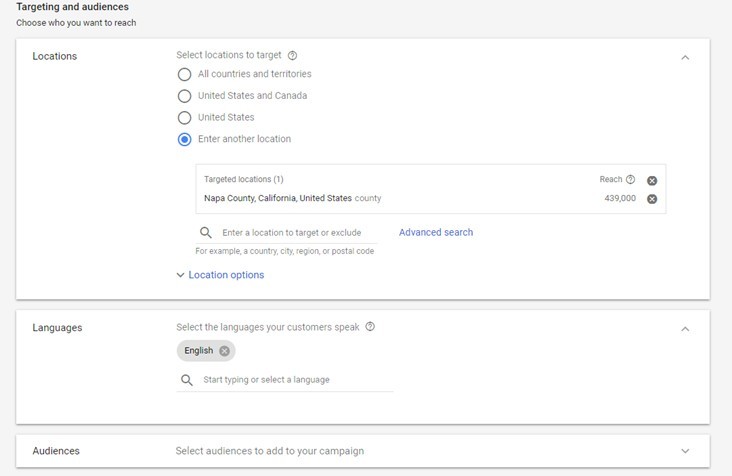
This is a very important part of the ad process to get right. You need to think about where you actually want your ads to show up. But you also want to spend as little money as possible.
As you can see, the top bubble is ‘All Countries and Territories,’ and that is a VERY DANGEROUS bubble to click!
Google would LOVE to spend as much of your money on ads as possible! So be wise here, and make sure to choose only a location that best suits your business’s goals.
Choosing The Right Location For Your Google Ad

Choosing the location for your ad is a very fundamental and important part of this process.
It is going to be assumed that you have already thought about this and planned for it. But here are a few things to consider if you haven’t yet thought about the location feature in Google Ads.
If you choose too broad of a location, you may spend needless money on customers who are not very likely to spend money at your company.
But if you choose too narrow of a location, you may miss out on valuable search traffic that could really increase your leads and sales.
Here are the primary default choices that you have to choose from.
- All countries and territories
- United States and Canada
- United States
- Enter Another Location
This last option pretty much allows you to completely customize the exact location (or locations) you want your ad run in. And this can get very, very specific!
If you are running a local business, then you are obviously going to want to choose to enter your own locations, and customize them to best suit the kind of ‘boundaries’ that your ideal customer base would reside in.
You could, for example, choose what counties you want your ad to run in, you can narrow down your locale as much as you want, and you can see your potential reach over on the right side of the screen.
You can even zero it in and focus on specific neighborhoods, etc.
In the end, this really all depends on your business. If you are selling Hemp t-shirts all over the United States, choose ‘United States.’
If you are an auto mechanic shop who pretty much just services one county, just choose that country, etc.
(Alright, let’s get back to the process. Moving on from location…)
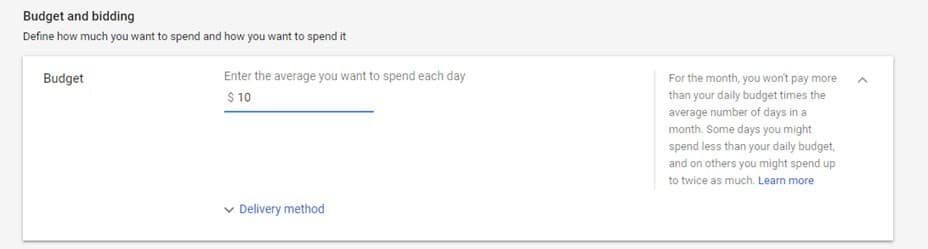
11: Scrolling down a bit further, you will come to the Budget and Bidding section. Here, you literally define how much you want to spend on your ad each day.
As with location, there is a lot to consider when choosing your budget. So here is some information to help you figure this part out before moving on.
Choosing The Right Starting Budget For Your Ad Campaign

A great way to decide on a starting daily budget is to figure out how much you are willing to spend each month on Google Ads, and then divide that number by 30. That should give you a great frame of reference for how much you would want to spend in a day.
If you are just getting started, $10 a day is actually a great place to start. In most niches this will give you plenty of useful data that you can use to see how well your ad is actually performing, and really has the potential to bring in some action.
One great thing about Google is that they are pretty good at spending your budget evenly throughout the day. So you won’t have to worry about your entire budget getting used up in the morning. You will also get lunch breaks, evenings, etc.
If you are just running and testing ads for your funnels or for something you’re building, $10 a day is a great starting point. It is recommended that you use a larger budget here than on Facebook.
On Facebook, you can get away with a $5 campaign, but that is actually quite a bit different, and you don’t get as much for your money when you go that low with Google Ads.
(Alright. Let’s get back to the step-by-step. Moving on from the budget section… )
12: Next, choose the DELIVERY METHOD. You will want to leave this on the Standard option, as this is absolutely the best option because it spreads your ads out evenly through the day.
If, for example, you set the DELIVERY METHOD to Accelerated, it could dump your entire budget by 9:00 AM, which is really not what you want.
(Note: Keep in mind that all of this is changeable as you move forward. You can come back into your campaign at any time, tweak those numbers, turn them up, turn them down, etc. So as you move forward, just keep in mind that you always have that option.)
13: The next part you will scroll down to is the Bidding section. On the option that asks you what you want to focus on, you should absolutely be choosing CONVERSIONS.
The reason for this is because if you choose this option, Google is going to optimize your budget to drive the most conversions that your budget can afford.
As for Google’s learning phase, you will be happy to know that they only need at least 15 conversions in a 30 day period to deliver quality data.
This is way smaller than what Facebook requires. Facebook requires 50 in a 7 day window. So you actually have the ability to kind of seed Google’s algorithm with less data. And theoretically, Google is going to bring you just as many relevant targets with even fewer seed/data points on your best users.
This essentially means that if you are selling a high-ticket physical product, this is a great way to let Google’s AI, their machine learning, work for you.
So even if you only reach the minimum and get 15 conversions a month, Google is still constantly getting smarter and smarter about the profile of that perfect customer/lead.
Also, keep in mind that all of this is very ‘set it and forget it.’ This is a very beginner approach, but it is very effective.
14: At the lower part of the Bidding section, you will see a button that says SELECT A BID STRATEGY DIRECTLY.
This button will take you into a more advanced area where you can really get in-depth with your bidding strategy. But you are also going to have to keep more of an eye on it if this is the direction you plan to go in.
All things considered, it is usually recommended that you do not mess with this until after you’ve already been running a standard strategy for a while. If you are brand new to Google Ads, it is in your best interest to really ignore this button and move on.
This part of the bid system can give you a ton of control over your bids, but it is pretty advanced. So for the sake of this tutorial, it is going to be assumed that you are not going to be using any of these features this time around.
15: Next you will scroll down to the Ad Extensions portion of the page. Extensions are basically secondary links that can be added to your ads. They will show just below your ads and typically improve your click-through rates.
Keep in mind that any time you get the option to obtain more real estate with your ads, the better! This gives you a pretty big advantage, so usually you want to jump on it.
Keep in mind that these ad extensions do not always display, especially on certain devices.
But… they can be super helpful for direct-linking customers to specific forms, including information like promo codes, phone numbers, or your actual physical business address to the ads.
They can also be used for adding anything else that may help to increase the odds of a click-through.
If you do ad extensions, the click costs you the same amount. So it doesn’t cost you any more to add this.
To access this control, click to expand the section that says SITELINK EXTENSIONS.
16: Once you open up this dropdown, you will want to add your sitelink text. This is the text that pretty much always appears right below the ad.
17: Next, you want to fill in the Descriptions. The descriptions will generally only show in a handful of instances, but you still want to include them.
18: Next, fill in the final URL, which is the landing page URL for your ad. This is where users are actually going to end up when they click on your ad.
You need to create at least two site links for your ad before Google will display these. So don’t just put in one. Make sure that you put two of them in.
Google needs to have both of them in order to start displaying them.
19: Once your site links are complete, you can add additional extensions. If you want to do this, you can click on the AD EXTENSION option located below the CALLOUT EXTENSIONS button back in the Ad Extensions portion of the screen where you were scrolling before.
Once you get all of these things filled out and to your liking, you can just click SAVE AND CONTINUE. And it will then be time to move on to keywords.
Keywords

Eventually, as you scroll down this page, you will arrive at the Keywords portion.
Keywords are the magic things that make Google work.
All searches done on Google are based on keywords. Yes, user search behavior with voices is changing a bit… but really, their entire ad platform is still run on keywords.
And that makes keywords an essential part of this process.
You are about to learn some advanced tricks here. But ultimately, you want to get all of the keywords that you want to target in on this ad.
It is very important to make sure that you get these all dialed in.
You will see where the keywords need to be entered, but formatting this correctly is important. Here are 3 pro-level tips for helping you to format your keywords for maximum effectiveness.
Tip #1: Modified Broad Match

First, if you need to make sure that a specific keyword is required to trigger your ad, make sure you add a ‘+’ sign before that word. So, in other words, if you want the word ‘kitchen’ to be a requirement as a keyword, you need to make sure to type in a ‘+kitchen’ in the box.
Google will give you all other variations, but it will require the search query to have the word ‘kitchen’ in it now before it will trigger the ad.
If you type in a plus sign with the wrong keyword after it here, your ad will never show unless that specific word is used in the search query.
So if you are doing ‘kitchen countertops,’ but also want to show up for ‘bathroom countertops,’ you must also add in a ‘+bathroom’ to get the word ‘bathroom’ to trigger your ad.
This is one of the ways Google lets you focus in on the exact type of person who is out there searching for what you have to offer.
To be really specific here, it is important for you to know what the ‘+’ sign actually means. This is a parameter that is called a modified broad match. It will still allow Google to show your ads for similar terms, but ‘kitchen’ will now be required to be one of the words in the search phrase. Without including the ‘+’ sign, it is possible that Google may show the ads for searches like…
- Home remodel
- Bathroom renovation
- Makeover
- Graphic design (this may seem strange, but I have seen things like this happen)
The trick here is to give Google some good parameters, but also to limit it so that you are attracting the best potential leads in the most focused manner possible… while still allowing the powerful machine learning capabilities of Google to work for you.
So if you only want to work on a certain thing, or do a certain thing, make sure to use that ‘+’ sign for the modified keyword match, so that you can really focus down your results and save yourself from paying for irrelevant leads.
Tip #2: Phrase Match
This is another really advanced tip that is important to understand when inputting keywords into Google.
If you add your keywords in “quotations” then your ad will only show up if a user does a search that includes your keywords in the exact order you entered them.
This is called Phrase Match.
So, let’s say that you enter a keyword like this…
“Kitchen Remodel”
If a user searches for: kitchen remodel estimate… your ad will show up.
But if the user searches for: estimate to remodel a kitchen… it will NOT.
This is another way for you to focus Google in on the exact types of customers you are looking for.
You have to be careful with this, but it is incredibly useful for helping you to filter out irrelevant search results.
Tip #3: Exact Match

To use a feature called Exact Match in Google keywords, add [brackets] around your keywords. If you do this, your ads will only appear if a user searches for the exact words that you’re targeting.
For example, let’s say that your target keyword is…
[kitchen renovation]
If someone searches for: kitchen renovation tips… your ad will NOT trigger, because this is not an exact match to what you placed in the brackets.
One thing to understand, however, is that an exact match will still target misspellings, singular forms, plural forms, acronyms, abbreviations, and capitalizations. So you don’t need to enter multiple variations of your exact match terms.
This is probably one of the most efficient ways of narrowing down your audience and/or the impact of your ad using Google’s keyword tools.
The more specific you are in what you are looking for, the more specific Google can be in who they bring to you.
You just have to make sure that you’ve done your research right for this!
Creating The Ad And Getting Started
Alright. Now, it is time to get your ad going!
You just put all of this time into setting it up. It is now time to kick it off and make it live!
It is also just about time to create a split test.
This is super-important, and you will find out why in just a few minutes.
First, let’s get started actually creating the ad.
1: Continuing where you left off, click on the NEW AD button. This will create an ad on the terms you just set up, based on the campaign you just set up, based on the goal you set up before that!

At this point, your ad is pretty much broken down into a number of different sections. It’s got the little display for you on the right hand side, so that you can see exactly what you’re working with and how it works.
2: Fill in the FINAL URL section. The final URL is the landing page the user is going to be taken to when they click on the ad. So just enter your actual URL there.
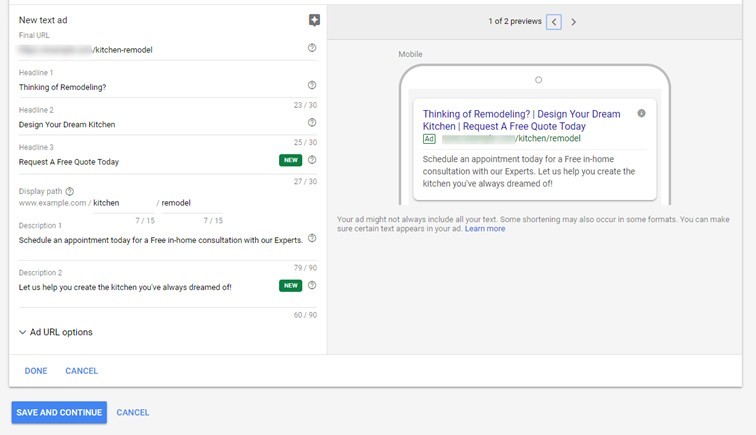
You want to keep the URL pretty short and concise. This helps out a lot to make it really reader-friendly. Remember that your users are able to see these URLs, so you probably don’t want to put the words ‘Aggressive Sales Pitch’ in it or anything like that.
3: Fill in the Headlines. There are 3 that you can include. It is best to craft them in such a way that they can stand alone, because whether or not all 3 will show depends mostly on the device and on where/how the ad is being displayed.
Headline number 2 and headline number 3 may or may not always show. So keep that in mind as you craft these.
4: You may also want to try to use your actual keywords in the DISPLAY PATH, to make your ad look more relevant.
When the actual keyword phrase that got searched on Google appears anywhere on that search results page, including that display path, it’s going to get bolded.
And that is just another little trick to get more user attention on your ad.
5: Fill in the DESCRIPTION. This should be relevant to your keywords. Remember that relevance is everything in the search engine world, the algorithm, and the user experience on the other side.
The user is looking for relevancy. That is super, super important.
If you are trying to sell cat food, and a user looking for cat food sees that your ad is talking about pet food, you are likely going to miss out on that lead because pet food is not as relevant to that customer as cat food, and that is a very, very big difference!
If you can list some benefits, do it. But remember that you are limited by characters here, so you only have so much space to work with.
You need to stay super relevant and concise. This is where copywriting skills can really come in handy.
6: Once you get this done, click the SAVE AND CONTINUE button.
Once you get this part done, your ad will be created, and your campaign will be complete!
At this point, it will go into a review queue, to make sure that everything is correct. They check to make sure that everything looks good, that your page has the proper terms of service, that your page is a Google-friendly landing page, and that you have everything that you need to qualify as an advertiser.
As long as there are no issues, your ad should be up and running within a few hours.
How Long Do You Need To Let Your Ad Run?

You really need to let your campaign run for at least 30 days to gather all the necessary data.
So it is really important that you are financially ready for an actual one-month run before you even start a new Google Ads campaign.
At about $10 a day, it will cost you about $300 to run the most basic test-run on Google Ads. That is a great number to start with because it can get you results and high-quality data.
Once you start figuring out what your cost-per-lead is at that rate, you can tweak and adjust and go from there.
Step 6: Start Split Testing
Once you get your ad set-up and your campaign completed, the only thing left to do is to set up a split test.
Now, if you’re running a $10 a day ad campaign, then running two ads is a really good number for that budget.
If you’re running a higher budget per-day than that, you’ll definitely be able to run more traffic to these split-tests.
The main concern here is data.
You want to run split tests so that you can get quality data, to see which version of your ad does better.
But you don’t want to run so many split tests that you don’t get enough good data.
It is important for you to remember that statistical significance is important.
So, to get started with a split test, return to the screen that shows the campaign you just set up. This should be found in the Google Ads dashboard, after clicking on CAMPAIGNS in the left-hand-side menu.
1: Click CAMPAIGN.
2: Click on the AD GROUP you just created.
3: Click ADS AND EXTENSIONS.
4: Click the little blue floating ‘+’ bubble hovering around the screen. That will bring you in to set up a new Ad.
5: The main idea here is to run two ads until you can gauge how many impressions you’re going to receive. You don’t want to spread your data too thin, but you also want to find out which version of your ad is doing better.
So set up your second ad with a slightly different headline, description, keywords, etc. Just make small changes so that you can see which one actually works better.
A really good number to reach on impressions is 1,000 clicks on each of the ad sets within a relatively short period of time… within 7 days or so.
What will this cost? At this point, you are not completely sure. Every campaign is a little different. It may take different amounts of time for each campaign to get those impressions as well.
You Can Always Come Back And Change Things If You Need To
Keep in mind that at any point in the future, you can ALWAYS come back and add things to your campaign. You can always change your budget, add more split tests, etc.
If you end up getting 3,000 clicks within two days on both ads, you are very prime to run a few more split tests. If you find that you’ve only got 200 clicks over the course of the week, just be patient and wait.
If you are running four ads and get only 200 clicks in a week, then you may want to dial it back to 2.
Persistence Is The Key

There is no question about it. Setting up a Google Ad can be a LOT of work, and it can be A LOT to keep track of!
So just take it one step at a time. Get it all set up. Don’t give up when it gets frustrating. Just read through this tutorial, and if you get stuck at some point, leave a comment and I will get back to you with an answer.
I check the comments regularly, and am always happy to help.
But once you decide that this is the right step for you, the most important thing, really, is to just keep going, get that ad put together, and get it going live.
Persistence is the key to success!
Conclusion
And that, my friends, is everything you need to know to get up and running in Google Ads efficiently, with as little startup capital as possible.
Now, keep in mind that there is a LOT more to this that you can delve into. Keep in mind that you can adjust these in a lot of different ways, and that as you get better at setting up and running your own Google Ads, you will just start to level up that skill and get better and better results.
With that being said, if you have any questions or would like to go any deeper into any of the steps, please just let me know in the comments.
There is virtually no limit to how deep you can go on this topic. If you have any advice for other newbies, please leave a comment and let them know as well.
Are there any other tools and resources you use that I haven’t mentioned? If so, let me know so that I can take a look!
Thanks for reading. I hope this tutorial helps. I will see you on the next one!