For several years now I’ve had Dave Wooding from IntegratePro.com helping me increase revenue and simplify my business through marketing automation.
The first steps were to get my business running on Active Campaign based on his suggestion due to their powerful automation engine.
Since those days my revenue has more than quadrupled and the number of new customers we are bringing in every month has skyrocketed.
Since Dave handled the migration for me I am not in a position to teach you how to get started using Active Campaign on my own…
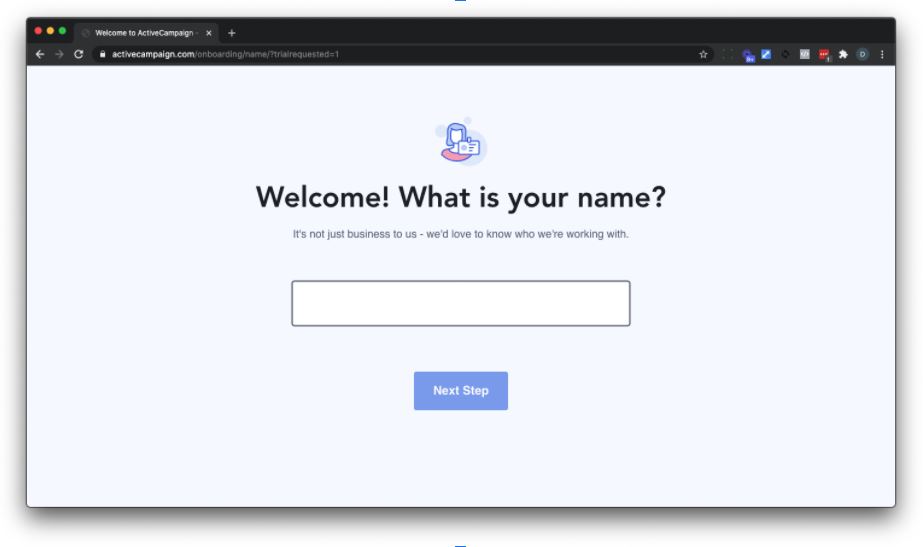
So, I asked Dave to create a step-by-step guide that will show you how to get going on ActiveCampaign…
He agreed and the tutorial is below.
Dave, the microphone is yours!
…Thanks Miles!
While I don’t know everything there is to know, I have used a lot of ActiveCampaign’s capability and know a lot of the pros and cons. Yes, there are cons.
To start with, ActiveCampaign is certainly not the only email marketing system out there and not necessarily the best for everyone.
In my opinion, AC does a great job with email marketing automation. It has the most (best) capabilities of all the modern email marketing systems for the price.
Email marketing automation is a way for you to send timely, relevant, personalized email campaigns to individual contacts when they take a specific action, like signing up for your email list or making a purchase from your online store. (source)
If you don’t need or want marketing automation capabilities, then systems like MailChimp, AWeber or ConverKit are likely better as they tend to be easier to use.
Or if you want to have more of an all-in-one solution with payment processing capability, landing pages, etc. then more expensive systems like Ontraport or Keap (previously Infusionsoft) might be a better option for you.
Yes, I am aware that AC offers landing page capabilities … however, they are not best in class when it comes to that. You are better off using a stand alone service like LeadPages or something built into WordPress like Thrive Leads.
With that said, for the purposes of this conversation let's talk about getting started with ActiveCampaign.
I am going to assume that you are just getting started with email marketing.
If you are considering moving to ActiveCampaign from another service, I have good news. ActiveCampaign will move everything over for free.
When they first offered this, it was awesome – they would do EVERYTHING. I think they got smart and realized that it is a lot of work. They will import all your contacts, tags and custom fields. Now, depending on the plan you sign up for, they might only recreate 1 automation, 1 opt-in form, 1 email email template. Still, much better than doing nothing.
Sign Up For The Free Trial
Visit the home page and provide your email address. Best to provide an email address associated with your domain and not a free email address (gmail, yahoo, etc).
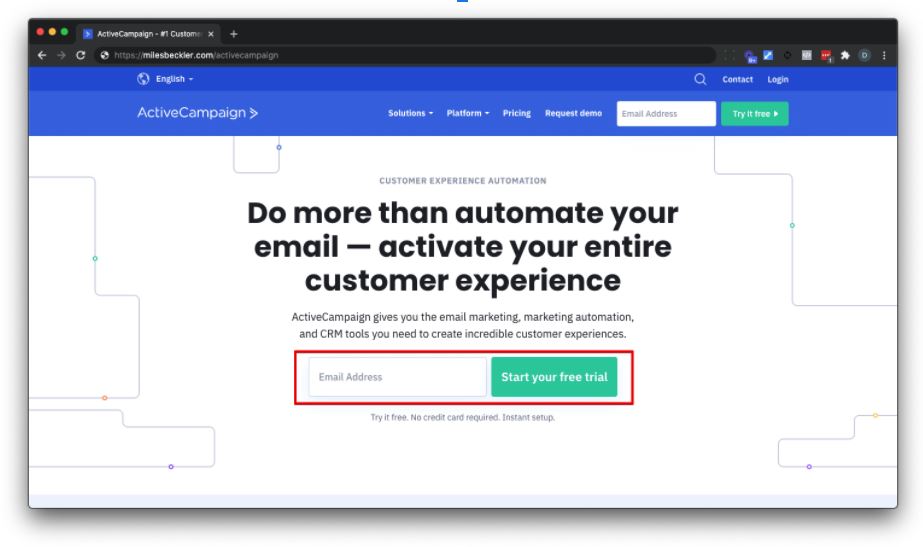
ActiveCampaign will want to find out information about you … just give it up.
As of this writing, once you have gone through the signup process, AC has a checklist of 8 items to complete.
They are kind enough to create a list for you automatically.
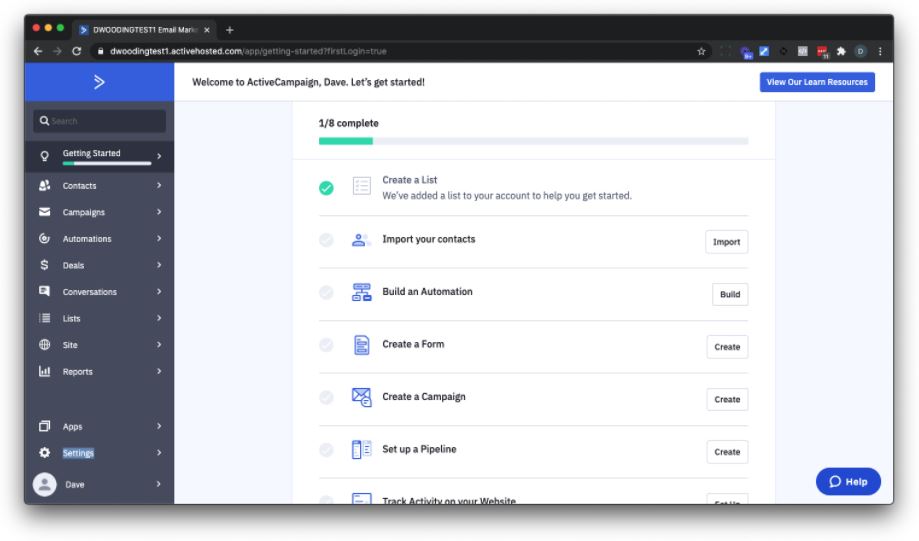
I do NOT recommend going through the 8 items first.
Instead …
IMPORTANT: Set Up The Right Account Name
Start with making sure your account name is what you want it to be. Something associated with your business.
By default, your account name will be your email address. In my case, I typed [email protected] and ActiveCampaign gave me the account name “dwoodingtest1”.
Uggh.
Either submit a ticket or send an email to help@activecampaign letting them know that you want to change your account name.
They will want you to understand that things might break, the sky is falling, the end of the universe is upon us … don’t worry, since we haven’t really done anything yet, nothing can break. Even before they change the account name, you can continue to move forward.
Your Profile & Basic Settings
Inside your ActiveCampaign, bottom left just above your name and where an image of you could be is a gear icon and likely the word Settings. Click on Settings.
If anything pops up, just skip it.
You will be on the Account Settings page.
Make any changes to your first name, last name, email. Again, I recommend using an email associated with your domain.
Scroll down to the bottom of the page and make sure the Time Zone is set appropriately. This is important because I am going to suggest that every email sent out in an automation is relative to your time zone. While ActiveCampaign gives you the ability to send relative to the contact’s time zone, I find this can often be inaccurate. The reason is our good friends at Google will often open your emails on behalf of your contacts. They snoop around, see what you are sending them. The way you will know this is if a contact’s location shows as Mountain View, California or some other location that Google is located at (Virginia comes to mind).
Also recommend you set a password and click Save Settings.
At this point, you might think you are half way there. Not really. We still have more setup to do.
We are just going to work our way through the settings section.
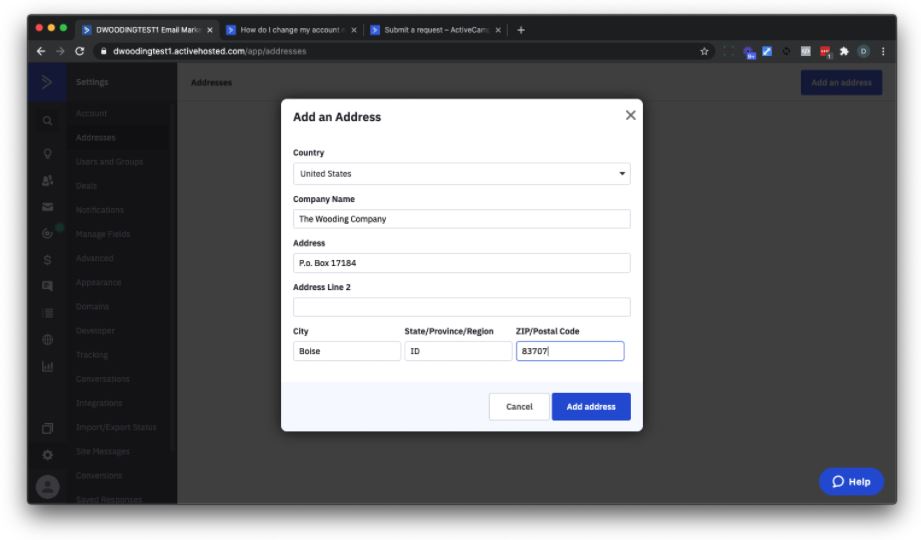
Your Physical Address
Click the Addresses link and Add an address.
You have to do it. ActiveCampaign – and I am fairly certain – and all other email service providers will require that your address shows up in the emails that you send out. I have used a P.O. Box address for this. Provide what is appropriate for you.
Don’t click this.
You clicked it 🙁
Just leave ‘as is’. In particular we are going to let ActiveCampaign manage your deliverability and authentication.
Tracking
Click on Tracking.
Enable Site Tracking.
Add Website Url and provide your domain, ex – https://example.com, click Add. Leave the ‘Include all website pages’ checked.
You can add multiple domains, ex – if you have a shopping cart with SamCart or Thrivecart, add those urls.
![]()
Eventually, we will come back and get the tracking code and add that to your website(s).
This tracking code is what provides some of the “magic” that AC has. For instance, someone on your email list visits your checkout page but doesn’t purchase. We can automatically follow up based on their behavior – or in this case their lack of behavior (they didn’t purchase). All because of the tracking code that you will add.
Security
Consider implementing Multi-Factor Authentication.
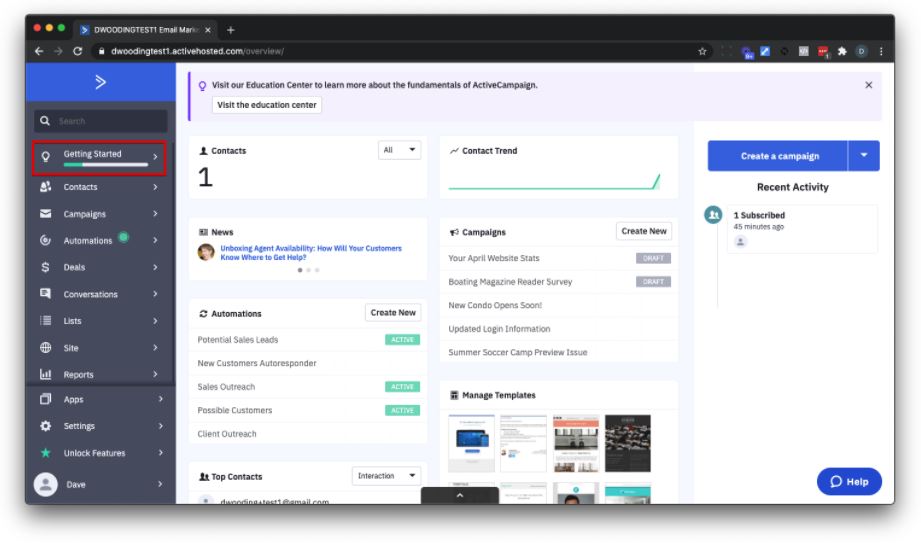
Getting Started
Now we can get started.
Click the blue boomerang AC icon in the upper left corner to get back home.
Now click the “Getting Start” link at the top.
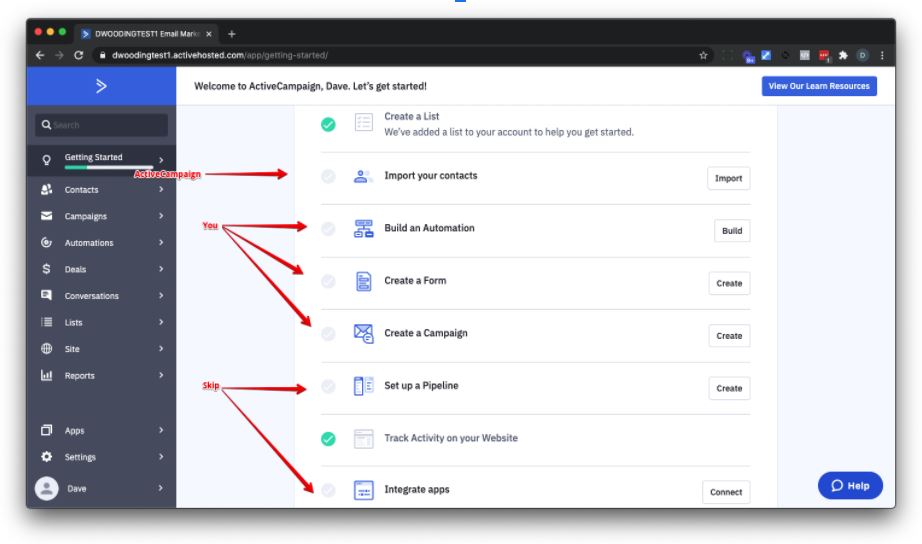
We are not going to do all of the steps.
Let ActiveCampaign Import your contacts if you are coming from a different email system.
We are going to skip Set up a Pipeline and Integrate apps.
We will Create a Form, and Build an Automation, Create a Campaign.
What is not listed that we will do is create Tags.
We have already ‘sort of’ setup Track Activity on your Website.
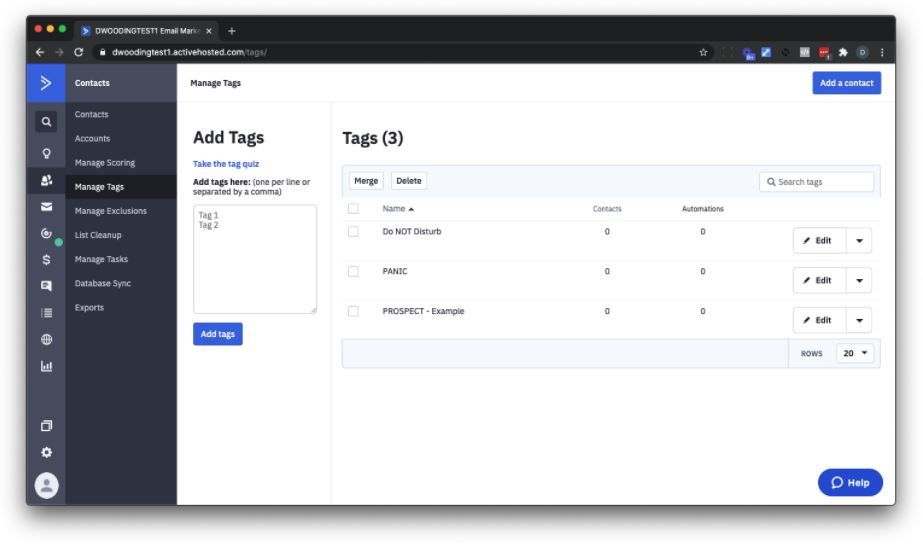
Add Tags On Active Campaign
On the left side, click on “Contacts”.
Click on “Manage Tags” also on the left side.
If you get a popup, skip it.
I’m going to get all philosophical here … if you want to skip to the bottom of this section I’ll show you the first tag to create.
Let's all pause for a moment and realize we are about to give birth to what can be a monster.
Tags are one of those things that can get unruly if you don’t have a system.
And by a system, I mean a naming convention for your tags (and lists and automations).
Here is my naming convention for tags (and lists and automations).
CATEGORY – Description – More Details – Even More Details
CATEGORY (uppercase): This represents a category, makes it easy to find tags that are similar. Ex – CUSTOMER, PROSPECT, INTEREST
This might seem anal (and it is), after the category is a white space following by a dash, followed by a whitespace. This is to be consistent and make it easy to find stuff. Let's say you have ten thousand tags, how much easier would it be to search through your tags if you were consistent with your naming and formatting? I’ll beat this drum again and again.
Description (title case, i.e. – first letter of each word is capitalized): most broad description of the tag.
More Details (title case, optional): more specific description of the tag.
Even More Details (title case, optional): even more specific description of the tag.
Yes, you could keep going with this, but hopefully you don’t need to go to that level of specificity.
For your first tag that you will use with your first form, create one that follows this format:
PROSPECT – [your domain name]
If your domain name is example.com, then the tag is “PROSPECT – Example”.
Bonus. Create two additional tags: “Do NOT Disturb” and “PANIC”. Yes, I know I am breaking my own rules 😁
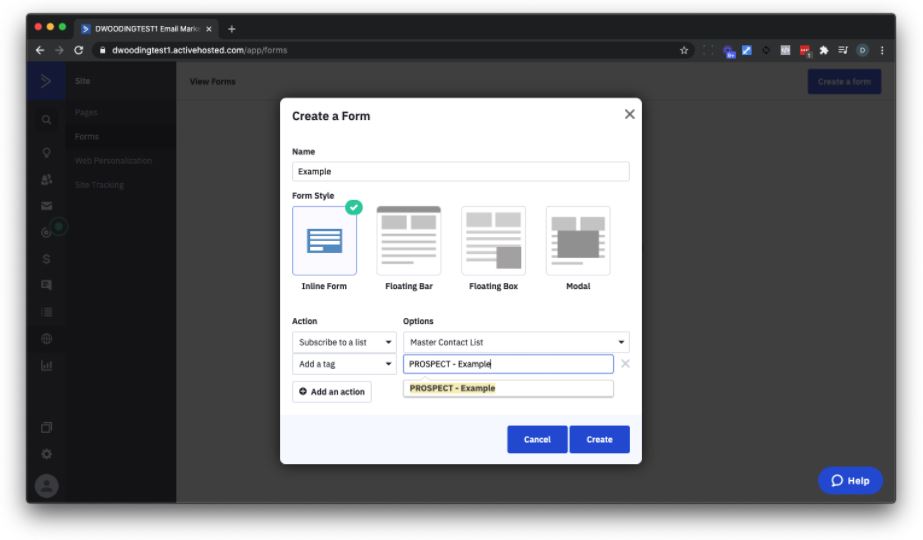
Create a Form To Add Subscribers
Confession time.
ActiveCampaign’s forms are … hmm, ‘not pretty’.
Lets just work with what we have.
On the left side, click on “Site” … it is that little globe looking icon.
Then click on “Forms”.
And finally, click “Create a form”.
Provide a name. I would suggest giving it the name of your domain, ex – https://example.com -> “Example”.
Click on Add an action > Add a tag > start typing PROSPECT … choose “PROSPECT – Example”.
Click Create.
Notice anything?
That’s right … my form is named “Example” and my tag is named “PROSPECT – Example” and this form is going on my https://example.com site.
The beat goes on …
Feel free to edit the headline and subheadline on the form. Click and type.
Far right, click on Options > then click the Gear icon next to where it says “Master Contact List”.
Turn Opt-in Confirmation OFF and Save.
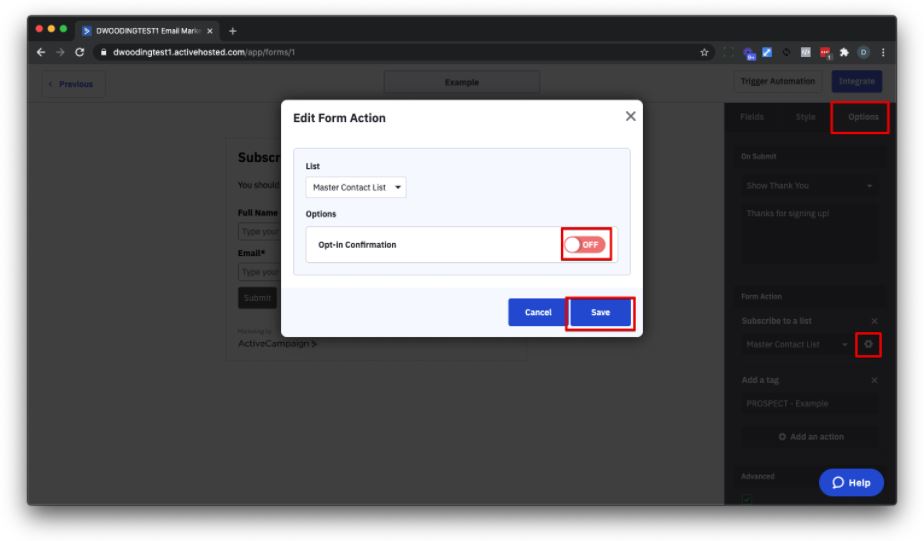
If you were to ask ActiveCampaign support, they would say to leave it on. And for good reason. It helps make sure people who are on your list really want to be on your list.
The downside is that some people won’t take that extra step to confirm their interest.
Plan on being responsible with your email list – if someone isn’t opening and reading and clicking, you will eventually want to remove them from your list. This is more advanced, but an important topic.
Moving along.
Click Integrate in the upper right corner.
Click the Link option and copy the url and save, ex – https://example.activehosted.com/f/1
Click Save and exit.
You will need to take that url and link to it from your website (yes, this won’t be super pretty).
Congrats! High fives all around. You have created a form that can be used for someone to join your mailing list. Next up is to send an email on signup.
ActiveCampaign Automation Template
We are going to use an automation to send the email to your subscriber.
We need to come up with a name for our automation.
Hmmm, I wonder what it could be.
Let’s see my form is named “Example” and my tag is named “PROSPECT – Example” and this form is going on my https://example.com site.
What about calling it PROSPECT – Example.
Great idea.
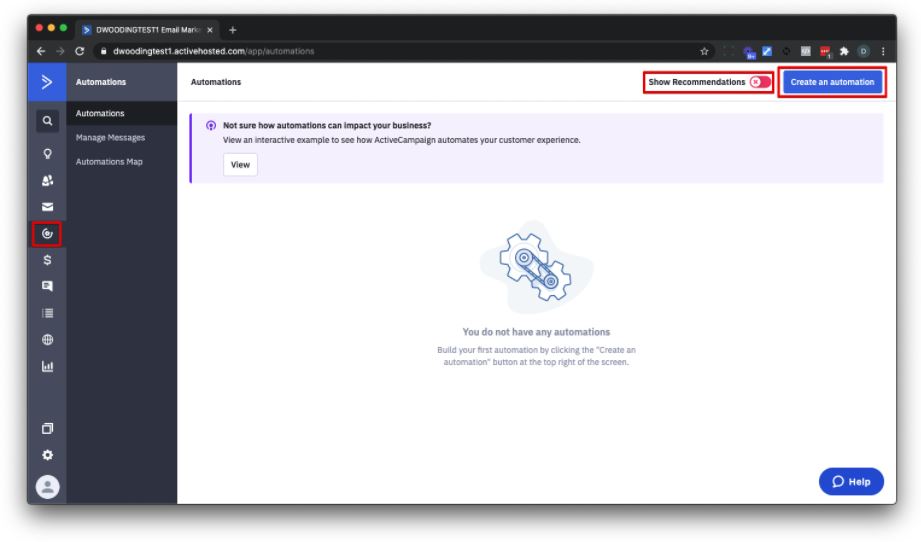
On the left side, in the center of the left side, click the gear icon with a line around it to get to automations (it is the icon underneath the envelope).
Turn off the “Show Recommendations”. Click “Create an automation” in the upper right corner.
Start from Scratch and click Continue.
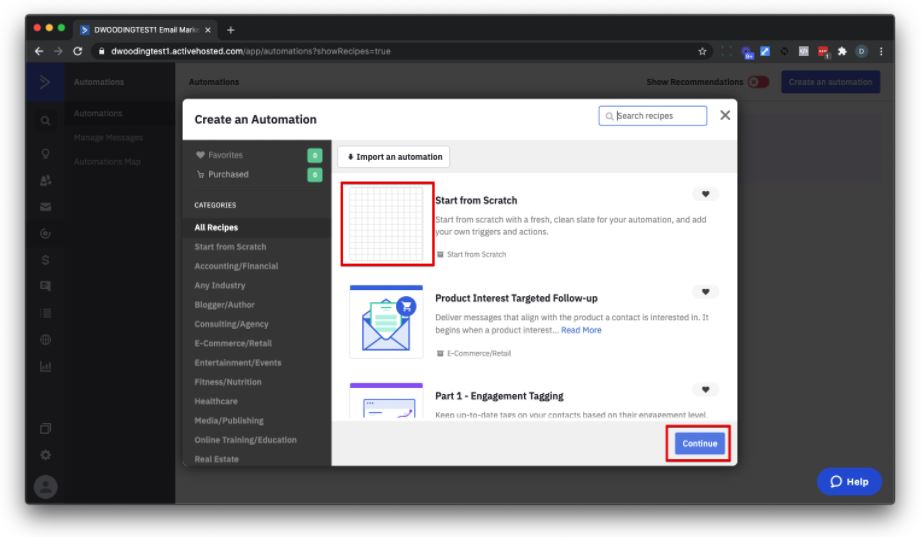
Choose “Tag is added” and click Continue.
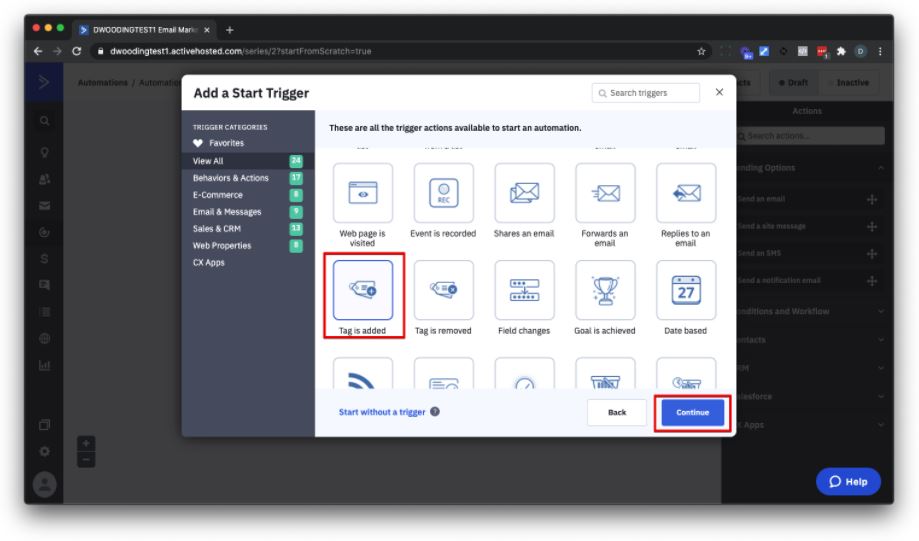
Start typing “PROSPECT” and choose “PROSPECT – Example”. Set Runs to Once. Click Add Start.
Click Send an email.
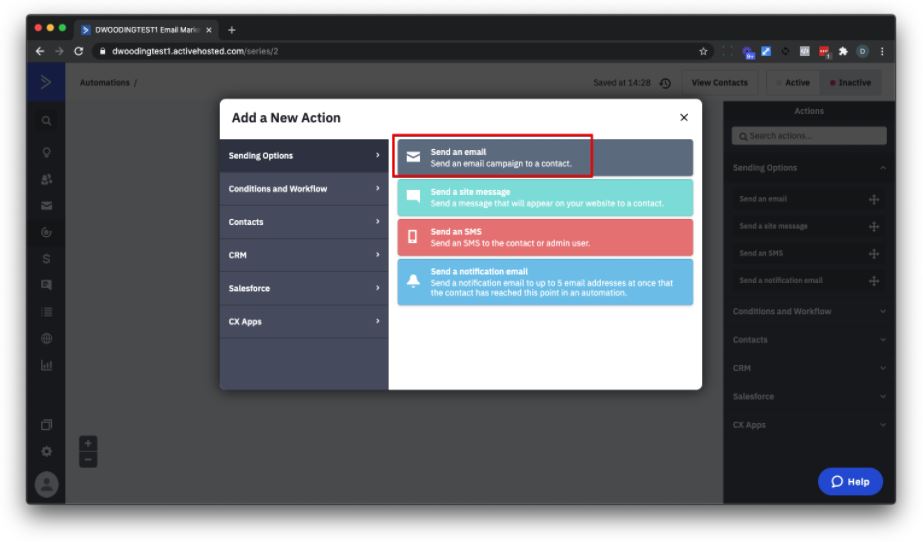
You will be prompted to create an email. Do so.
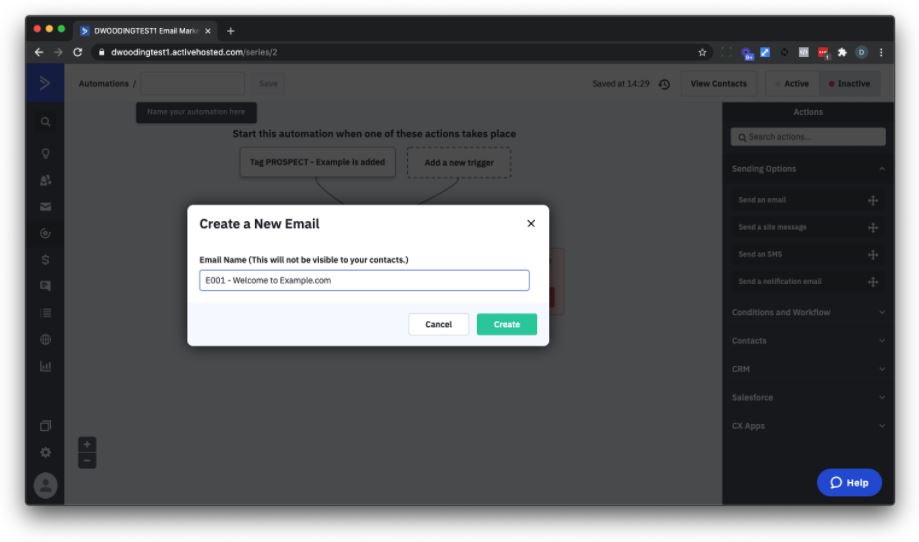
Provide a name.
By now you know that the name is not going to be some random made up unorganized ‘thing’.
The first email in the automation is going to be called “E001 – [subject_goes_here]”. Make appropriate substitutions.
Ex – E001 – Welcome to Example.com
(Please do better than that).
The methodology is tracking the order of the emails and knowing what the subject is without having to come back into the automation.
More honesty, ActiveCampaigns stats are ‘OK’. Having a naming convention like this will help.
Here is where you get to be creative.
Still, I would NOT recommend starting from scratch.
Instead ‘copy / modify’.
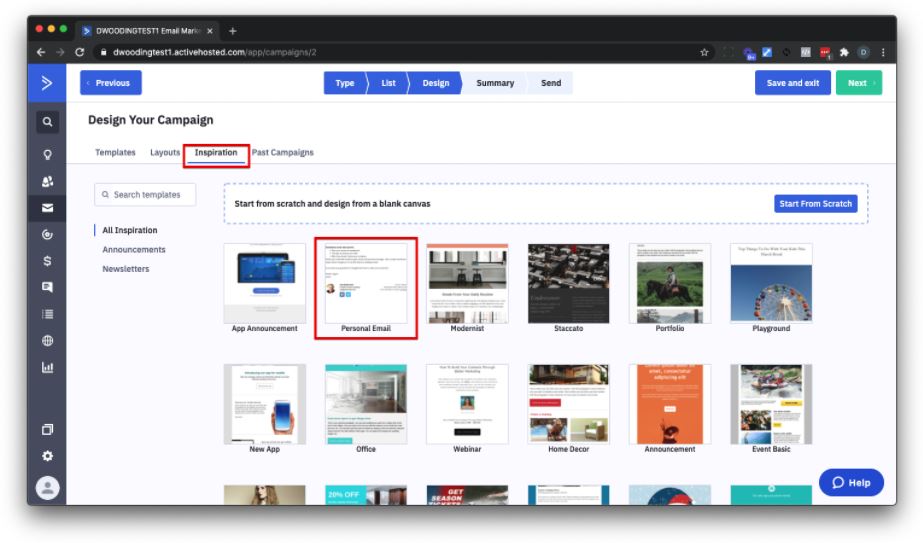
Use one that ActiveCampaign already provides and modify like mad.
I recommend clicking the “Inspiration” tab and using the Personal Email.
You might get a message when you start to create this first email that your domain needs to be verified. This is where you want to be using an email address associated with your domain and not a free email account.
Provide a subject and click Continue.
Customize & Simplify Your Email Template
Here is what the email looks like. I am going to strip away almost all of the fancy stuff, change the font (and increase the font size and line height so those with glasses can read it).
In general to delete or modify something, run your mouseover and click the gear icon on the right side of the block that appears.
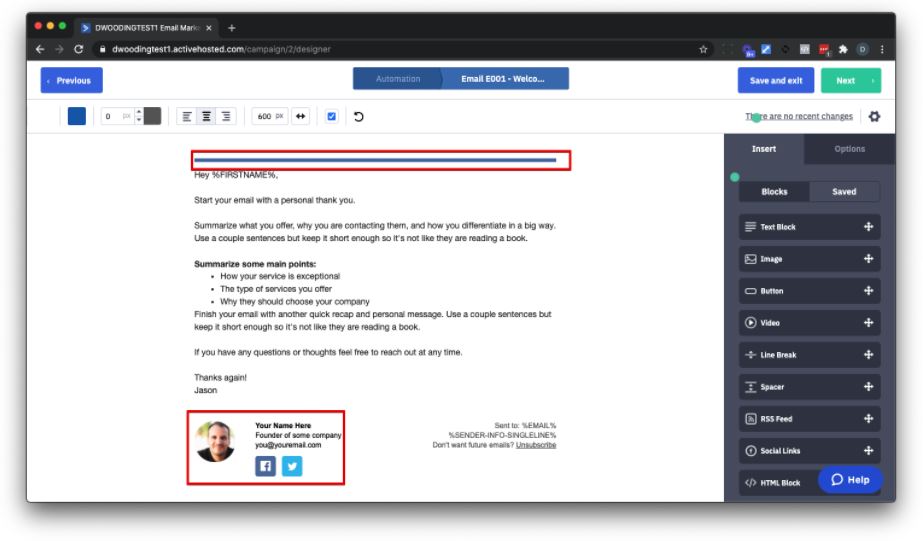
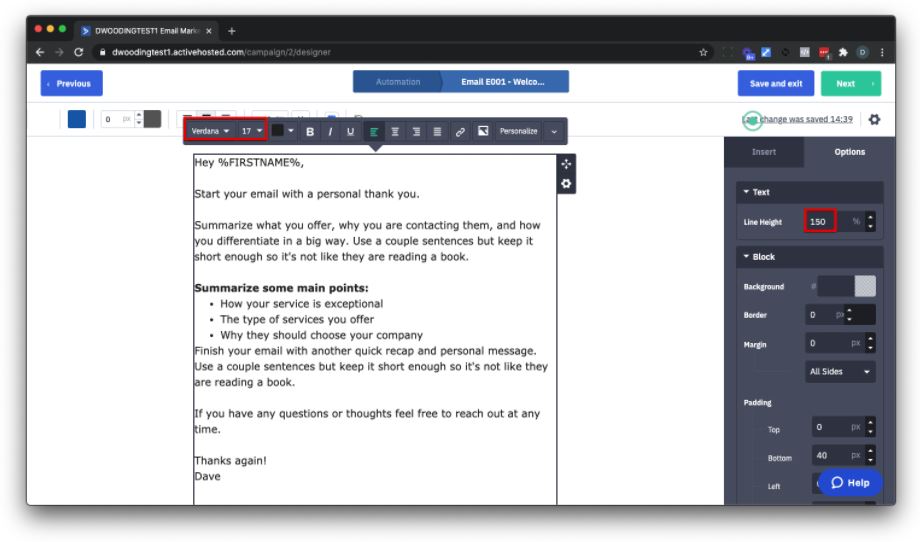
Here is what it looks like now with modifications.
My preference is to use the Verdana font, size 17 with line height of 150%.
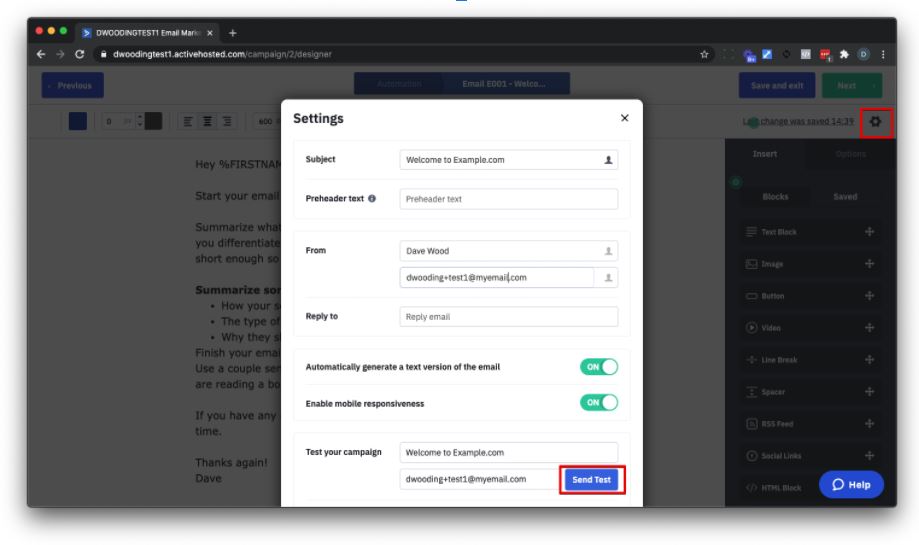
Once you are done, click on the gear icon in the upper right corner.
Click Send Test to yourself.
Then view the email both on the desktop and on mobile.
Do this every time you set up a new email. Period. Full stop.
Click on Next. Click on Save and exit.
Click on Save.
Provide a name for your automation, ex – PROSPECT – Example. Click Save.
Make the automation Active (upper right corner).
Just below the email, click the plus sign. Click Conditions and Workflow. Click “End this automation”.
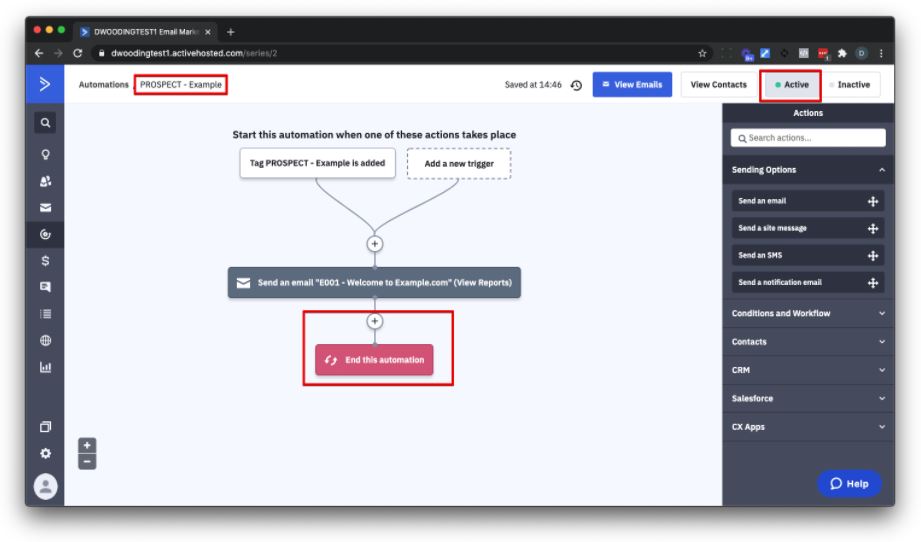
Another high five. Your first automation is ready to go.
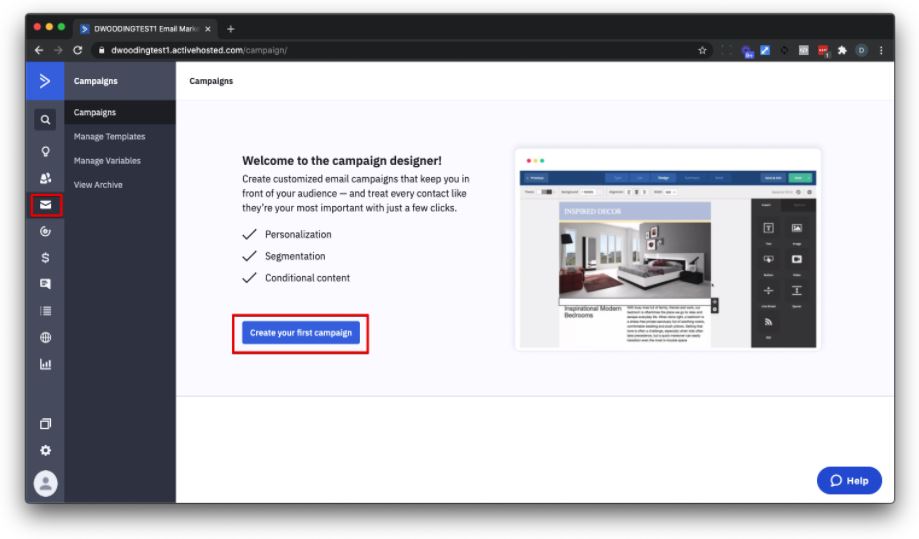
Sending A Broadcast Email Campaign With Active Campaign
If you want to send a broadcast email to your list of people, then you want to use the Campaign capability that ActiveCampaign provides.
Click the envelope icon on the left side.
Click Create your first campaign.
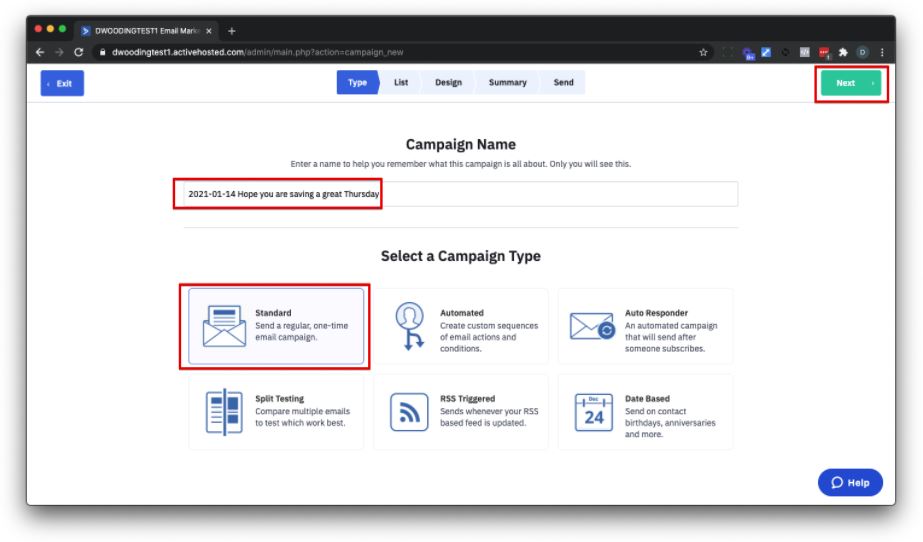
You are going to send a Standard campaign.
And now you need to come up with a campaign name.
Let's take a few deep breaths and do a few stretches.
Again, you want to have a system for naming your campaigns so you can easily know when you sent it and what it is about.
It should come as no surprise that I recommend the following naming convention:
YYYY-MM-DD Subject
Ex – 2021-01-14 Hope you are having a great Thursday
It is year (4 digits) dash month (2 digits, not 1 or 2 digits, always 2) dash day (2 digits, see month) subject in whatever case you are using.
It is not month day year … always year month day.
I’ll stop now.
Click Next.
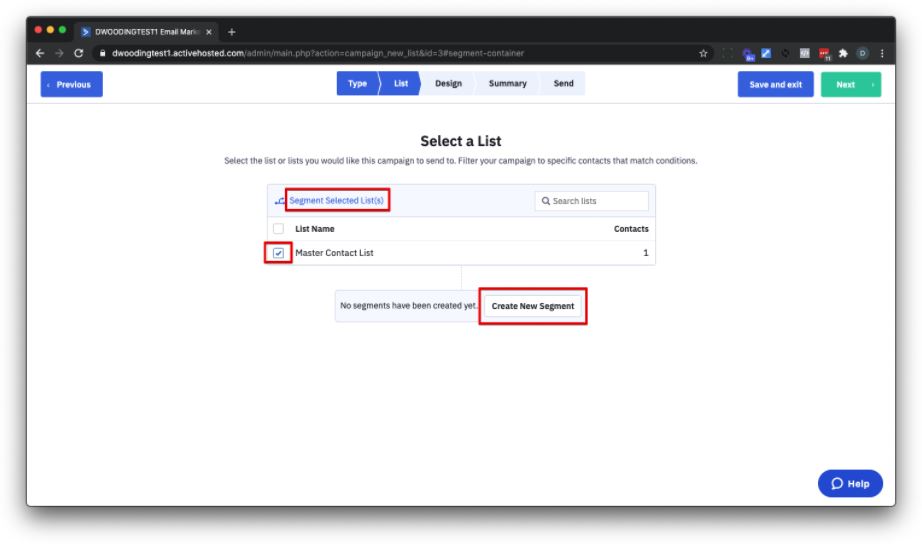
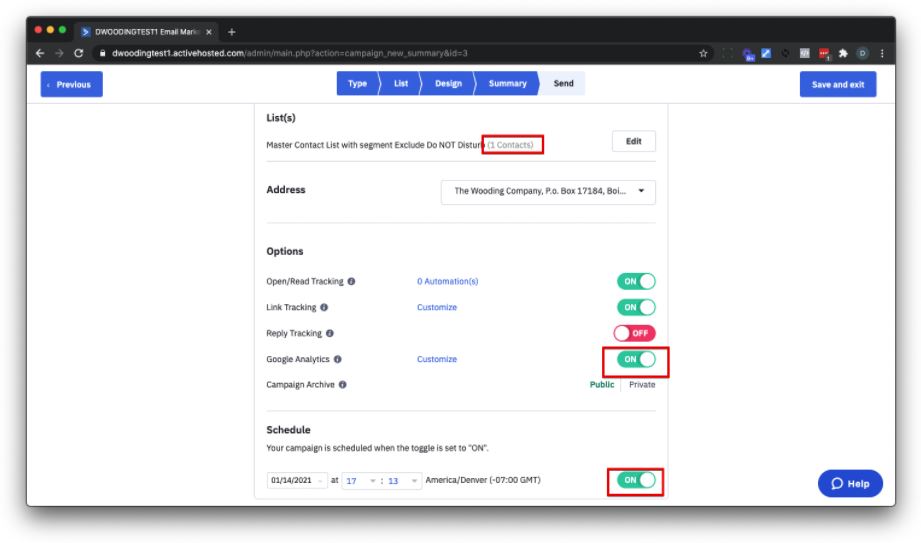
For the list, choose the Master contact List.
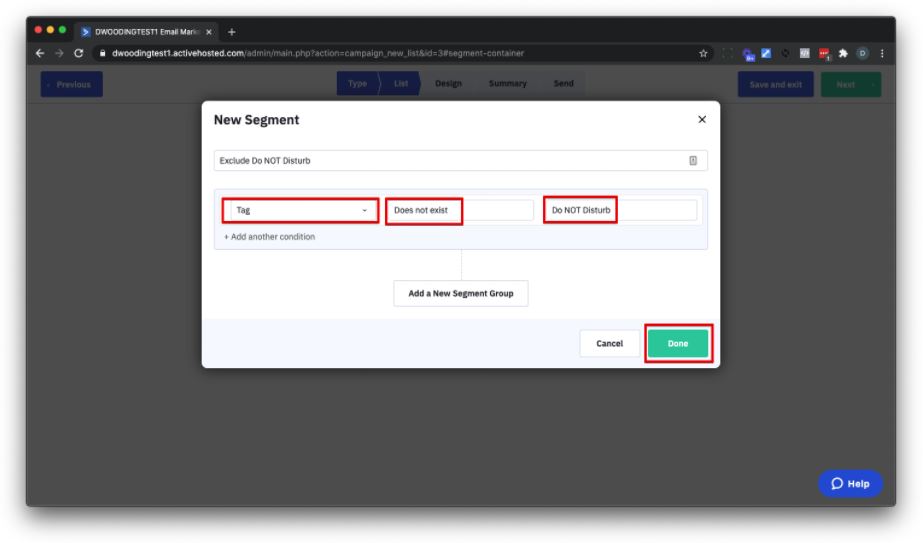
Also, click the Segment Selected List(s). Click Create New Segment.
Change the name of the segment to Exclude Do NOT Disturb.
Click Add your First Condition.
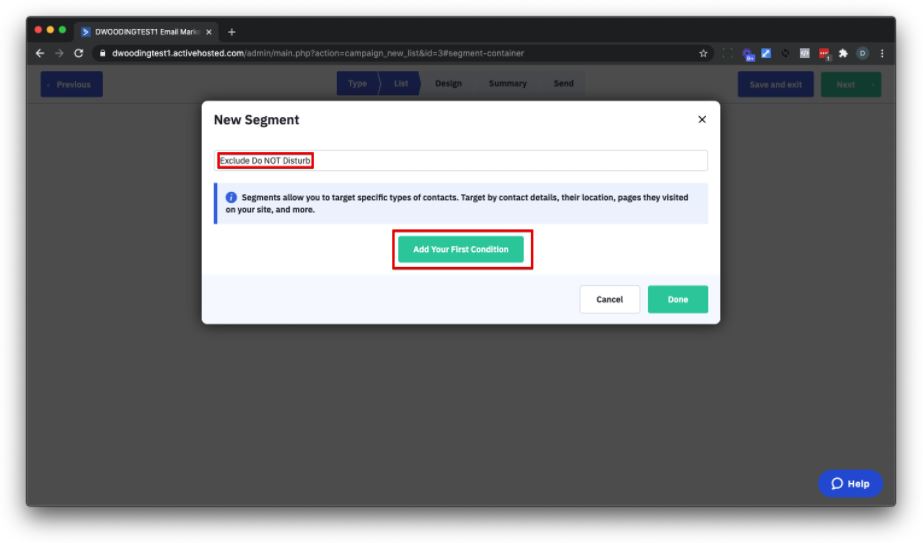
For Select a condition, choose Contact Details > Tag.
Change Exists to Does not exist and make sure the tag is Do NOT Disturb.
Click Done.
Click Next.
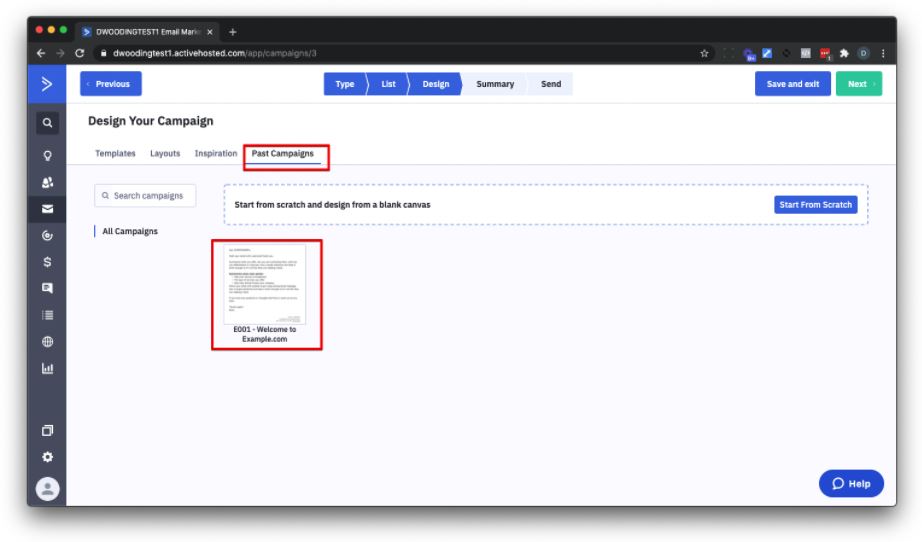
Click Past Campaigns and Select the email you have already created for the automation.
In general, keep reusing previous emails and with the appropriate modifications.
Provide a subject, ex – “Hope you are saving a great Thursday” and click Continue.
Make appropriate changes to the content.
When done, click the little gear icon in the upper right hand corner.
Click Send Test to yourself.
Then view the email both on the desktop and on mobile.
Do this every time you set up a new email. Period. Full stop.
And the beat goes on …
Click Next.
On the final page, if you have a link in your email, I would recommend that Link Tracking is on and Google Analytics is on (accept the default recommendation that ActiveCampaign makes).
From here you can send it immediately or schedule when to send. If you want to schedule be sure to slide the chooser to ON in addition to setting the date and time.
You will also be able to see how many people the campaign is going to.
Click Save and exit (or send).
… and there you go.
Your Active Campaign account is all set up now.
From here, you may want to add more follow up emails to your autoresponder automation to make sure it delivers the value and your offers to your new subscribers, for you.
Then from there, it’s all about growing your audience and building your list.
Active Campaign’s marketing automations will nurture those leads for you.
Miles… It’s back to you.
Thanks Dave!
At this point your account is all set up and you are ready to start leveraging the power of their automations and broadcast emails.
It’s my belief that your email marketing strategy should include a brief follow-up automation and then build you a “broadcast segment” that you send additional emails to, manually.
Technically speaking you will need a landing page that connects the active campaign (I prefer either LeadPages or Thrive Themes), in automation, a tag and a new segment.
If this feels confusing, don’t worry…
I had Dave create a short video that shows how to set this all up, which you can watch here:
Be sure to give that video a like and click through to Dave’s YouTube channel here and click subscribe is your way of saying thank you to Dave for creating this awesome content that will get you started on Active Campaign like a pro.