This post was most recently updated: October 4th 2022
After spending 237 hours testing every free email marketing tool available, there is a clear winner for your email marketing.
They offer…
- Free landing pages
- Free automations
- Free autoresponder
- Free 24/7 support
- up to 500 subscribers free!
Here's the reality with email marketing today:
You need an autoresponder that will help you to start making money BEFORE you have to start paying!
Here's exactly what you're about to learn:
- What is the best free email marketing system?
- How to build an email autoresponder for free
- How to send a broadcast for free
- How to build a landing page for free
WARNING: This is NOT another annoying ‘review‘ or ‘comparison‘ post that regurgitates basic info you could find on their homepage…
You are going to get walked step-by-step through the process that will show you how to set this all up… It's 100% complete with screenshots.
This post is designed so you can follow along with the steps and at the end have a fully functional email marketing system and autoresponder all setup.
Ready to get started?
Great!
Let’s dive in.
What’s The Best Free Email Marketing System?
Okay…
With free email marketing tools, there are quite a few options out there…
There’s…
ConvertKit… MailerLite… Sendinblue…
Others offer free trials like Active Campaign, Get Response and Constant Contact…
And there are hundreds more…
But there's only one free option that offers all of the features AND 24/7 support you need: Aweber.
What Makes Aweber’s Free Level So Good?
Here’s the thing…
Unlike many other free email marketing tools, Aweber gives you access to their entire suite of tools without having to spend a dime…
The other competitors in the ‘free email markeitng' world DO NOT offer a fully functional account…
Like Convert Kit for example… You cannot create an autoresponder (automated follow up sequence) on their free level…
And if you get confused and need support?
Too bad! You're on your own! No support on their free level.
Speaking from experience…
You NEED the ability to create autoresponders and you NEED the ability to get your questions answered 24/7!
And you can get all of it for free!
Here’s what you get with a free Aweber account:
- Up to 500 subscribers
- A FULL landing page builder
- 3,000 emails per month
- All email design tools (including smart designer)
- Campaign automations
- Autoresponders
- Sign up forms
- Integrations
They do not limit you whatsoever!…
To recap why Aweber is the best:
Not only can you create autoresponders, create automations, and send broadcasts to your entire list of 500 subs…
But you can also build beautiful landing pages, pop-ups, and more!
Plus, even on the free level, you get access to Aweber’s 24×7 support that is beyond EXCELLENT.
Get stuck trying to setup a campaign, a tag or automation? Send them a message 24 hrs a day and they’ll get you unstuck fast.
You see, not all new marketing have the luxury of ‘working’ on their websites and email lists during the 9-5 hours.
Many marketing are working their day-jobs and spend those 10pm -2am hours growing the side business.
What if you get ‘stuck at 1:15 am? Are you supposed to wait 24 hours to hear back?
Not with Aweber! They are there for you… Even at 1:15am on a Friday.
And this separates Aweber from any other email marketing tool paid or free…
To be perfectly honest…
This is the package I wish was available when I got started building my first business online…
But this begs the question…
Are you ready to get started? Here’s how…
When building your email list, you need two pieces of technology…
And they MUST work together seamlessly.
… A landing page to convert traffic into leads and…
… An email marketing system (often called an autoresponder) to collect the leads so you can email them.
Thankfully, Aweber allows you to do both.
So let’s start by opening up your free Aweber account…
Step 1: Open Up Your Free Aweber Account
The first thing you need to do is go to MilesBeckler.com/Aweber…
The page will look like this:
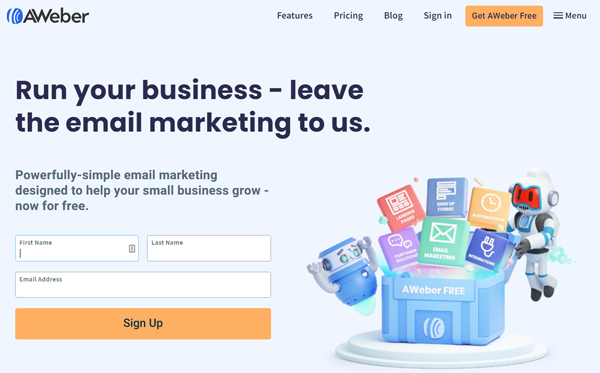
Your name and email will be pre-filled for you, so all you have to do here is click ‘Sign Up’.
Once done, Aweber will then ask you to check your inbox in order to verify your email and complete your account creation.
The email will look like this:
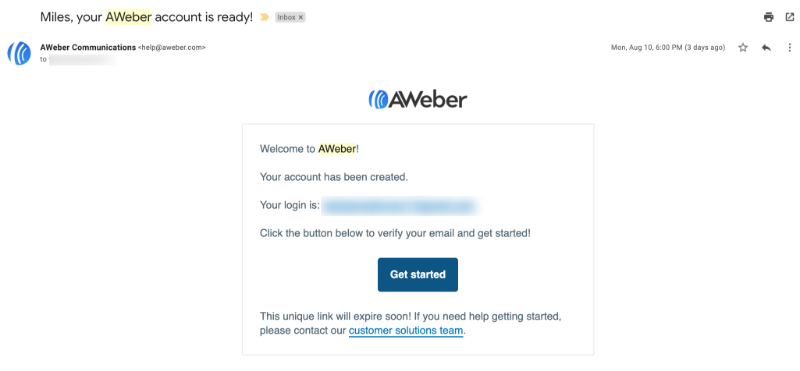
Once you have received this email, open it, and click ‘Get Started’ and that will take you to a page to create your account password.
The page will look like this:

Just enter your account email and enter a password of your choice.
Then click ‘save password’…
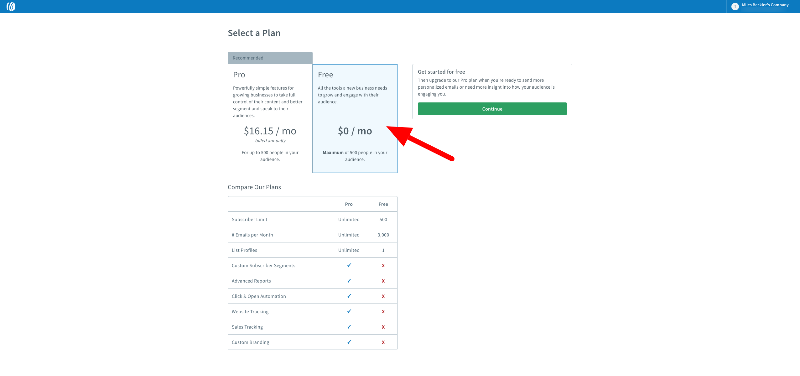
Doing this will bring you to the ‘Select a Plan’ page…
This is the page where you can create a free account, or upgrade to the pro plan.
This will page will also explain in more detail exactly what you are getting, in terms of features, with the free account.
The page will look like this:
Now…
By default, this page will be pre-selected with their recommended ‘Pro’ account at $16.15/month…
So you want to click on the ‘Free’ option as shown in the picture above.
Then click the ‘continue’ button…
Once done, your Aweber account will have been successfully created…
But before we start creating landing pages and build our email lists…
We need to finish a few important details…
Step 2: Setting Up Your NEW Aweber Account
When you first arrive into your Aweber back office, after creating your account, this page will greet you:
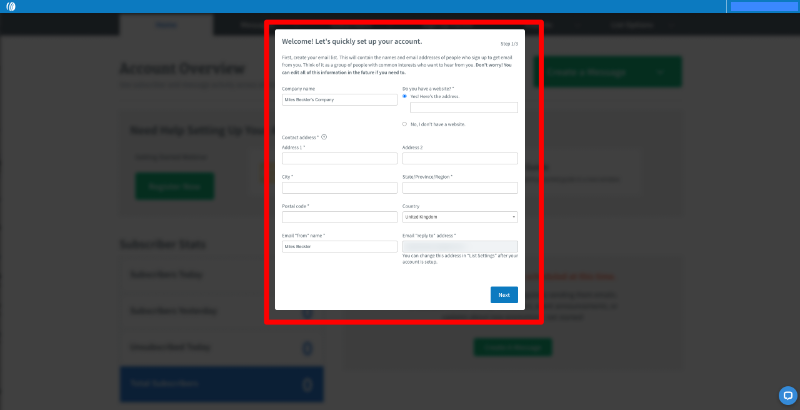
This will step 1 of 3 steps to creating your first list.
It’s very simple…
On this page, you need to enter some information that is important when complying with SPAM laws…
- Company name
- Do you have a website?
- Your contact address
- Your email “from” name
- Your “reply to” email address
When you have completed that and clicked ‘next’, Aweber will ask you what you’d like your list named as, and a brief description of what your list is about.
The page will look like this:
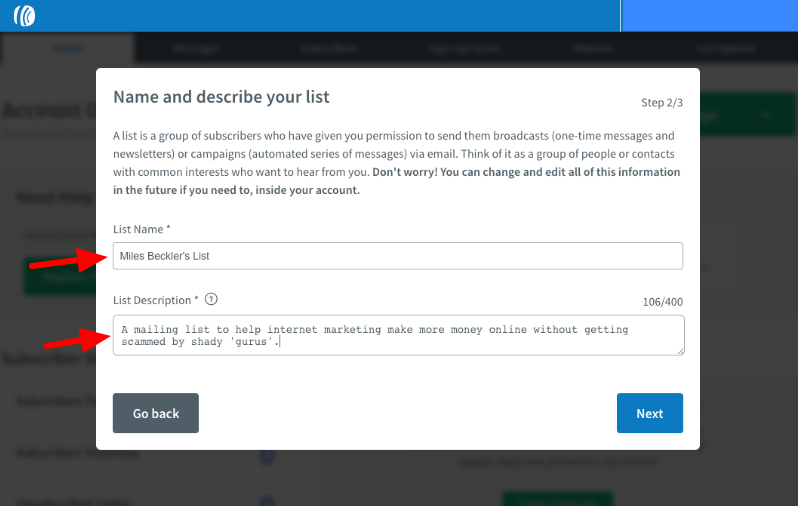
Give your new email list a name… Something simple will do, as shown above.
Also, enter your list description… This should give the subscriber an insight into what they have subscribed for, and why they should stay.
When done, hit ‘next’.
Once done, you’re taken to the last step in the process…
Creating your confirmation message.
The page will look like this:
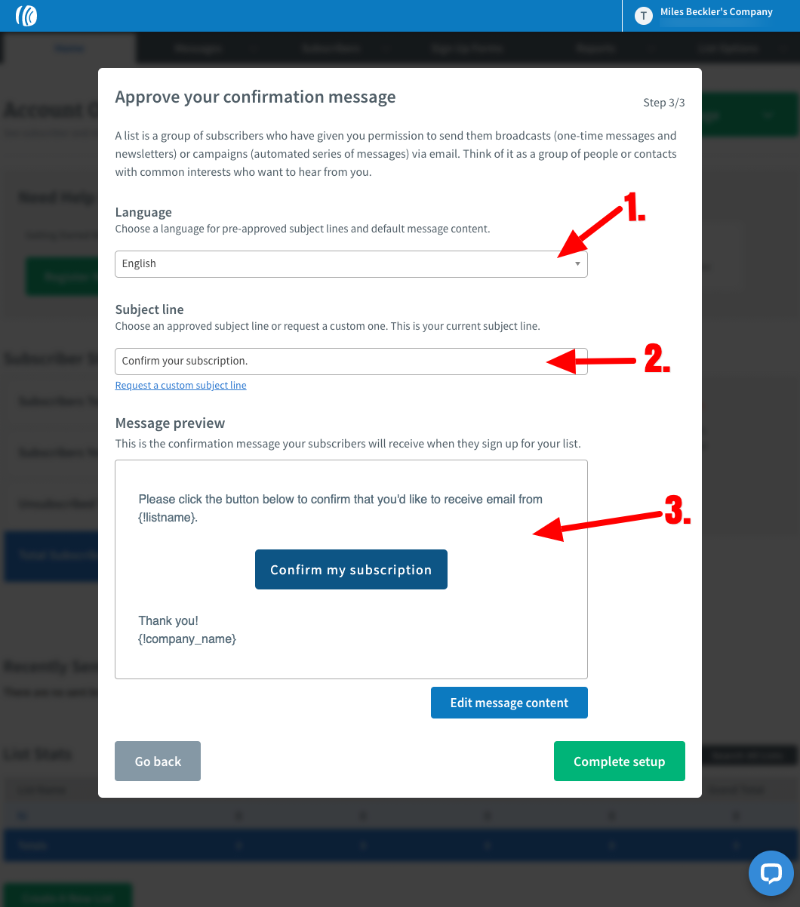
The first thing we need to address is ‘choosing our language’…
For this example, we will stay with English.
Next…
We need to select our subject line
You can easily stick with the default, ‘Confirm your subscription’… But you can also click ‘request a custom subject line’ and submit your own subject for Aweber to review.
But for this example, we’ll stick with the default subject line.
But be sure to play around to write and find one you like better.
Finally…
We need to edit our confirmation email.
To do this, hover over the message preview box and click to edit…
As shown below:
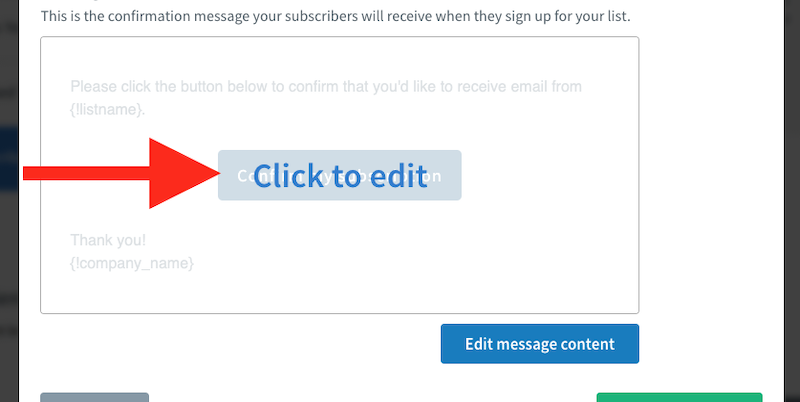
When you’ve done that, the page will change and look like this:
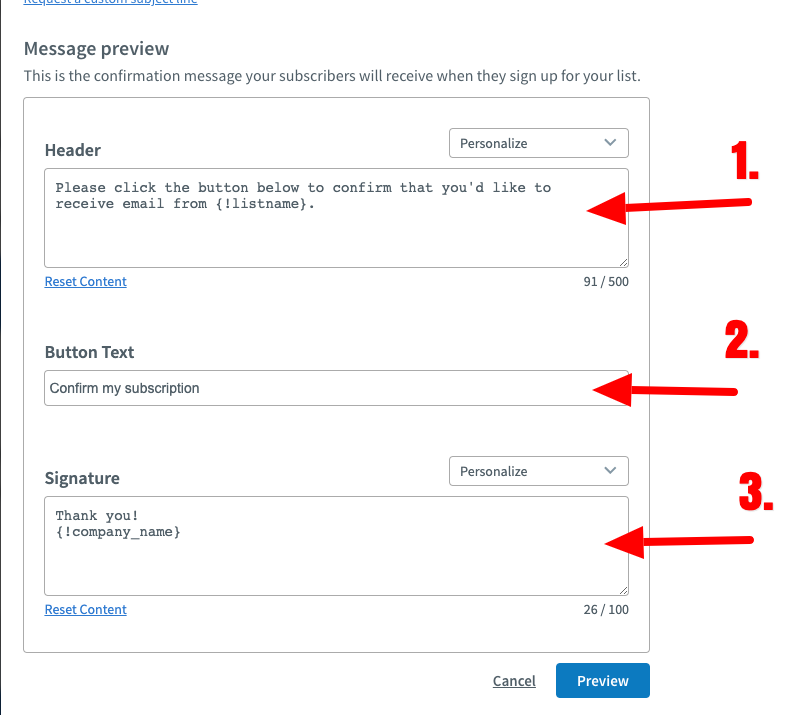
As you can see from the image above…
There are 3 things you must edit.
- The email body copy (shown as ‘header’)
- The button text
- The signature
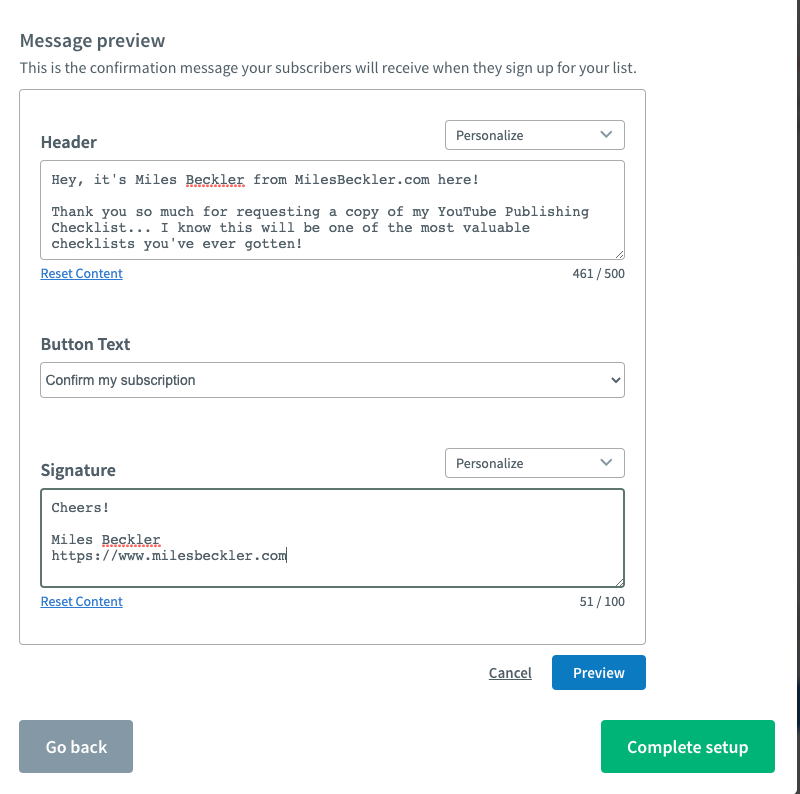
For the email body, we want to keep it simple, and to-the-point.
Like this:
“Hey, it’s [your name] from [your website] here!
Thank you so much for requesting a copy of [your free thing]… I know this will be one of the most valuable [book/pdf/mp3/video/webinar] you ever learned from.
But before I can send you this, I need you to do one ‘tiny’ thing… Confirm your email address with me.
This allows me to make sure the goblins up at SPAM castle are happy!
Your [free thing] will arrive in your inbox instantly as soon as you’ve done it.”
For this example, we will keep the button text exactly the same.
Finally, we need to edit the signature…
This will be your name and your website address… Like this:
Miles Beckler
www.MilesBeckler.com
Once done, it will look like this:
Click ‘Complete Setup’ and let’s move on…
Step 3: Turning Off Double Opt-in
I recommend turning off double opt-in confirmation.
Here’s why….
You want to add as many people into your email list and receive your emails as possible…
Double opt-in adds an extra step that often genuine subscribers won’t take…
Therefore…
You end up missing out on valuable subscribers in your email list.
That’s why I recommend turning it off to begin with at least…
You can always add it on later, or find other ways to clean your list through engagement campaigns…
That’s what I do!
So how do you turn double opt-in off in Aweber?
Let’s dive in….
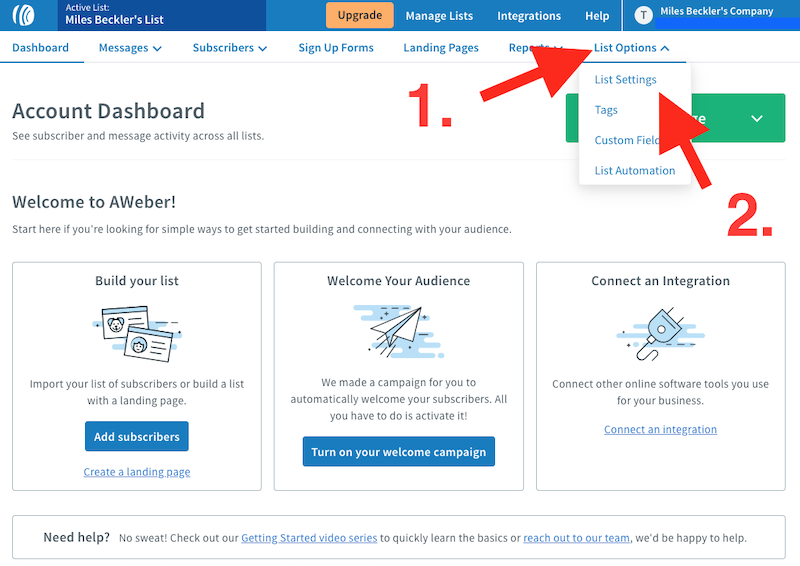
First click on ‘List Options’ in the top navigation bar and select ‘List Settings’ from the dropdown box.
Like shown below:
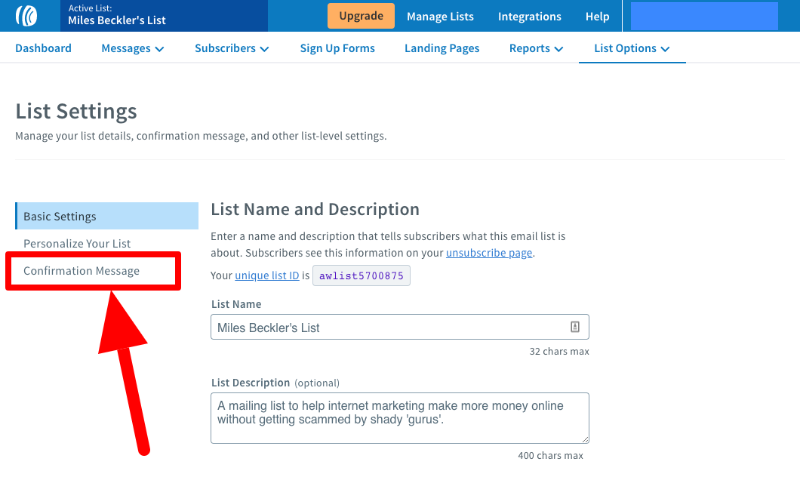
On the next page, click ‘Confirmation Settings’ in the left sidebar.
As shown below:
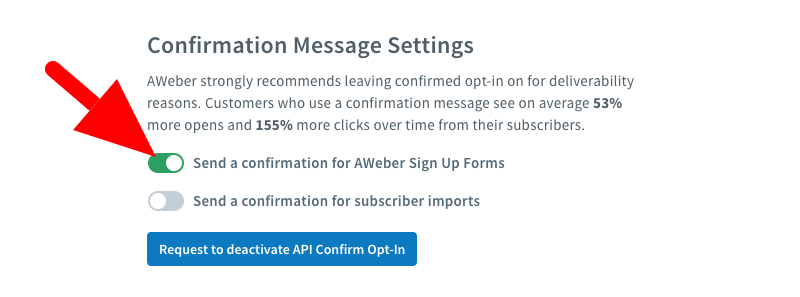
Once clicked, you need to scroll down to the very bottom of the page and underneath the ‘Confirmation Message Settings’…
Uncheck ‘Send a confirmation for Aweber Sign Up Forms’…
As shown below:
When you click this button, Aweber will show you a confirmation message to confirm you want double opt-in turned off.
Like this:
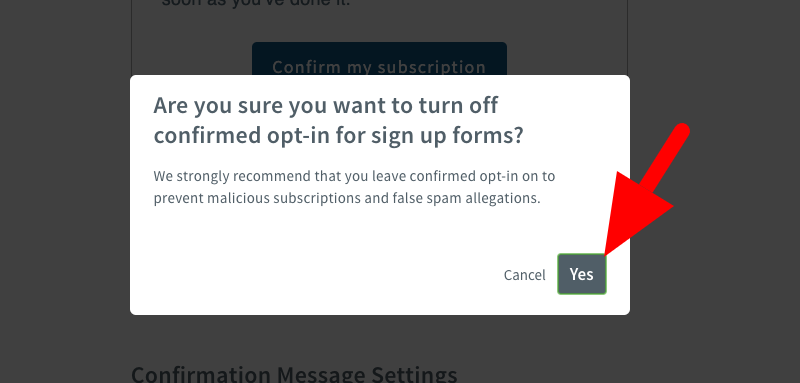
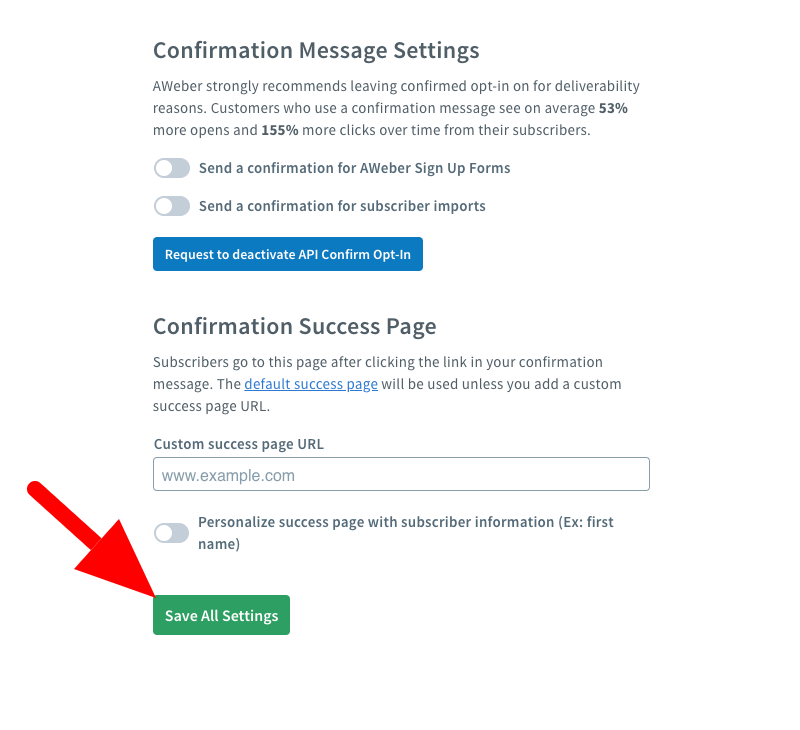
Just hit ‘Yes’ and click ‘Save All Settings’ shown below:
Now, with that done…
Let’s build your first landing page inside Aweber…
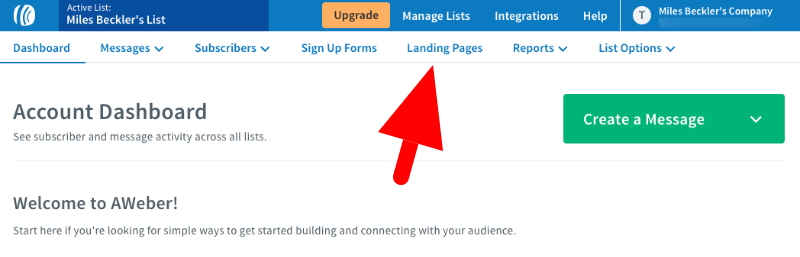
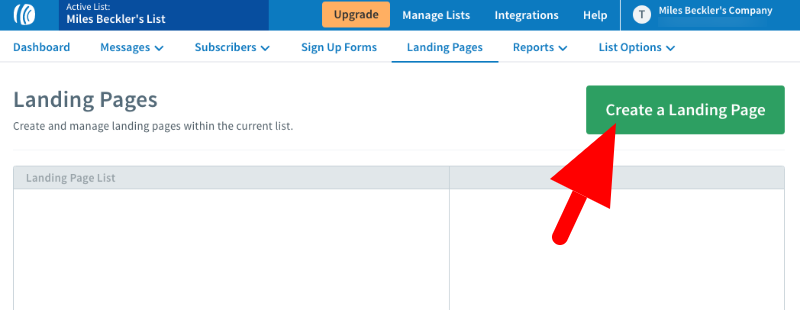
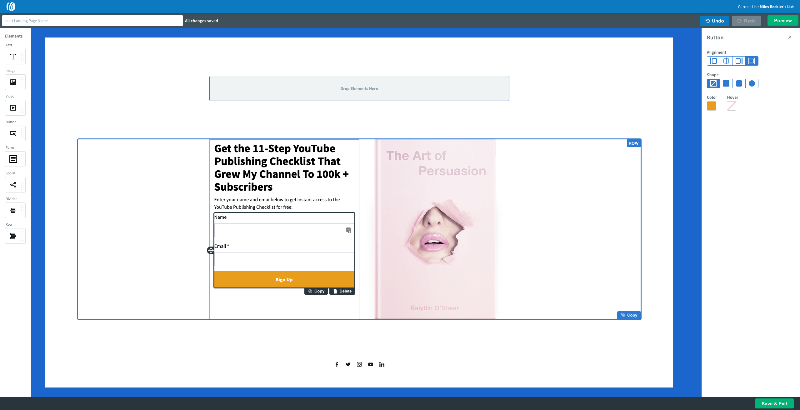
Step 4: Building Your First Landing Page
To build your first landing page, click on ‘Landing Pages’ in your top navigation bar.
Like this:
Then, click “Create a Landing Page”, like this:
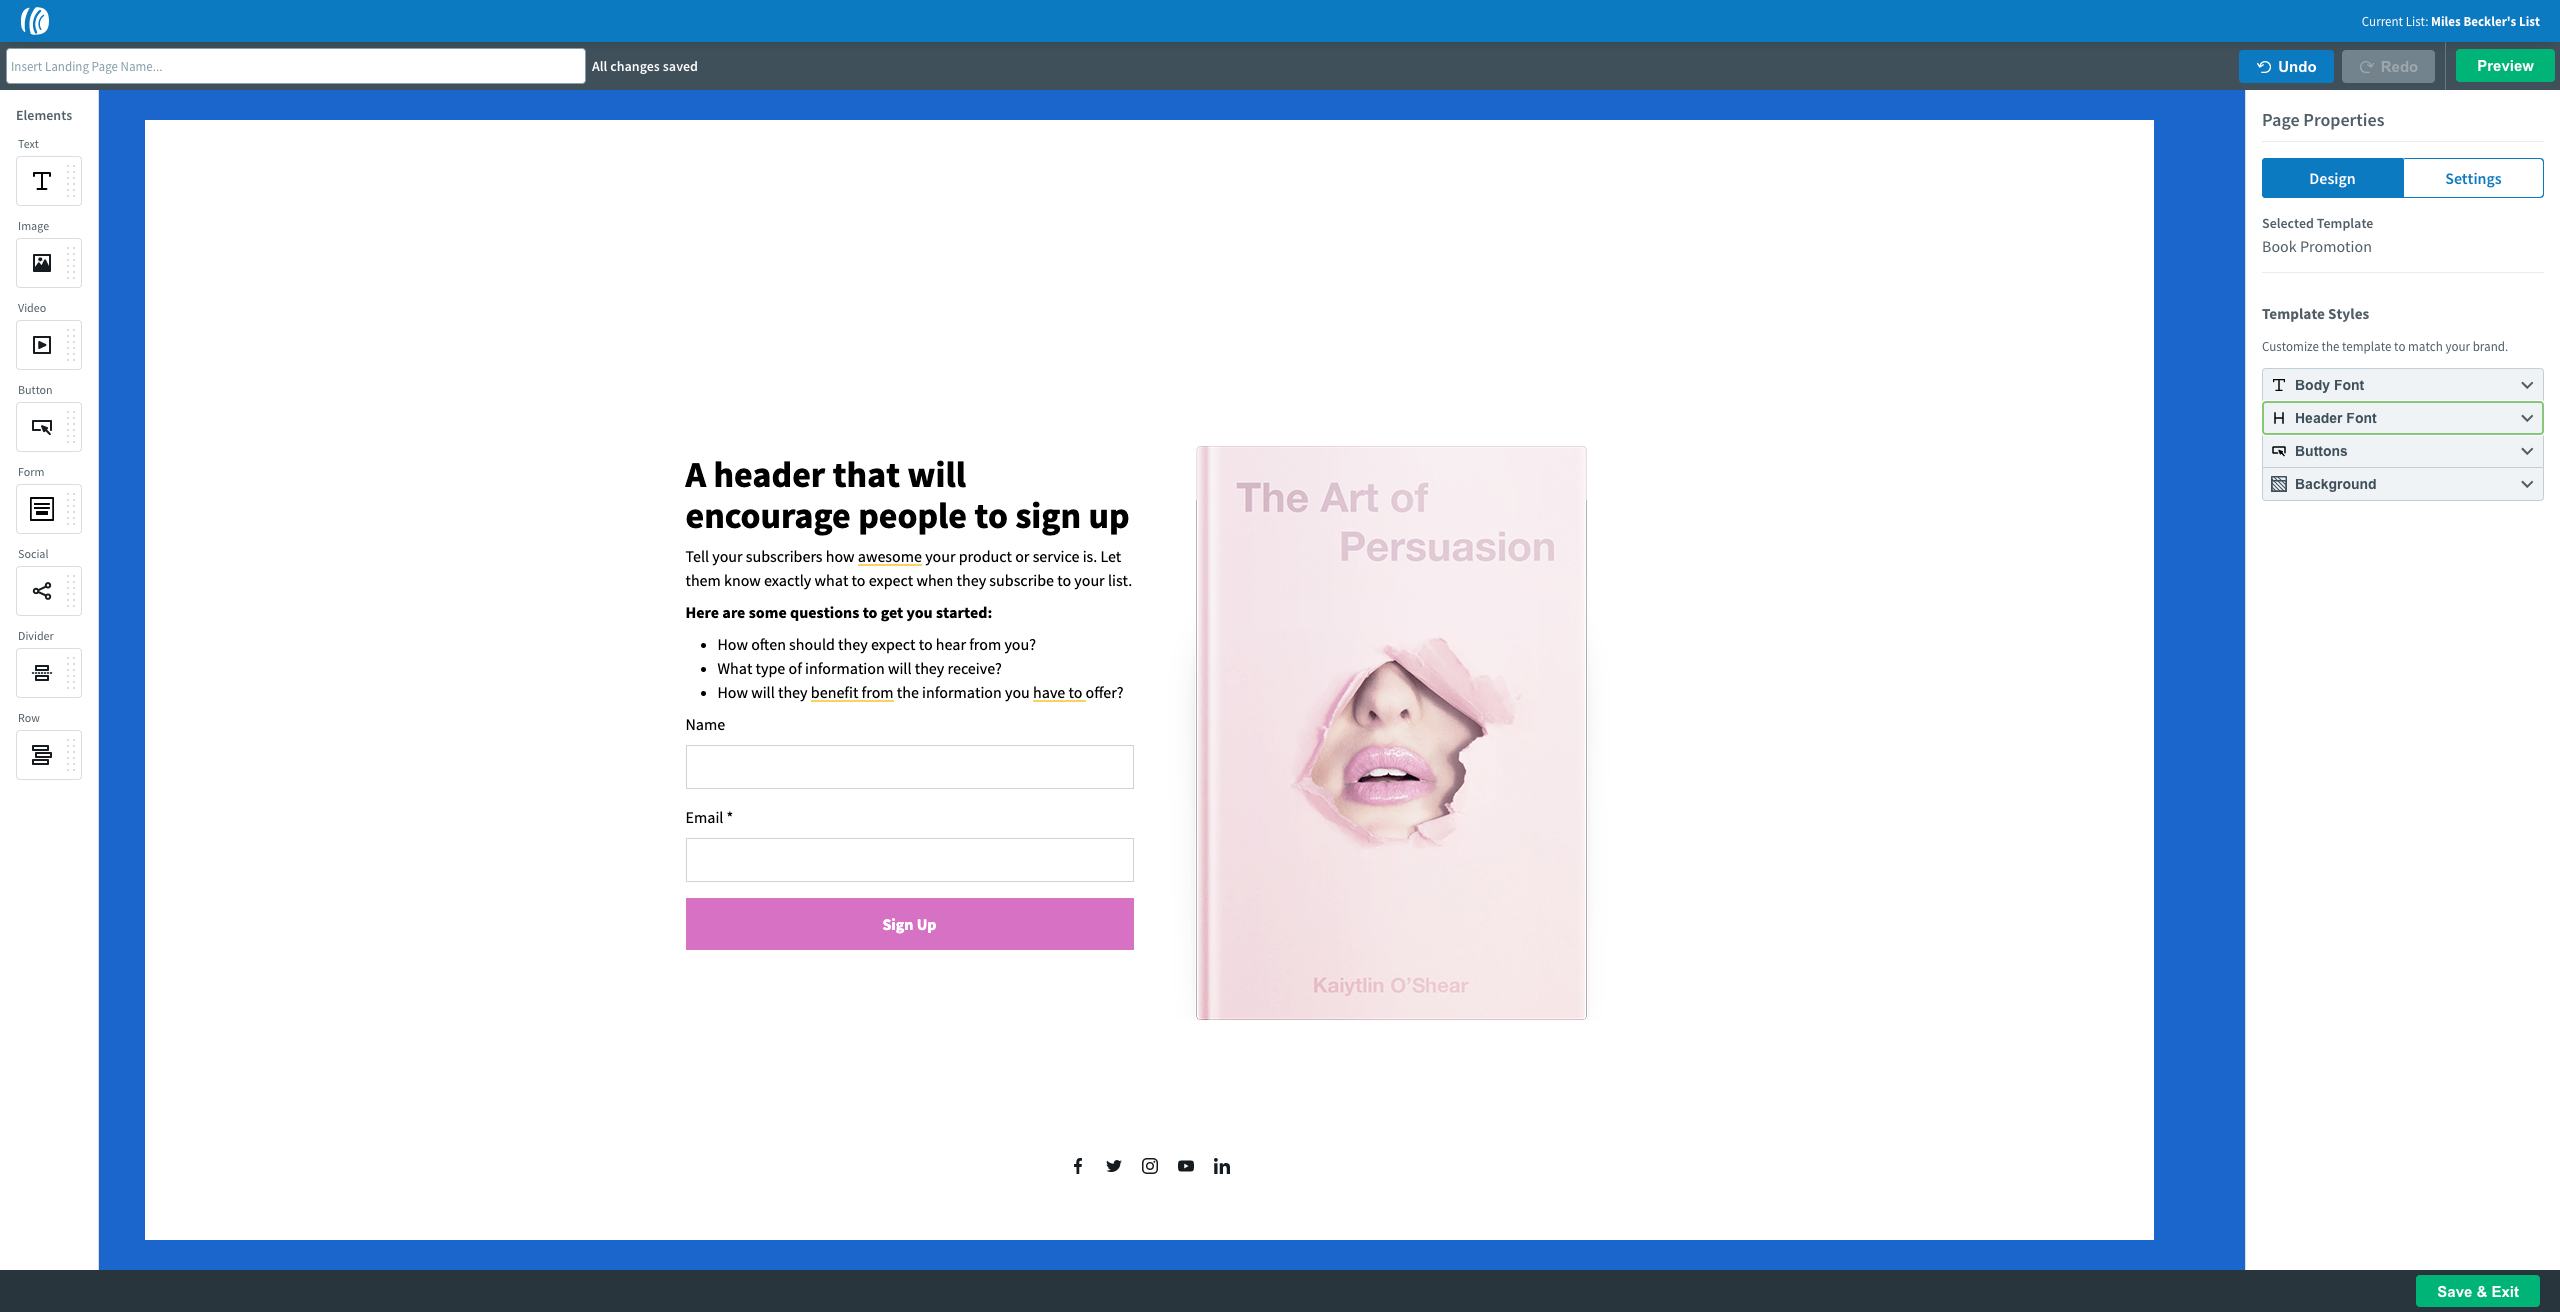
Next, choose your landing page template.
I recommend using the ‘Book Promotion’ template. As shown below:
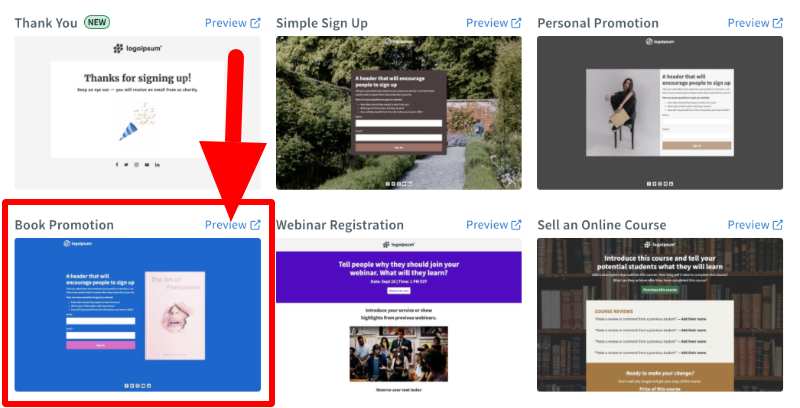
This template works best for lead magnets.
To select this template, hover over it and click ‘choose template’.
Editing Your Background
The first thing we want to do is change the background color to white.
To do this, first…
Under Page Properties, click on ‘Background’. This will open a drop-down menu…
From the drop-down menu, you can change the colour of your background. I suggest you keep your background a neutral colour…
As show below:
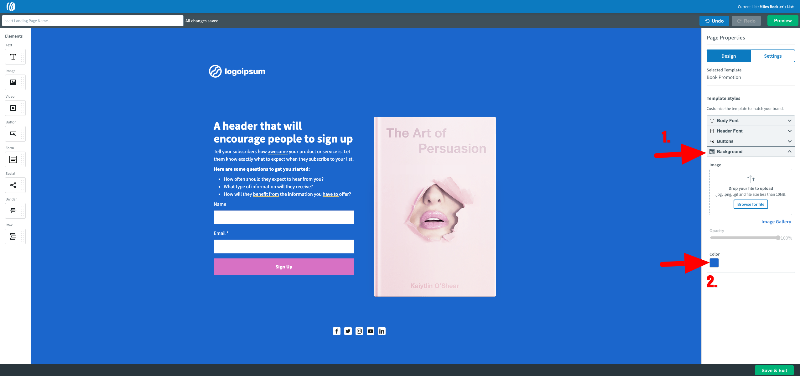
I suggest using a white background.
When done, it will look like this:

There’s one minor problem. Your text is white and is no longer visible…
Therefore…
We need to change our body font colour
To do so, under ‘Page Properties’, first click ‘body font’, and from the drop down menu select your new colour…
As shown below:
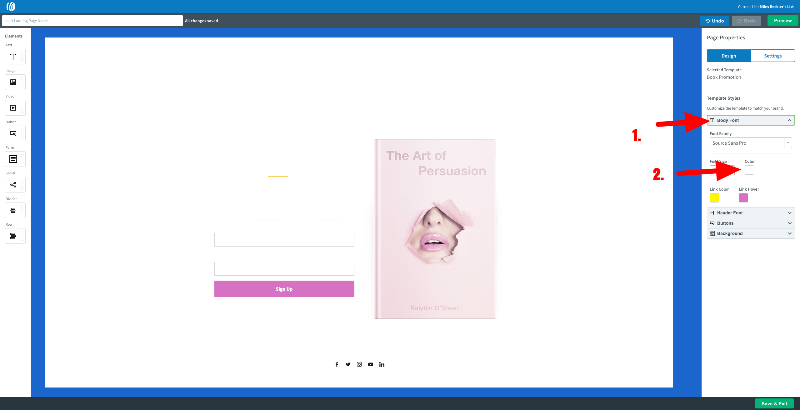
Select black.
Once done it will look like this:
Now that we’ve done that. It’s time to edit our copy.
Editing Your Headline
Next…
Let’s edit your headline.
To edit your headline, click on your headline text…
Next highlight the original headline, as shown below:
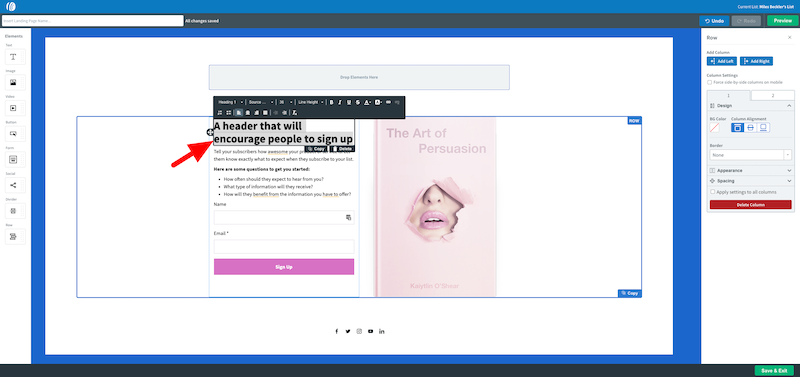
Now, write your new headline.
Something like, ‘Get the free ____ That ______.
This headline template is simple but works really well.
Once done, it’ll look like this:

Let’s move on…
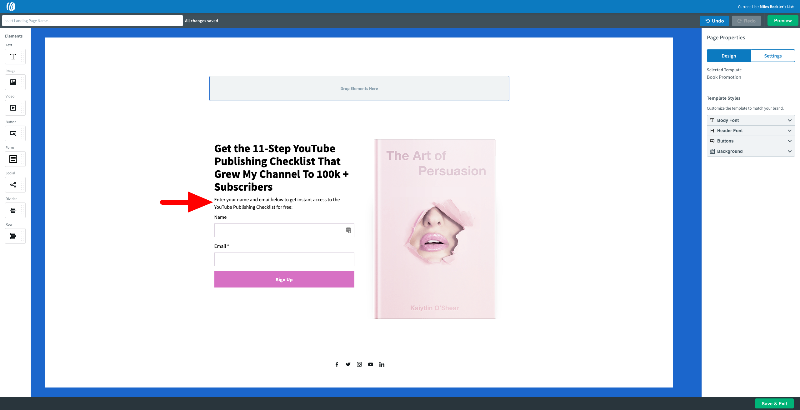
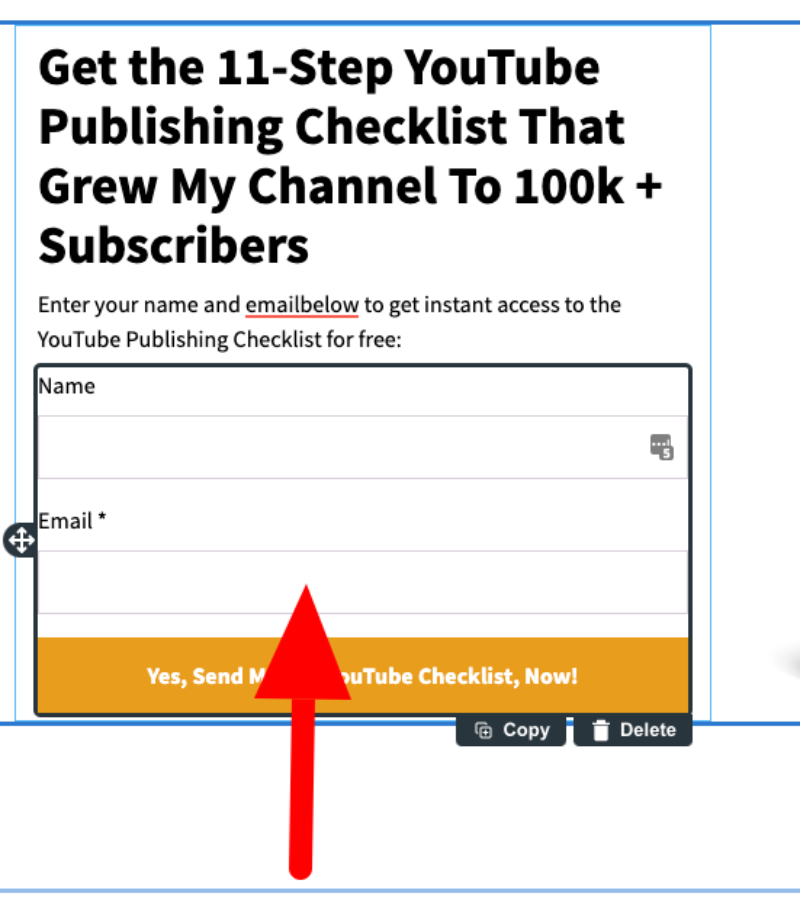
Editing your body copy
Next we want to edit your body copy.
Editing the body copy is exactly the same as editing the headline.
So first click on the body copy, highlight the text, and begin writing your new copy.
Something simple like, “Enter your name and email below to get instant access to the _____ for free.”
Once done, it will look like this:
Now let’s change your web form button color:
Editing Your Web Form Button Color
The default button color of this template is pink. If that fits your brand then keep it.
However…
I recommend changing the button color to ‘Orange’.
Here’s how to do it…
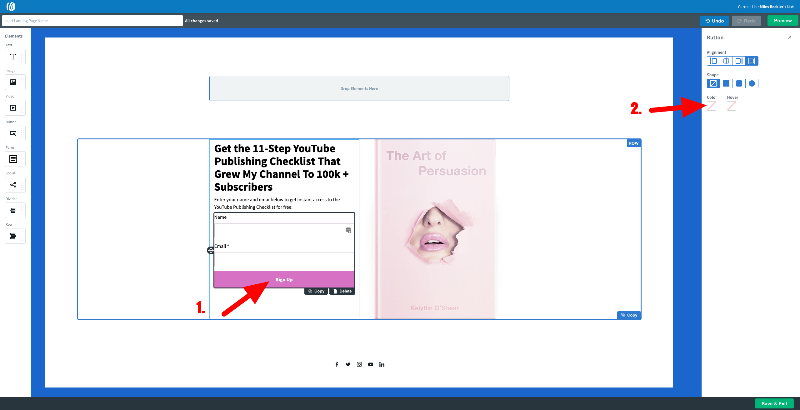
First…
Click on the button.
That will open up the ‘Button Settings’ in the right sidebar.
From there…
Click on the colour option and select your new button colour, as shown in the picture above.
Make sure also to change your ‘hover’ color to orange as well.
Once done it will look like this:
Now that’s done, let’s edit your button text…
Editing Your Button Text
Again, editing your button text is the same process as editing your headline.
So first click on your button text, highlight the text, and write your new text.
For example: ‘Yes, Send Me The ___, Now!’
Like this:

Now let’s add your image…
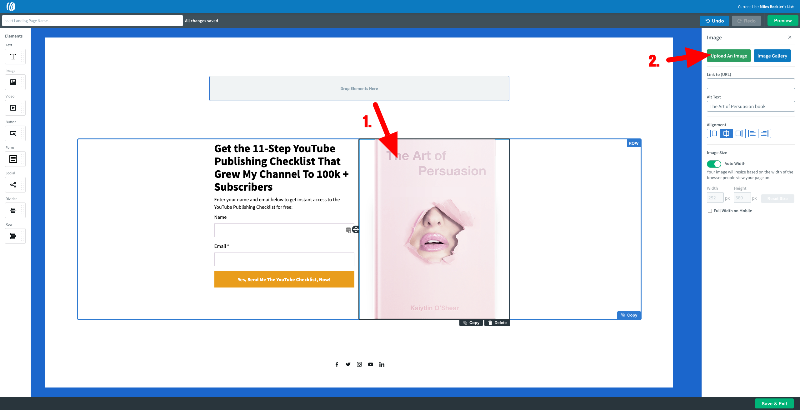
Adding your eBook cover image
The next step when designing your landing page is adding your eBook cover.
To do this, first click on the image already provided…
This will bring up the right sidebar…
From there, click upload an image.
Like this:
Doing so will bring up the upload window. As shown below:
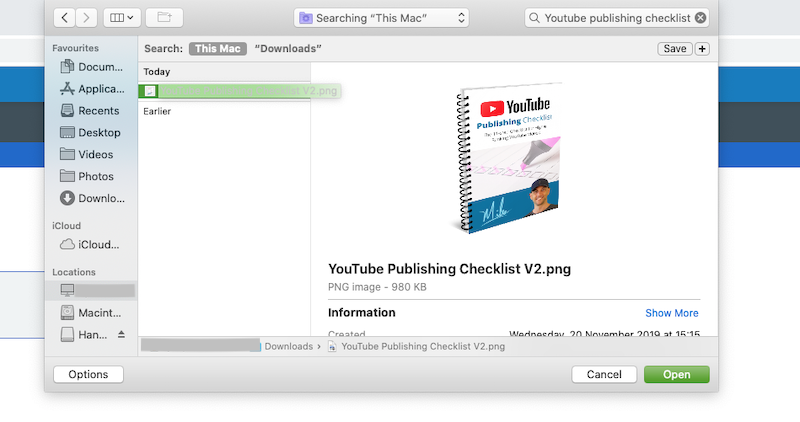
Find your eBook cover image and click ‘open’…
When done, your landing page will look like this:

Now that’s done, we need to select our thank you page, and give new subscribers a tag.
Adding a thank you page and tags
Okay…
To start this off, click on your web form. As shown below:
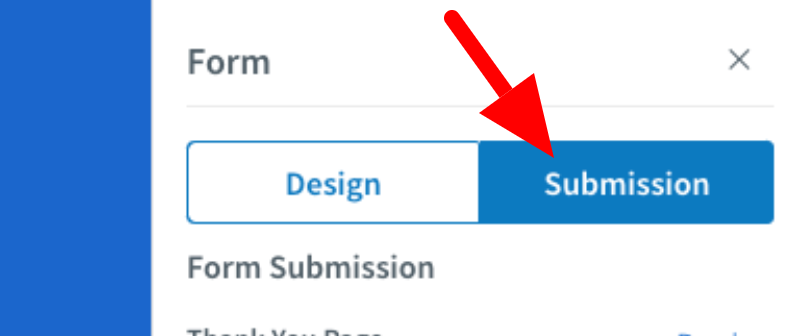
This will bring up the right sidebar again.
From there, click on ‘Submissions’. Like this:
Now go down to the thank you page section. Like this:
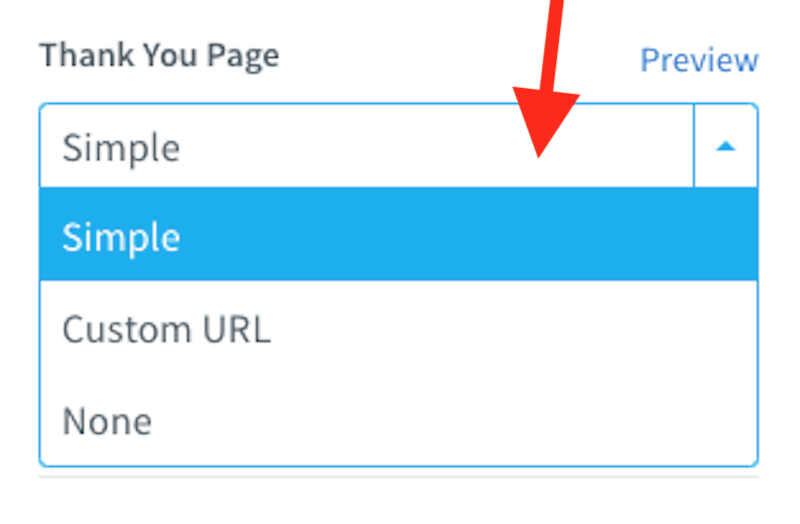
You have two options here…
You can use Aweber pre-built thank you page for speed.
Or if you have your own custom, thank you page build, you’d click on ‘custom URL’ and enter the URL of your thank you page.
For this example, we are just going to use Aweber’s pre-built thank you page.
Next…
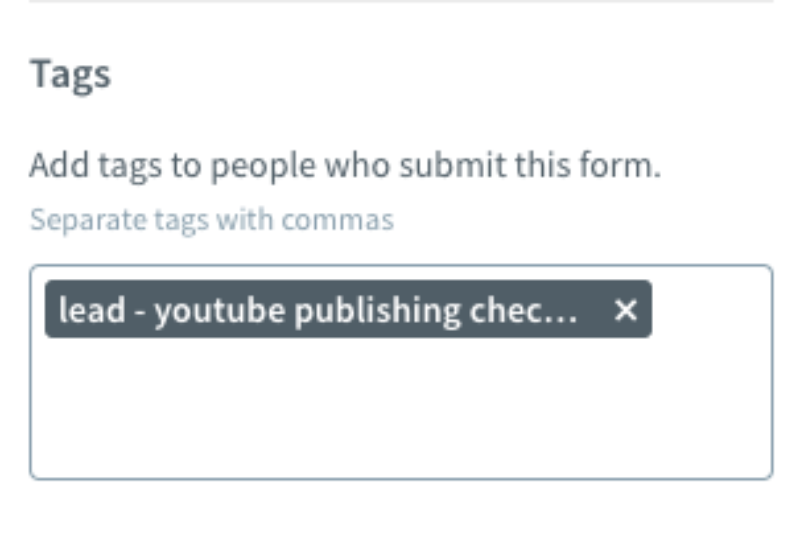
Let’s add a tag.
To do this, go to the tag section, under ‘submissions’… Like this:
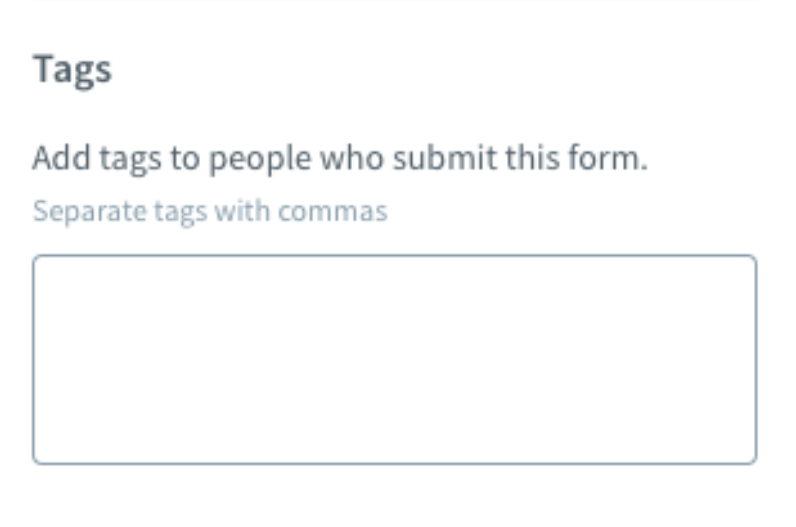
For the tag, you want to use something that instantly tells you what the subscriber opted in for…
For example: ‘lead – [lead magnet name]’
Like this:
With that now done, it’s time to give your landing page a name and click save. As shown below:
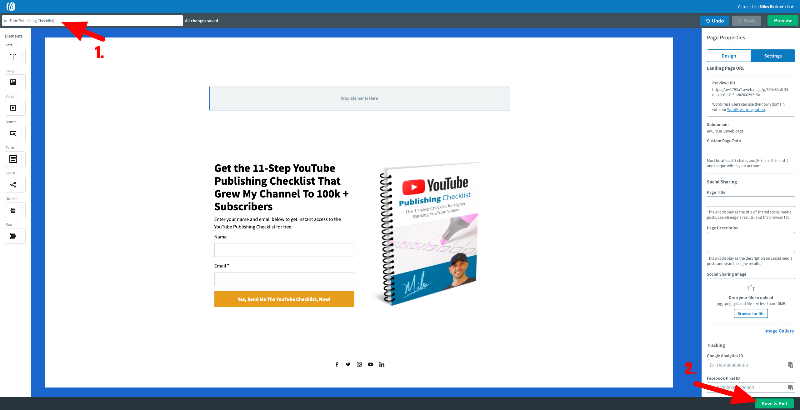
Publish Your Landing Page
OK…
The last step is to publish your landing page.
This is simple…
Just click the ‘publish’ button next to the landing page you wish to publish. Like so…
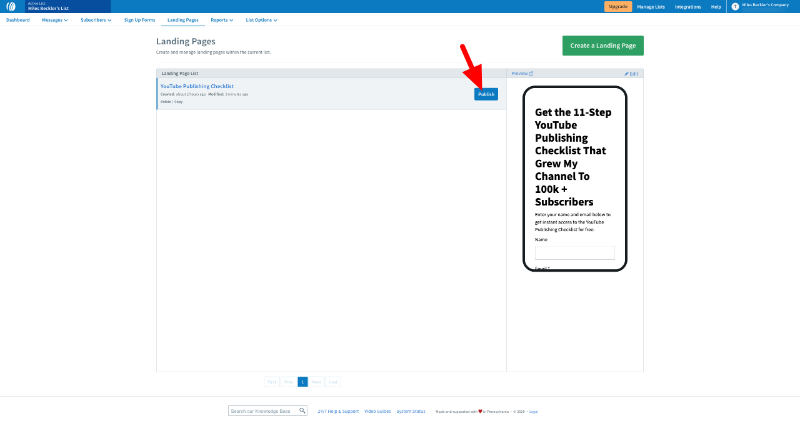
Once published, you will find your landing page URL here:
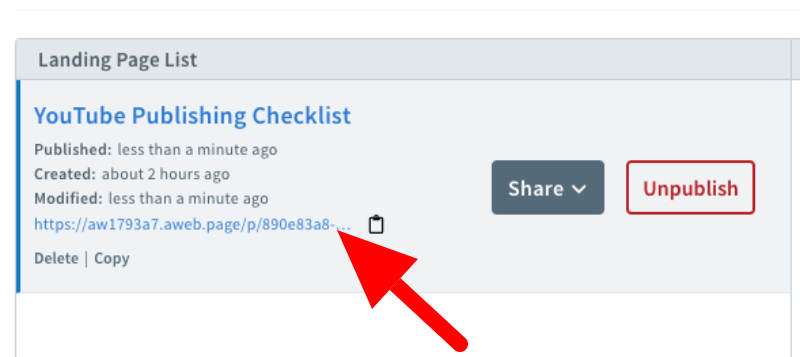
Now that you’ve successfully created your landing page…
Let’s now create your autoresponder and deliver your lead magnet.
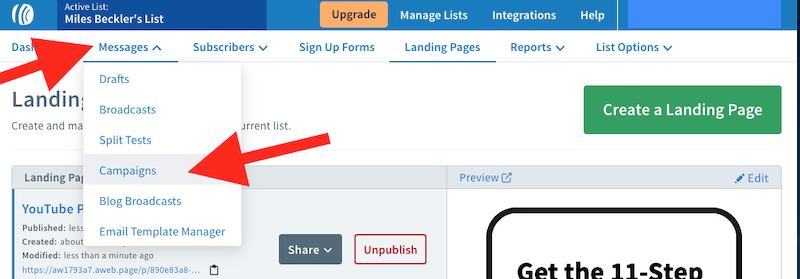
Step 5: Building Your Autoresponder & Delivering Your Lead Magnet
Okay…
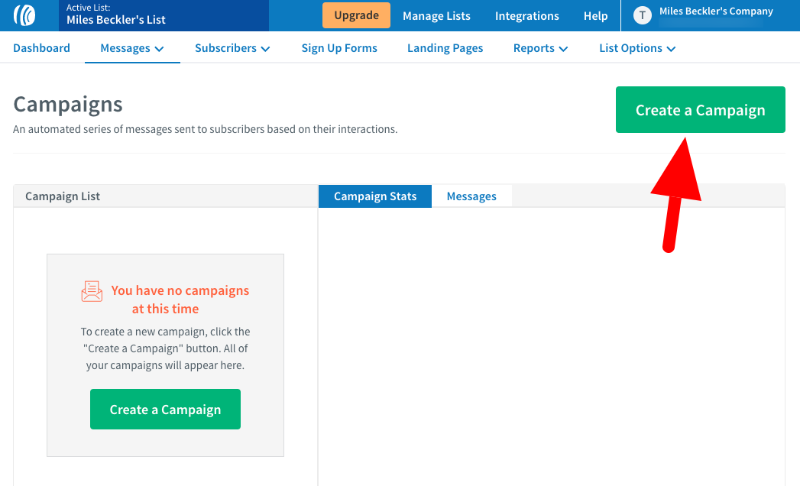
To start building your autoresponder, click on ‘messages’ in your top navigation bar…
And click “campaigns” in the drop-down list.
Like this:
Then click “Create a Campaign”. As shown below:
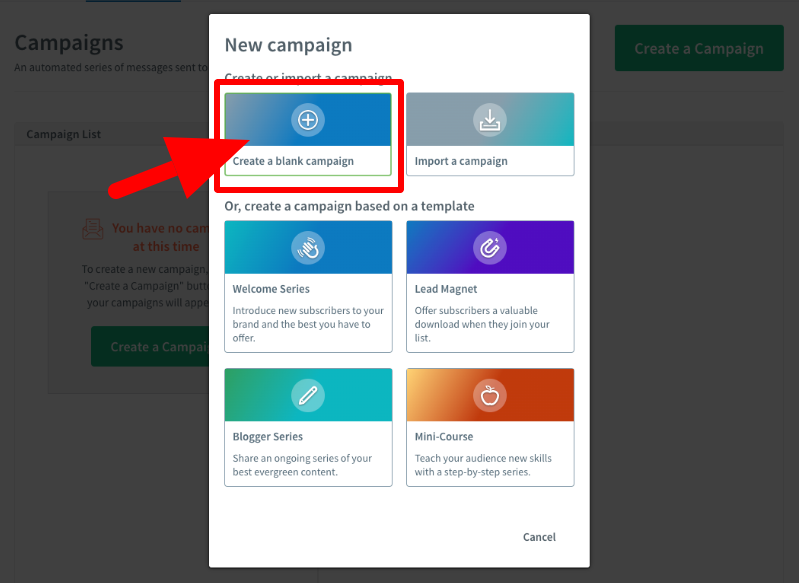
At that point, Aweber will ask you what type of campaign you want to create…
Select ‘Create a blank campaign’. Like so:
Once done, you need to give you Campaign a name…
Use the name of your lead magnet to keep it simple. Like so…
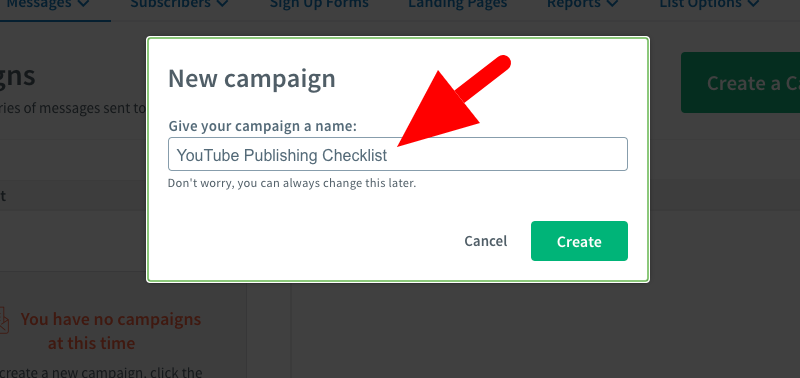
Then click create.
Setting Up Your Campaign
After you have created your first campaign… You see this page:
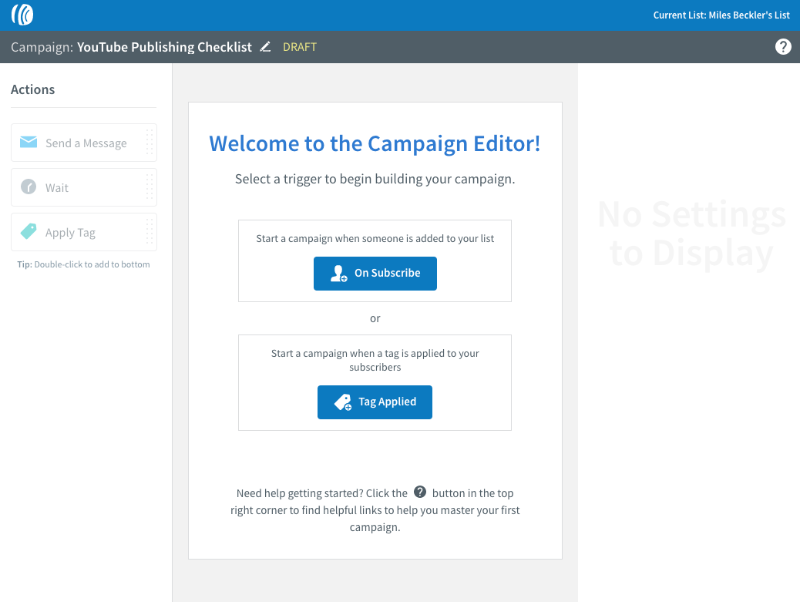
This is where you need to tell Aweber to start the campaign when someone opt-ins via the landing page we just created…
We do this by telling Aweber to start the campaign when the new subscriber gets tagged… This will be the tag the subscriber gets when they opt-in via your landing page.
We do this by clicking “Tag Applied” as shown below:
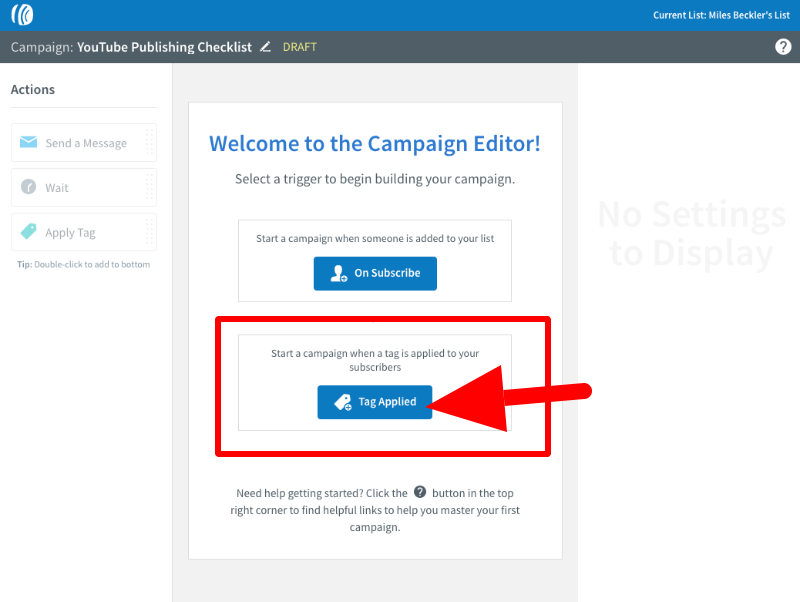
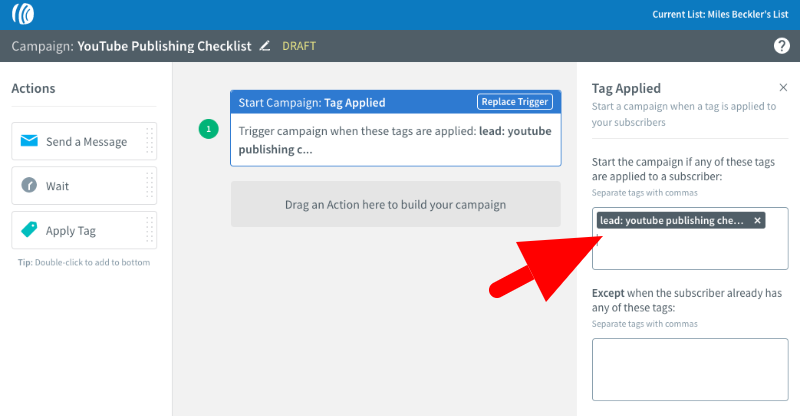
When you’ve clicked ‘Tag Applied’, you will then need to tell Aweber what tag you want the campaign to start on.
IMPORTANT NOTE: This is the tag that you added to your landing page. ‘LEAD: [lead magnet name]’
Once done, it will look like this:
Now it’s time to add your emails.
Adding Your Emails
At this point, I recommend building out a 3-day campaign.
Building these campaigns is easy inside of Aweber..
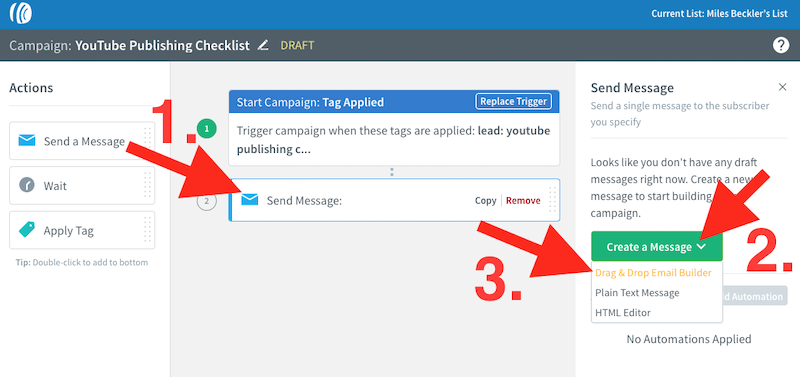
Let’s add your first email and deliver your lead magnet…
To do this, drag over the email widget in the left sidebar into the center…
Then click ‘Create a Message’…
Followed by clicking ‘Drag & Drop Email Building’…
Like this:
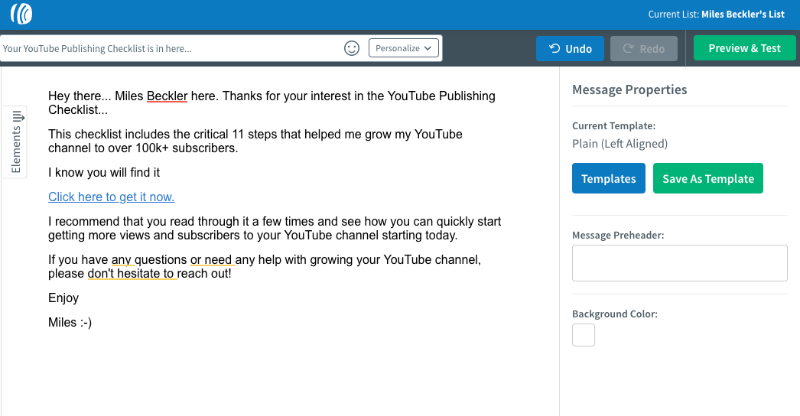
When the drag-and-drop editor opens, you need to do two things…
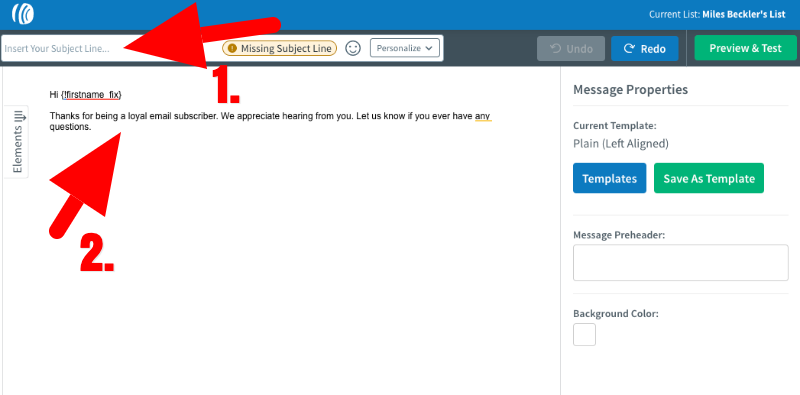
- Insert your headline
- Write your email
Like this:
Delivering Your Lead Magnet
Aweber doesn't have file hosting available.
So to deliver your lead magnet to your new subscriber…
You need to upload your lead magnet to a third party company like Dropbox, or Amazon S3.
Then you need to take your download file and hyperlink a phrase like “Click here to download it”…
As shown below:
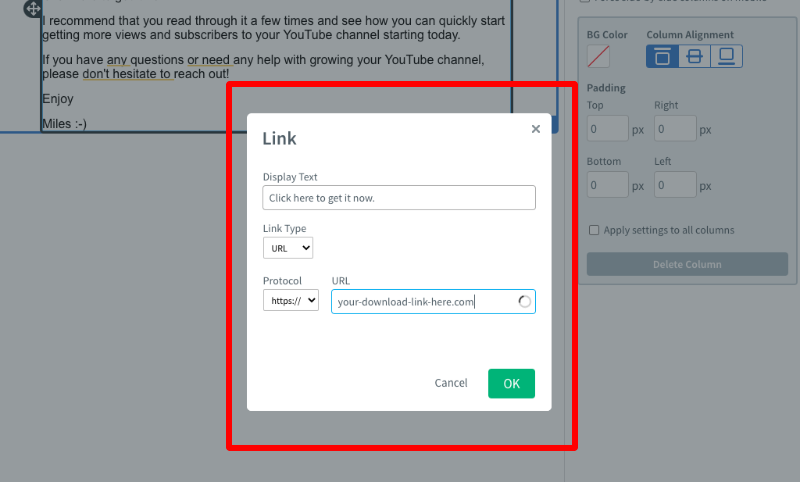
Once done, click ‘OK’ and then ‘Save’ your email.
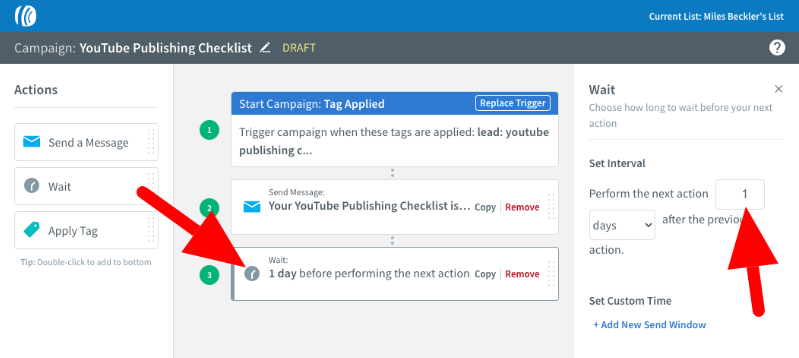
Adding a Wait Time After Your First Email
It’s important when you are building out your sequence to leave a wait of 1 day between each new email.
Here’s how to do it…
First, drag over the wait widget in the left sidebar into the center…
Then in the right sidebar, make sure you set your interval as 1 day…
Like this:
Once done, it’s time to add you second and third emails…
You can do this easily by following the last few steps I showed you.
When finished, it will look like this:
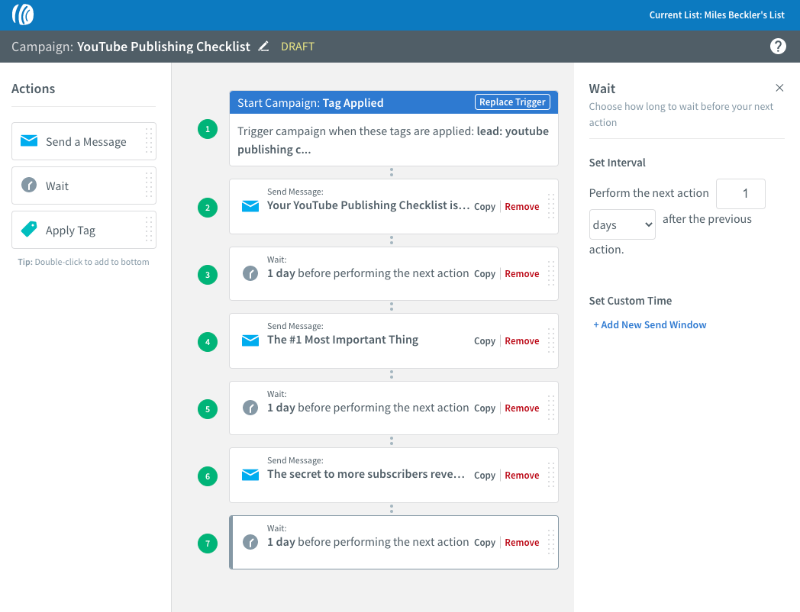
But you are not finished yet…
You need to add a broadcast tag at the end of the sequence…
Adding Your Broadcast Tag
It’s important that you don’t send broadcast to subscribers that are in the middle of your autoresponder…
That’s why you need to add a broadcast tag to subscribers when they finish the autoresponder…
That way you can build out a segment within Aweber and only send broadcast to people who are ready to receive them.
To do this, drag the “Apply Tag” widget into the centre…
Then, enter a simple broadcast tag… For example: ‘BROADCAST-Ready’
Like so:
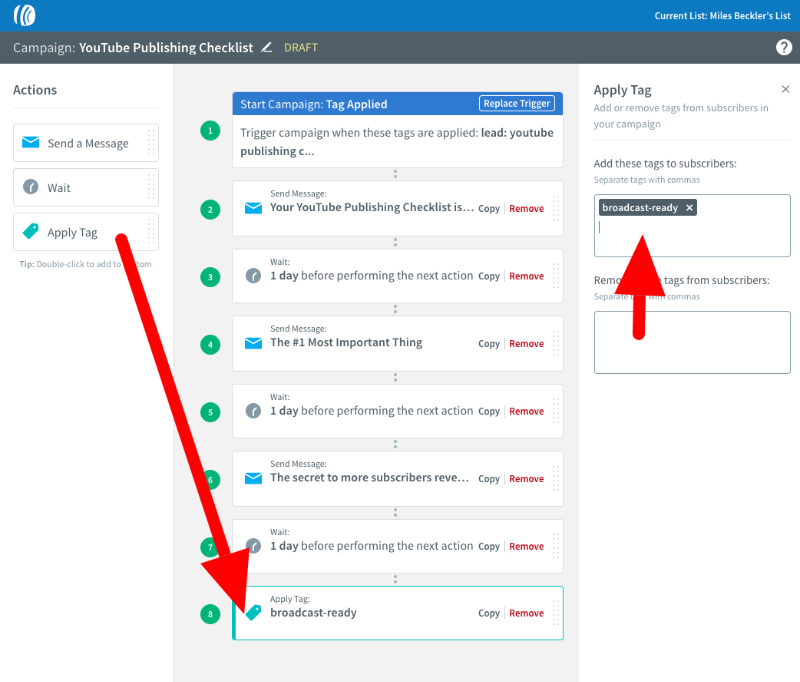
Once done, click ‘Save & Exit’.
To finish creating your autoresponder, we need to activate the campaign.
To do this…
In your campaign list, click the ‘Draft’ under your new campaign…
This will open a drop-down menu…
Click ‘Activate Campaign’.
Like so…
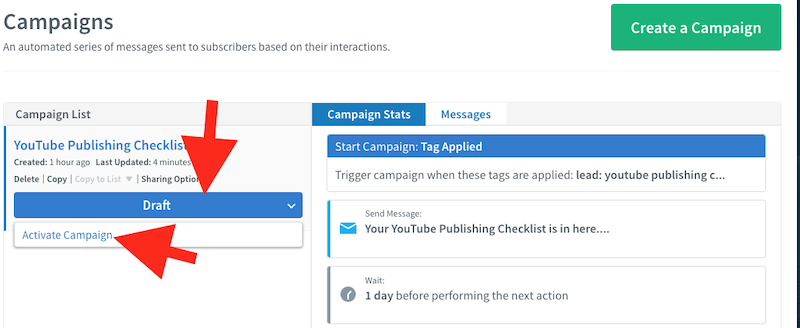
Then your campaign and autoresponder will be LIVE!
As shown below:
Now let me show you how to set up your list segment..
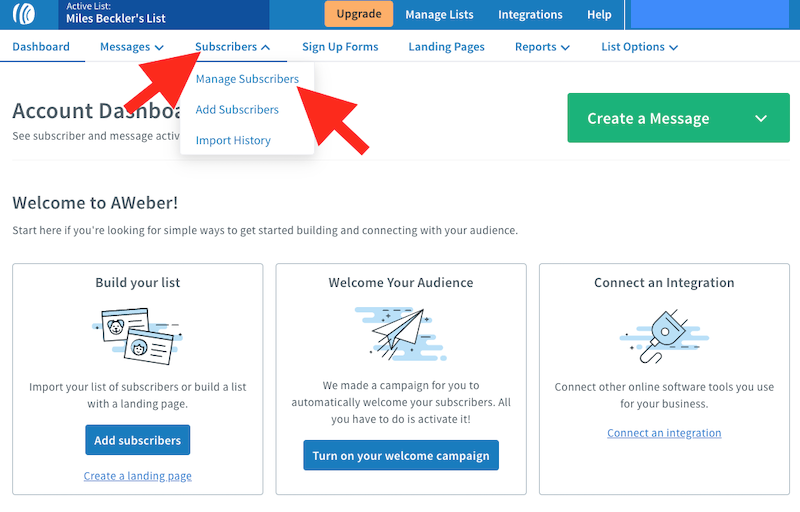
Step 6: Setting Up Your List Segment
Creating a list segment allows you to create and send broadcast to specific people on your list.
And for us, this allows us to send broadcasts to only our subscribers who are tagged ‘broadcast: ready’…
Here’s about to do it:
First click on ‘Subscribers’ in your navigation bar…
Then click ‘manage subscribers’…
As shown below:
Next we want to click on the ‘Search Option’ drop-down menu and find ‘Tag’…
Like this:
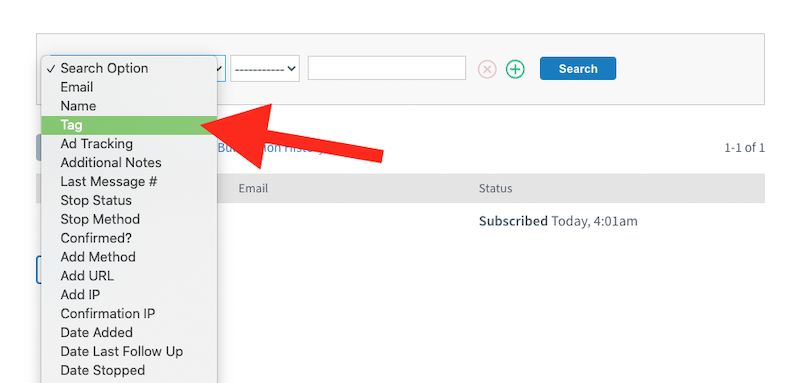
Now we want to enter our broadcast tag in the search box and click search…
This will bring up everyone on your list with that tag.
Like this:
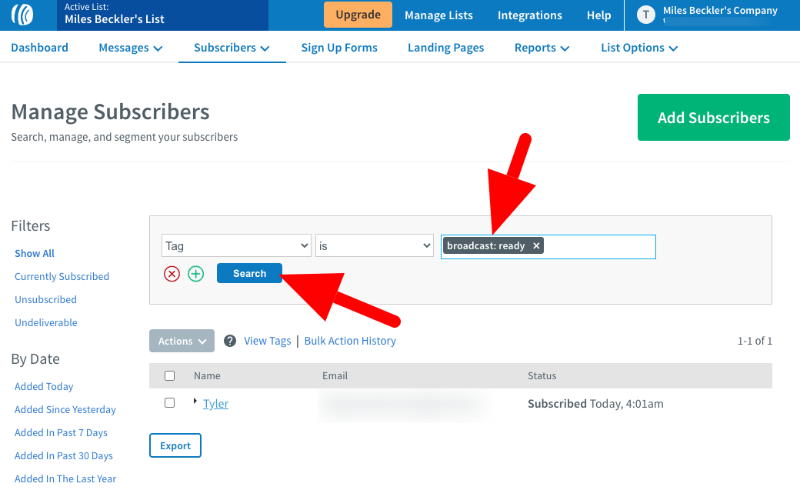
IMPORTANT NOTE: You will have to wait for your first subscriber tagged with your broadcast tag before you’ll be able to do this.
When the search has been complete… You save that search as a segment. Like this:
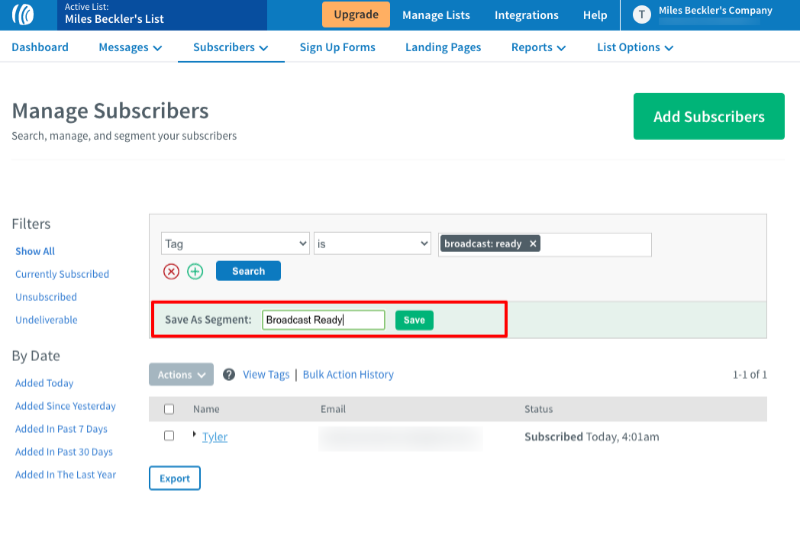
Save it as something simple, like: Broadcast Ready.
Once you’ve clicked save, you are ready to send broadcasts.
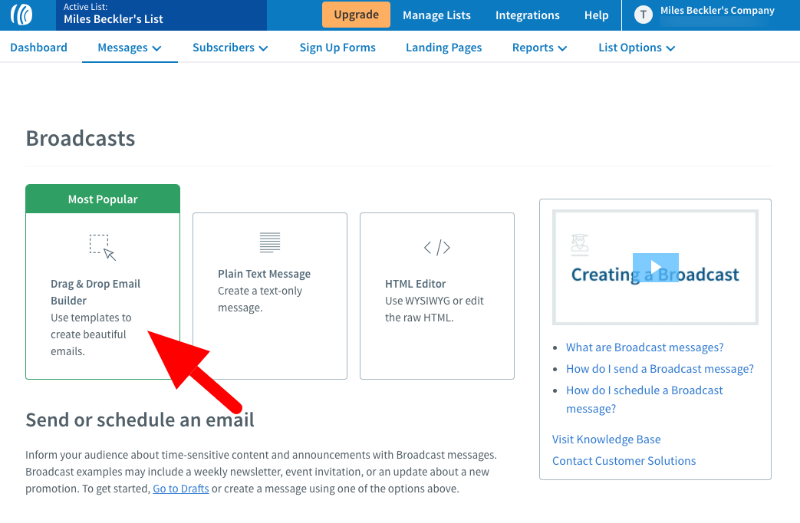
Step 7: Sending A Broadcast
When your subscribers have been through your autoresponder, you want to send them broadcasts full of value.
Here’s how to do it…
- Click on ‘Messages’ in your top navigation
- Then ‘Broadcasts’ in the drop-down menu

Next, click on ‘Drag & Drop Email Builder’. As shown below:
Next, write your broadcast email. Like so:
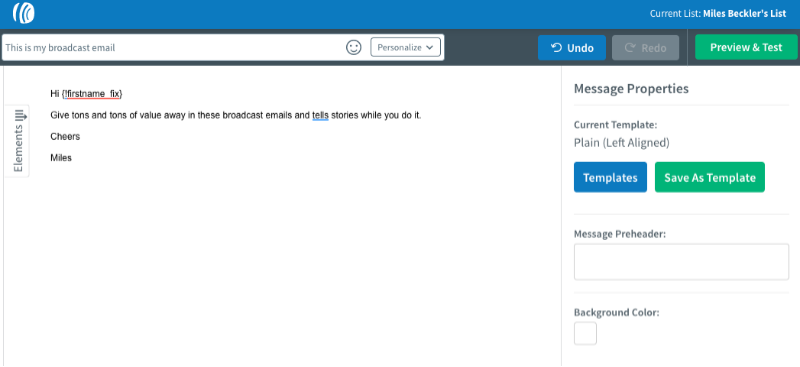
When you’ve finished writing your email, click ‘Save & Exit’.
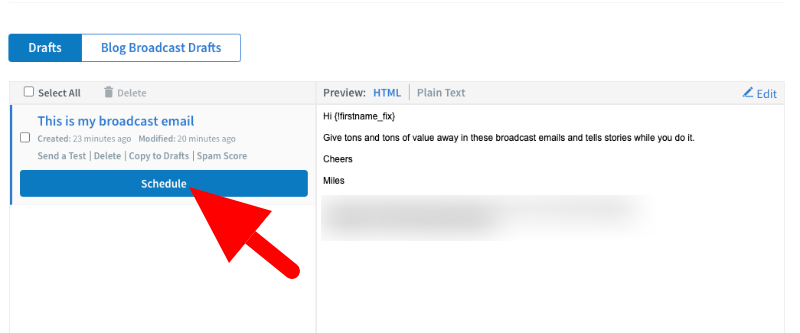
Now we are ready to schedule our broadcast.
Scheduling Your Broadcast
To schedule your broadcast, click on the ‘Schedule’ button underneath the email…
Like this:
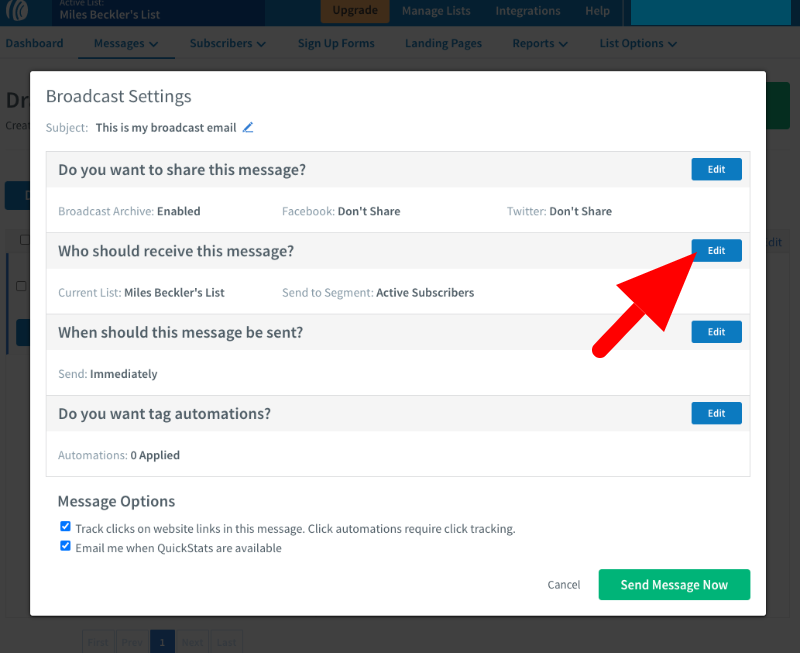
That will bring up your broadcast settings window.
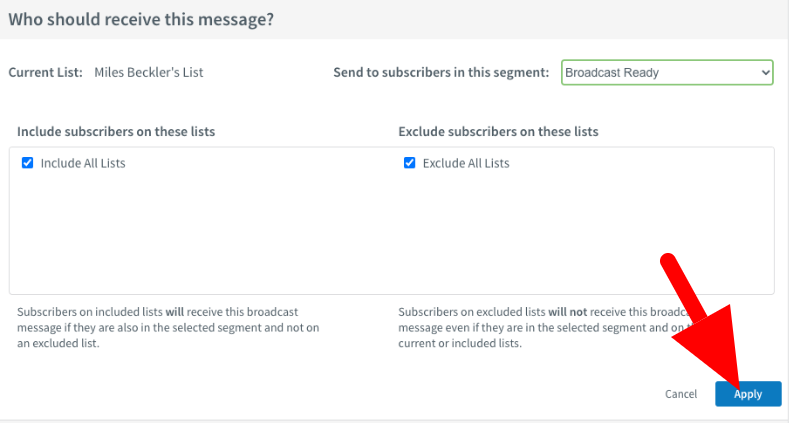
Under ‘who should receive this message?’… Click edit. Like so:
Then…
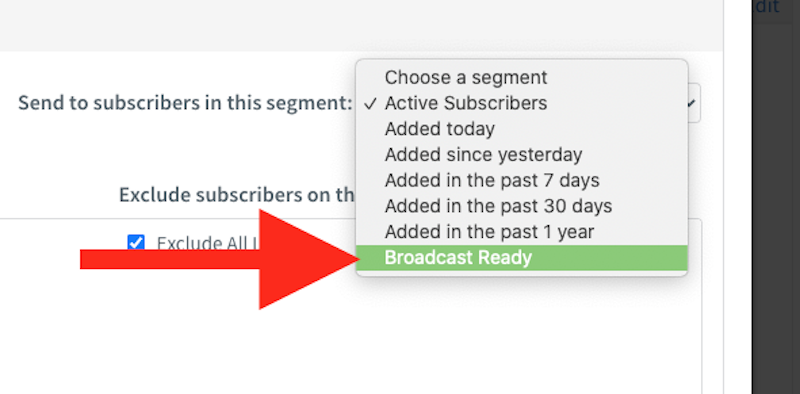
Next to ‘send to subscribers in this segment’… Click the drop-down menu, as shown below:
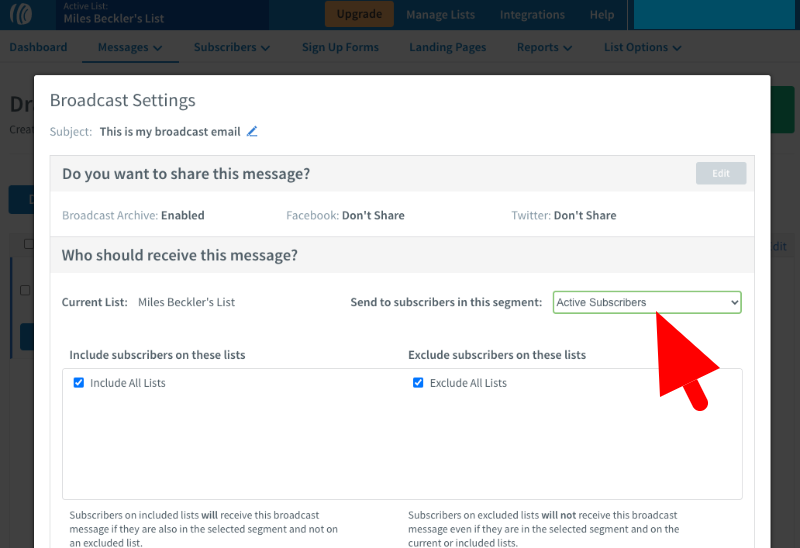
Go down the drop-down menu until you find your broadcast segment…
And select it… Like so:
Then click apply…
Once done, click on ‘Send Message Now’
Like so:
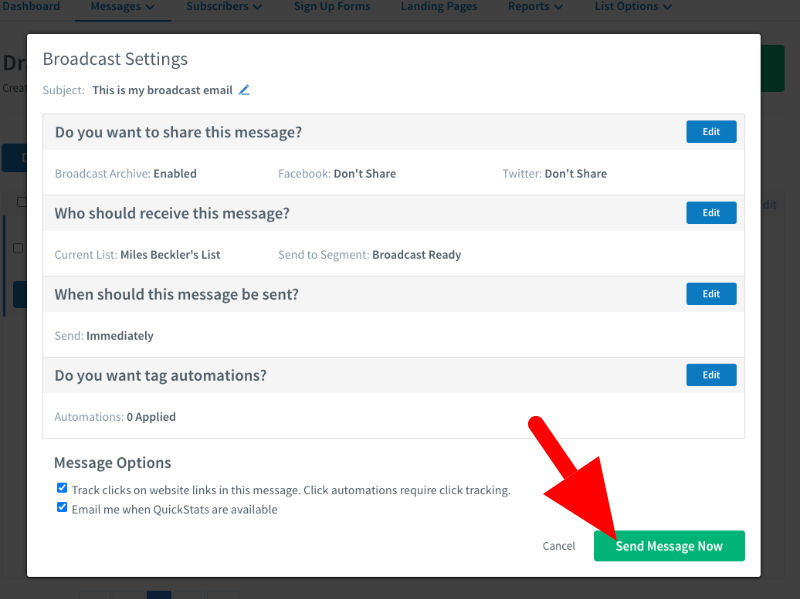
After you click ‘Send Message Now’ Aweber will give you confirmation message like this:
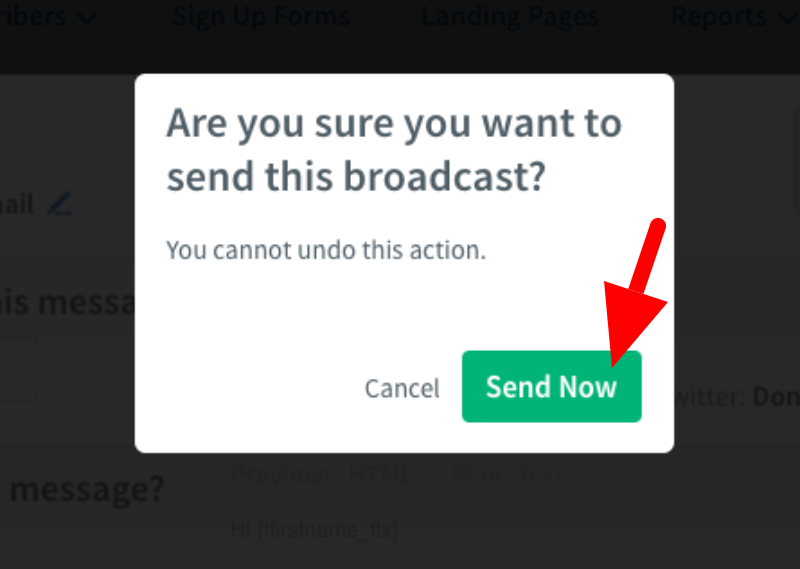
Click ‘Send Now’.
And that’s it, you’ve just sent your first broadcast!
If you’d like some help in knowing what to send in your broadcast, look at a course from one of my mentors, Terry Dean, and it’ll give you access to his proven collection of million dollar emails – Click here to learn more about it.
Conclusion
Aweber has now made it easier than ever to build your email list without spending a single penny…
With Aweber there is nothing holding you back from growing your email list and building your online business.
This post shows you exactly how to do it…
There’s nothing stopping you.
Why not start today?
To your future success,
Miles “Forever Helping” Beckler
P.S. If you don’t have your own blog up and running yet… Personally, I think that should be priority #1 for you right now.
And I’ve got a free training that walks you step-by-step through setting up your blog in this post here.
Ultimately you want to have a blog based sales funnel that can attract visitors from the search engines.
Then you get those visitors on your list based on what you learn here…
That is the most sustainable online business I know of and it is not only simple, it is EXTREMELY effective once you get it all setup!