

Email marketing often brings up the ‘chicken or the egg' scenario…
Because most all email systems require you to start paying for subscribers right away, or after 30 days.
Not to mention you often need to buy a funnel or landing page software to build your opt in pages and run your pop-ups.
So if you bring in a whopping 30 subscribers each month…
It would cost you up to $19/mo for the autoresponder (aweber) and $37/mo for the landing page tool (leadpages)…
Running this setup for 6 months to a year while you grind from 30 subs to 450 subs doesn't FEEL great.
It FEELS ‘expensive’ for what you get…
But up until now, using paid tools has been the only path.
You are expected to spend upwards of $672 per year while you are in the early days of building your list.
Whether you are making money from your list or not.
Until now…
Because as of today, there is a better way!
Regardless of the tools and tech you use, there’s one truth that every marketer like you faces.
The path to a hyper profitable email list starts at 0…
Through growing your audience, giving value and testing lead magnets, you will grow your way up to 1, then 10, then 100 and so on.
But how do you get into momentum…
So you are earning income from your list…
BEFORE having to shell out hundreds of dollars per year in tech?
That’s the solution you are going to learn about here today…
And you won’t just learn ‘what the best free email marketing tech’ option is for beginners…
But you are about to get exact step-by-step instructions on how to set it all up.
First, the free email marketing tech stack.
My friend Nathan Barry who runs Convertkit just launched a free level account for up to 1000 subscribers…
Now, this started as a free plan for only 100 subscribers, but with all that is going on he increased it to 500 at least through April 30th…
UPDATE! As of 4-22, they decided to keep the 500 subscribers free indefinitely
UPDATE! They've increased the free level account to include 1000 subscribers!
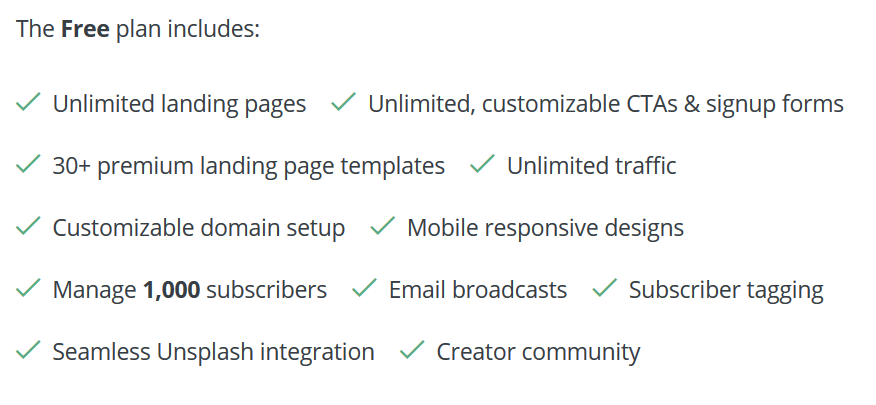
Not only can you send broadcast emails to your entire list of 1000 subs, but you get a free landing page builder, too.
I've been pushing him to create some “Miles style” landing pages like I use and teach…
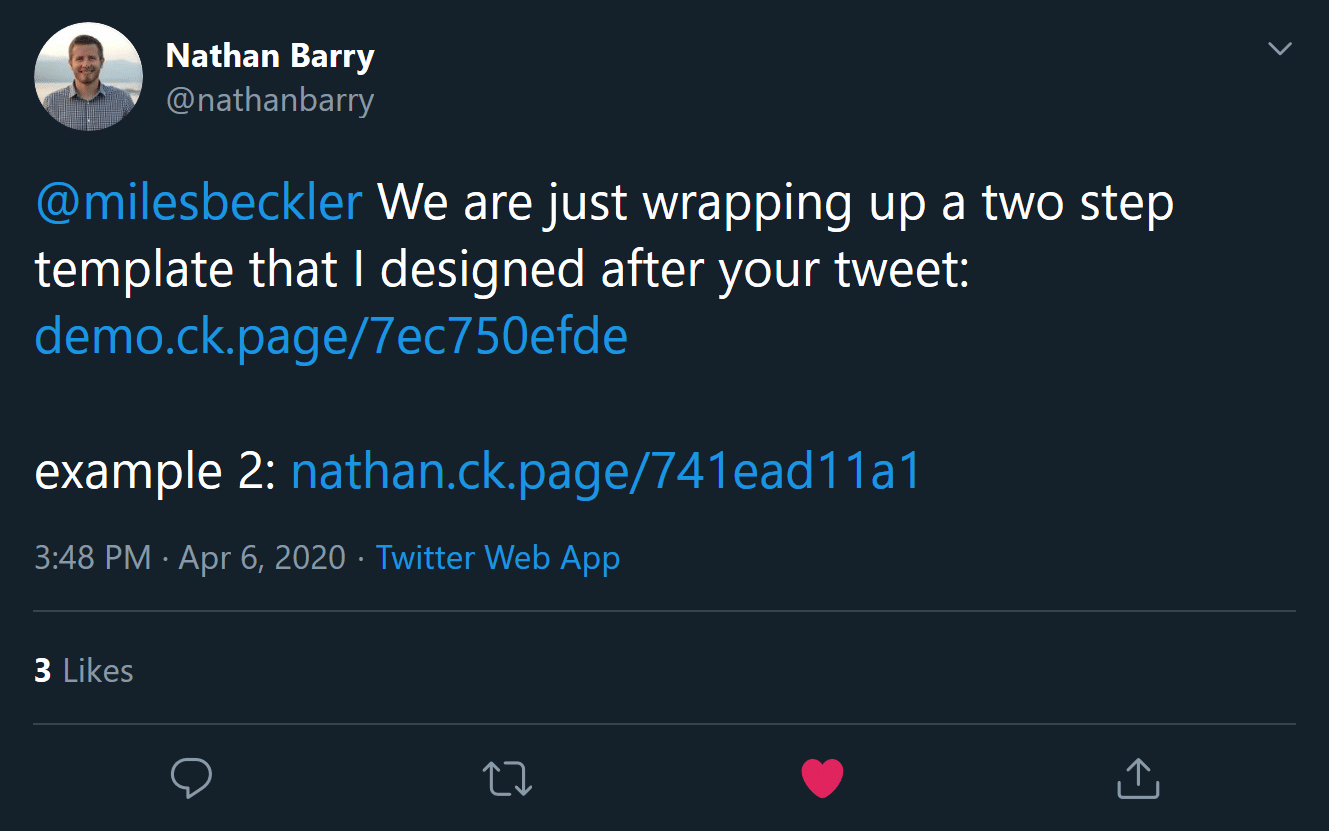
You are going to learn more about this ‘style’ template and why they are scientifically proven to work better than basic submit forms later…
If you want to see the basic templates you can see them here and here.
Now here’s the coolest part.
The landing page builder needed for you to build your own landing pages like these are now free.
You can play around with ConvertKit's free landing page tool here before even signing up.
To be perfectly honest…
This is the package I wish was available when I got started building my first business online…
Before we get into the step-by-step guide to building your first landing page, which happens below… You need to know all the in’s and out’s about this free system.
The ConvertKit Free Account Explained
By clicking here and signing up now, you will not only get the free landing page builder…
But you will get their email marketing system for 500 subscribers for free, too.
And you can even increase the free level to 1000 subscribers!
It is important to mention that there are a couple things missing from this account level.
You don't get automations meaning you can't really run an autoresponder with an automated follow up.
But, all you have to do is consistently mail your list 2 or 3 times per week, and that limitation becomes irrelevant…
And you should be emailing your list that often anyways, so no biggie here.
They also aren't offering support to this account level…
Which is precisely why I’ve decided to show you step by step how to get this all going, right here…
Beyond this DIY tutorial tho…
You gotta be resourceful when you have questions which means searching YouTube, Google or Facebook groups if you are trying to do anything advanced…
That said, I recommend keeping it simple!
Follow this guide, get your landing page and list setup and get back to growing your audience!
Ok, last key here… How to get 1000 subscribers free instead of the 500 you get when signing up.
You simply invite friends to get a free account too and every friend you refer, you earn 100 more subscribers for free on your account with a max of 500.
What about after your first 500 free subscribers?
When you cross the 500 subscriber mark or if you decide you want to get automations and support, it is just $29/mo which is exactly what 501+ subscribers costs with Aweber.
Not bad if you are on a total bootstrapped budget!
So why would anyone ever want to use Aweber & Leadpages?
Well, there are 2 reasons I personally have subscriptions to both of these systems…
Support & additional features.
Aweber has 24×7 support that is beyond EXCELLENT.
Get stuck trying to setup a campaign, a tag or automation? Send them a message 24 hrs a day and they'll get you unstuck fast.
You see, not all new marketers have the luxury of ‘working’ on their websites and email lists during the 9-5 hours.
Many marketers are working their day-jobs and spend those 10pm – 2am hours growing the side business.
What if you get ‘stuck’ at 1:15 am? Are you supposed to wait 24 hours to hear back?
Not with Aweber! They are there for you… Even at 1:15am on a Friday.
And this is what you pay for…
Plus, you get an autoresponder that can run all new subscribers through a similar follow up sequence before the broadcast emails start. Helpful, not necessary.
So that $19/mo for aweber is really to save time, to have pro level support 24×7 and to start automating…
Leadpages ($37/mo) can do more than just landing pages, they offer a pop up for your blog… if you are getting 100 visits/day this is a HUGE benefit and will grow you list FAST!
Plus they give you the ability to create sales pages which are required if you have products to sell.
For a beginner marketer following the A.T.M. process who is just growing their first list… One subscriber at a time and not yet selling products… And who doesn’t require 24×7 support…
ConvertKit, even at $29/mo is a better deal than Aweber & Leadpages at $56/mo combined.
Not to mention you can get started on ConvertKit for free so you can get your landing pages built, your list growing and ultimately get some income flowing from email marketing BEFORE having to cough up the funds needed to grow your list.
I think we found our solution to the ‘chicken or the egg' problem here.
Ready to get started? Here’s how…
When building your email list, you need two pieces of technology… And the MUST work together seamlessly.
… A landing page to convert traffic into leads and…
… An email marketing system (often called an autoresponder) to collect the leads so you can email them.
Thankfully, ConvertKit allows you to do both.
So let’s start by building your first landing page so you can start collecting leads.
Step 1: Open Up Your Free ConvertKit Account
The first thing you need to do is go to MilesBeckler.com/LandingPage …
When you use this link, ConvertKit will help you create your first landing page before you have to enter any of your details, which will give you a chance to see how good ConvertKit landing pages are.
The page looks like this:
Step 2: Choosing Your Landing Page Template
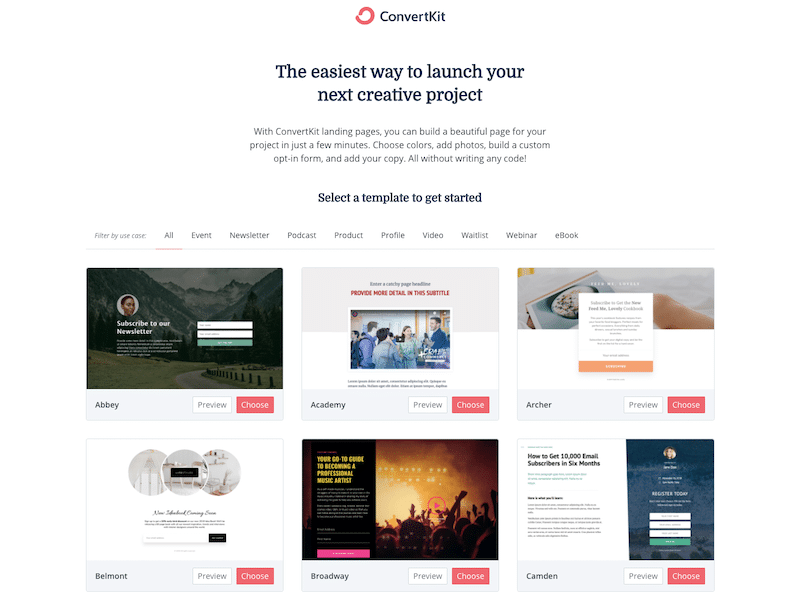
The first step of opening your ConvertKit account will be creating your first landing page.
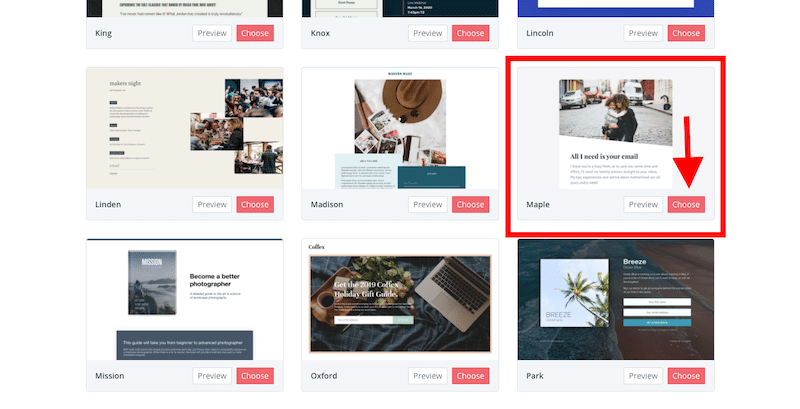
All you need to do on this page is simply click the “Choose” button on a template that you like…
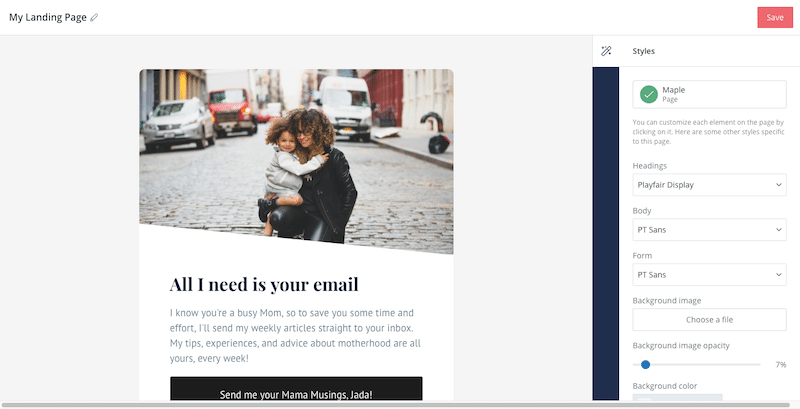
I highly recommend choosing “Maple”.
This is one of the designs that Nathan Barry, ConvertKit’s Founder built to emulate some of my own personal pages that produce my highest conversion rates.
Step 3: Edit Your Landing Page
The next page you come to will be the ConvertKit page editor. It’s at this stage in the process where we will start to design your landing and add your copy.
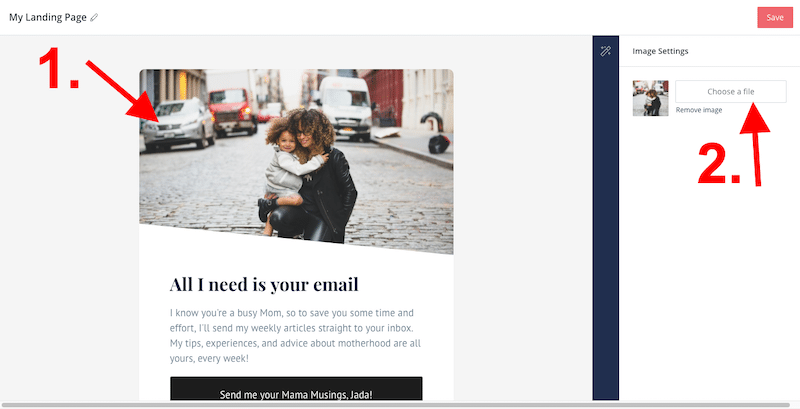
Step 3: Adding Your Image
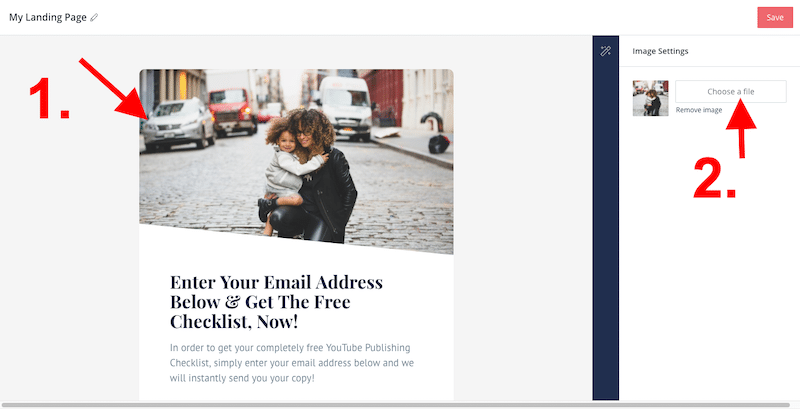
First things first, let’s add our image…
To do that, you need to first click on the image on your landing (showcased on the page), then click on “Choose a file” on the right sidebar… Doing so will bring up an upload window…
It will look like this:
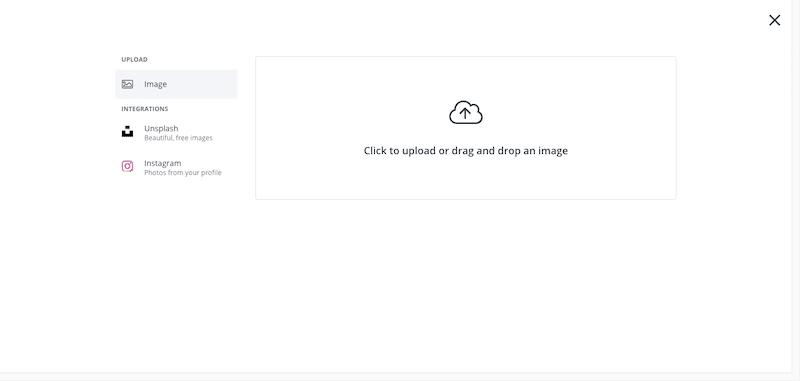
From this point, all you need to do is click to upload your image of choice or alternatively drag and drop your photo on to the uploader.
For this template, you can either upload a pic of yourself or an image of your ‘free thing’, whatever you feel fits better.
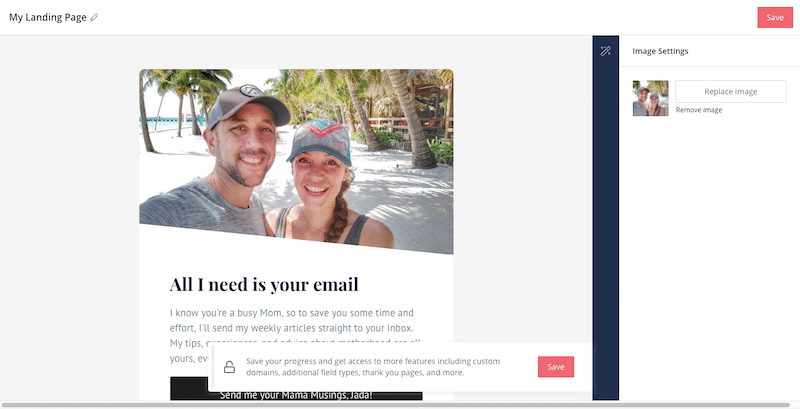
Once you’ve done this your page should look like this:
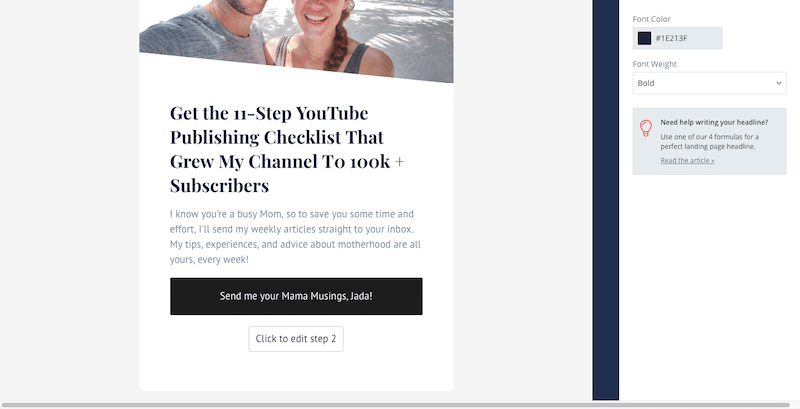
The next thing we are going to do is add our headline.
Step 3: Adding Your Headline
Editing your headline is easy. Simple click on the text and delete the pre-written headline using the backspace button, then type in the headline you want…
It will look like this:
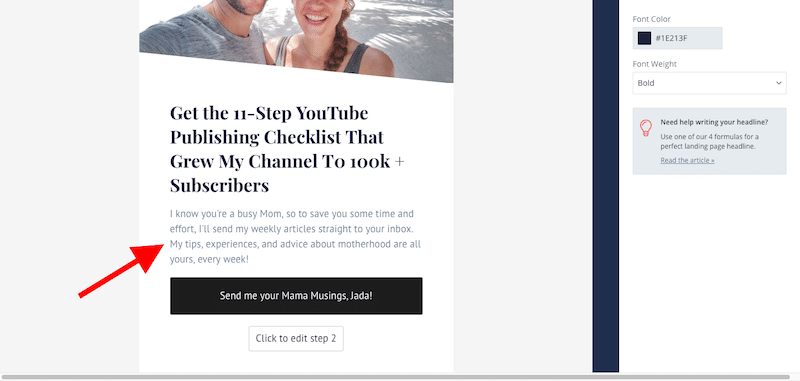
You can edit the colour of your headlines using the “font color” selection in the right sidebar (this will show up after you have clicked on the text in the headline)… But I suggest for simplicity and effectiveness, just use the default colours.
Next we move onto the subheadline.
Step 3: Adding Your Sub-Headline
Editing the subheadline is exactly the same as editing the headline. Simply click on the text, delete the text that is already there and enter your own headline.
You can also use the subheadline as a call to action, so something like “Enter your email address below to get your very own copy today.”
It can be that simple.
Again, you can edit the color of your text but I would suggest leaving it as the default.
When done, it will look like this:
leave the color of your text as the default
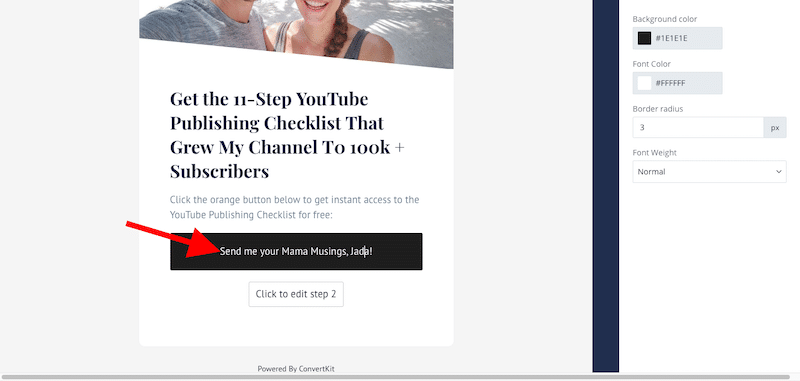
It’s now time to change your button text and color. To edit the text, we first need to click on the button text (it’s the same process as when editing our headline).
Once done, it will look like this:

Now it’s time to change the color. I recommend a yellow/orange color button for best results.
In order to change the button color you must:
- Click on the button… That will bring up the sidebar with your colour options as shown in the picture above
- Click on the “Background colour” bar to change the color
- Use the color palette to select the color for your button
Step 4: Editing Your 2-Step Opt-In Box
The next part of the puzzle is your 2-step opt-in box. This is what will collect the email addresses of your audience.
To start the process, you need to click on the ‘Click to edit step 2’ button, as shown below:
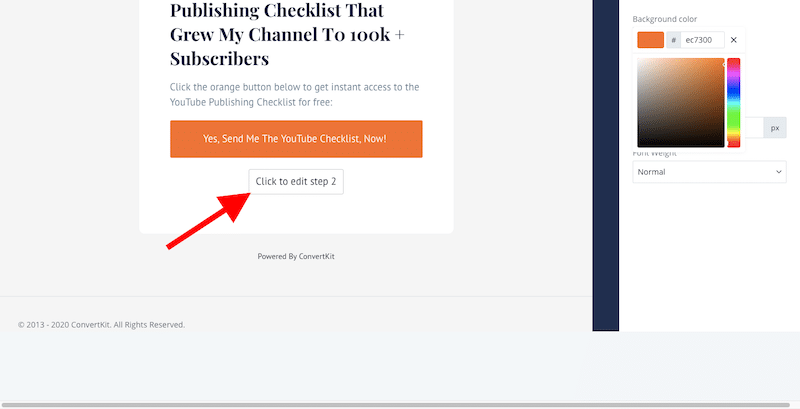
Once you click that button you’ll bring up the editing options for step 2. From here you’ll be able to edit your form that will capture your audience's email addresses.
The step 2 editor will look like this:

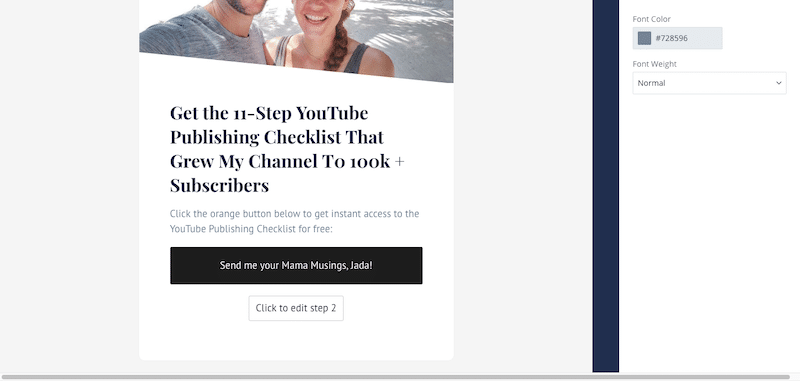
The first couple of things you are going to do is edit the headline and subheadline on this page.
Just like before, to edit the headline and subheadline, simple click on the text and hit backspace to start deleting it.
Once done it will look like this:
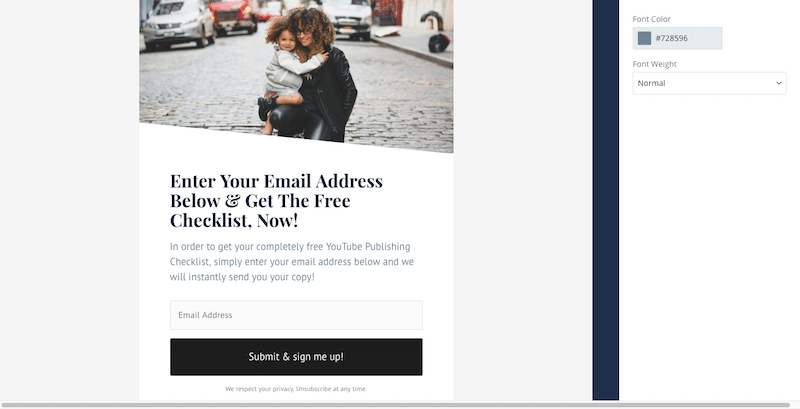
Now that this is done, it’s time to change the image. For the image, we are going to use the same image as we did earlier so that we keep the continuity.
Like before, in order to change the image we need to first click on the image…
… Then click ‘Choose a file’. That will bring up the upload window once again, like this:

Now, just drag and drop your chosen photo on to the uploader window to start the upload.
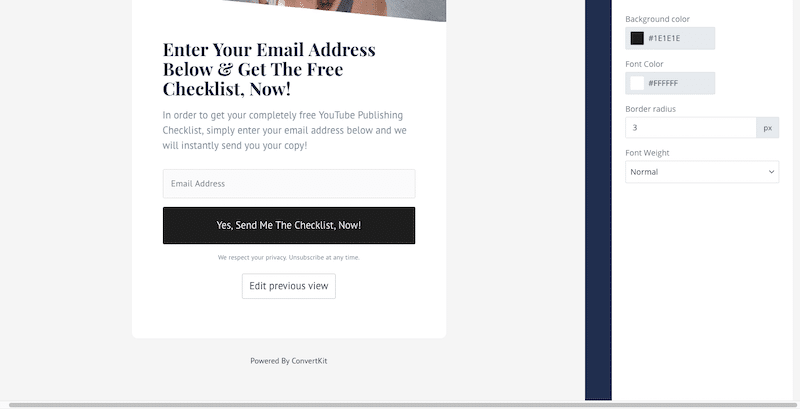
Once done your page will now look this this:

Step 5: Editing Your Button
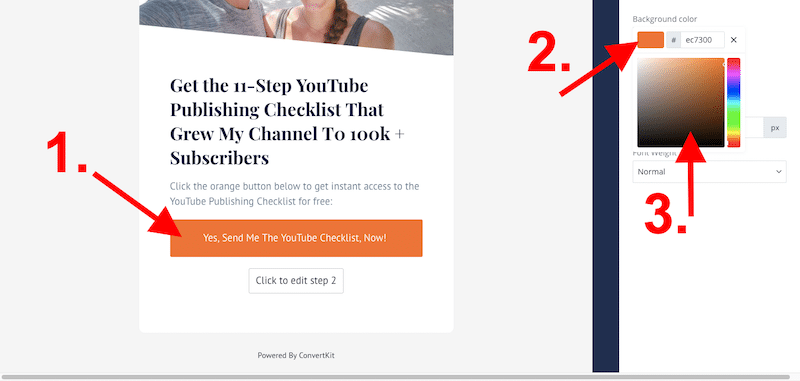
The final thing you have to do on your step 2 page is edit your button text and color, just like we did before. To edit the text, we first need to click on the button text.
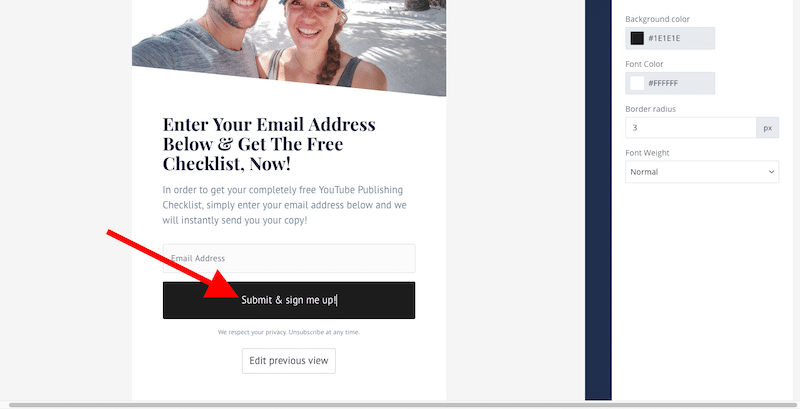
In terms of what the text should say, I recommend this… “Yes, Send Me The [free thing], Now!”.
Once done, it will look like this:
Now we need to change the button color.
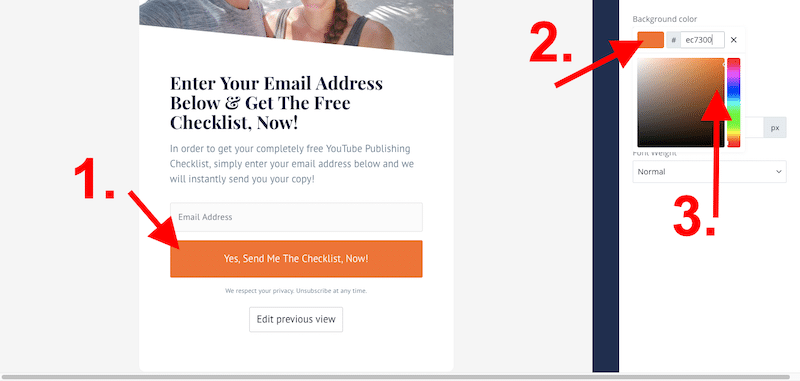
Just like before, to change the button color you to:
- Click on your button… That will open up the color selection box on the right sidebar…
- Click on the background color… That will open up the color palette
- Choose the button you’d like. We recommend the same color as your original button.
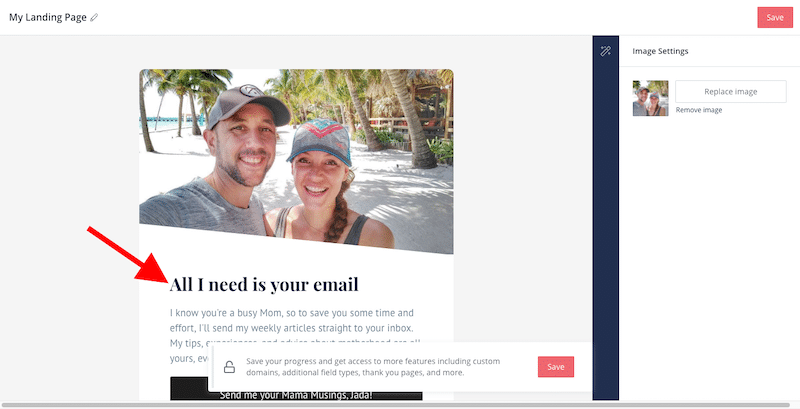
Step 6: Give Your Page A Name & Save
The final step of your landing page is to give it a name and click save. Here’s how to do it:
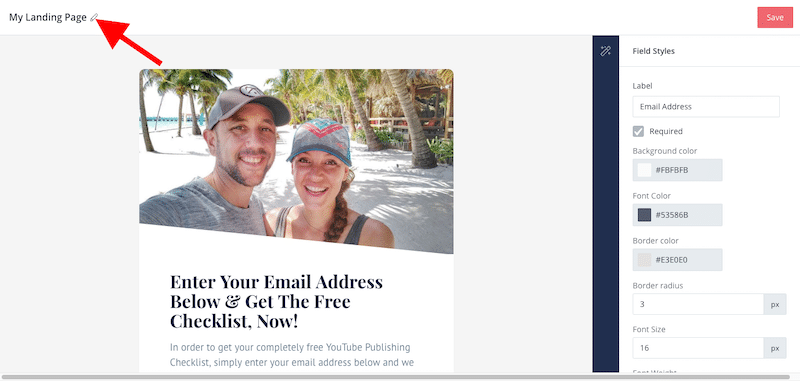
First, next to where it says ‘My landing page’, hit the little pencil icon… This will allow you to edit the name of your page. Once you’ve click it click to highlight the name and hit backspace….
Now enter the new name of your landing page…
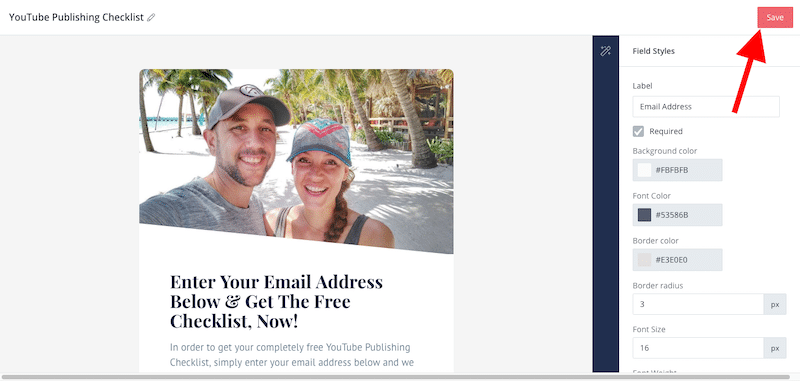
When completed, it will look like this:

The final thing to do is click the SAVE button and your all done building out your page.
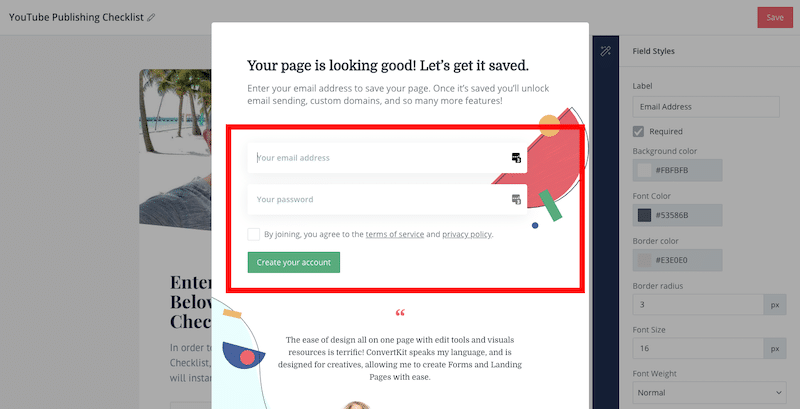
Step 7: Create Your ConvertKit Account
Once you click save you will presented with an invite from ConvertKit to finish the creation of your free ConvertKit Account. All you need to do is enter your email address and password for your new account.
It will look like this:
Step 8: Adding Your Free Download
Once you enter your email address and password and click “create account”, you will be taken to the inside of your ConvertKit account.
At this point we have built our landing page and it looks great…
Now we have to make sure that people get the “thing” they opted in for after they sign up to your list.
So to do this, we need to get back onto our landing page and edit some setting…
First, you need to click on “Landing Pages & Forms” in the top navigation bar, as shown below:

What this will do is bring up the list of all the landing pages you have created with ConvertKit… You have just created a new account so you’ll only have the landing page you just created.
It’ll look like this:
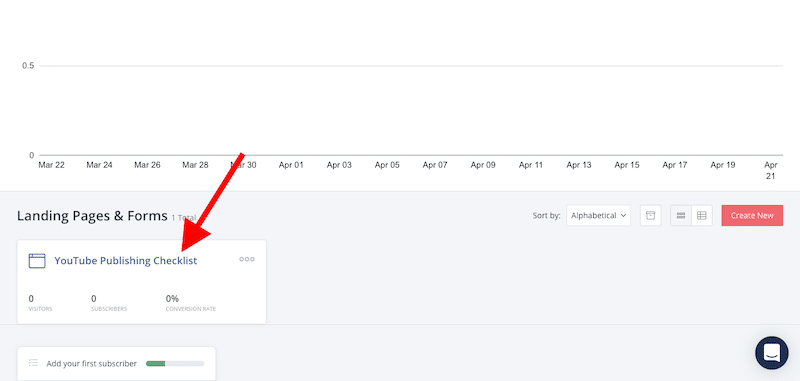
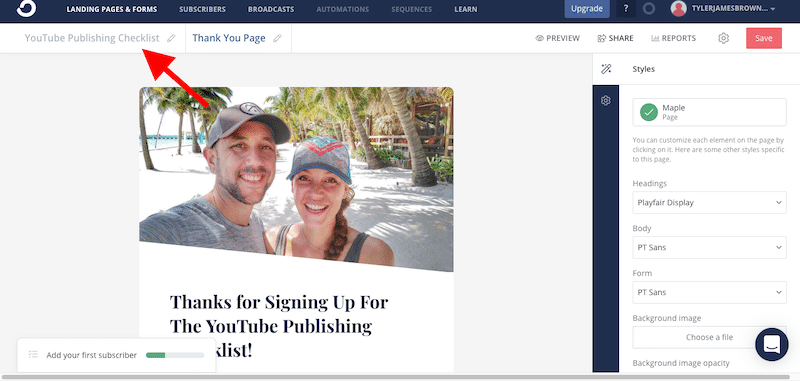
As shown in the image above, after you have clicked on “Landing Pages & Forms”, you need to scroll down and click on the name of the landing page you just created…
For me, it’s called “YouTube Publishing Checklist”…
Once you click, you’ll be taken back to the Landing Page editor, like so…
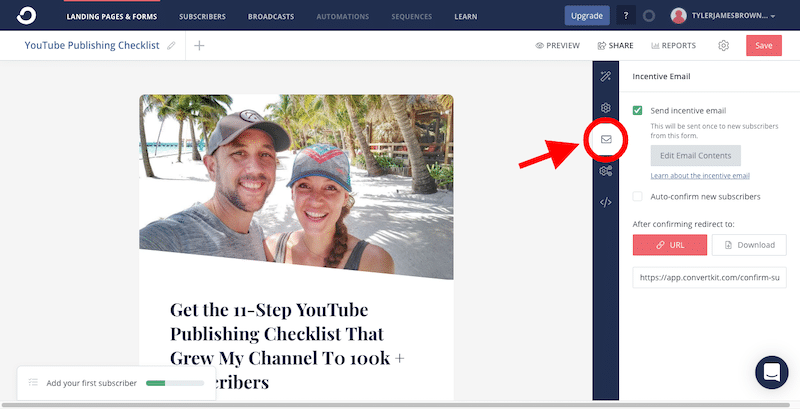
As the image shows above, once you are back inside of the Landing Page editor, click on the little email/mail icon you can see in the blue right sidebar…
This will open up the setting where we can edit the very first email your subscribers will get and add our the download link to our free “thing”…
First let’s add our download link…
We have two options here…
- If your download file is already hosted somewhere else online for example, Amazon s3 or dropbox etc or…
- You would like your download file to be hosted by ConvertKit and just need to upload it…
Well firstly if your download file is already hosted on Amazon s3 or Dropbox etc, you’ll only need to do one thing… Add your hosted download file link.
To do this, under “After confirming redirect to” in the sidebar, we need to click on the “URL” button and then simply paste our download link in the box provided, like so:
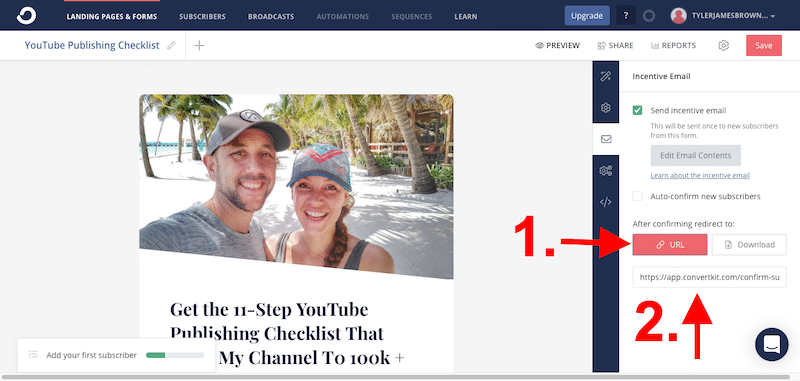
Then hit save, and move on to Step 9 in the process.
But if you need ConvertKit to host your file for you, then we need to upload our file to ConvertKit.
Here’s how to do it:
To upload your free “thing” to ConvertKit, under “After confirming redirect to” in the sidebar, we need to click on the download button… like so:
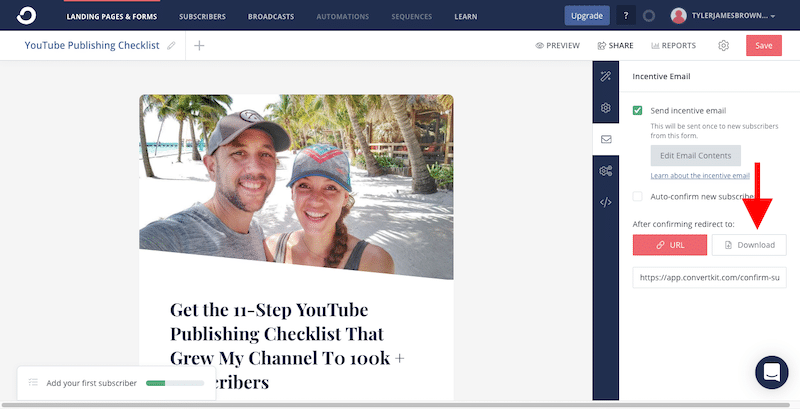
When you click that button it will bring up the option to upload your download file.
It’ll look like this:
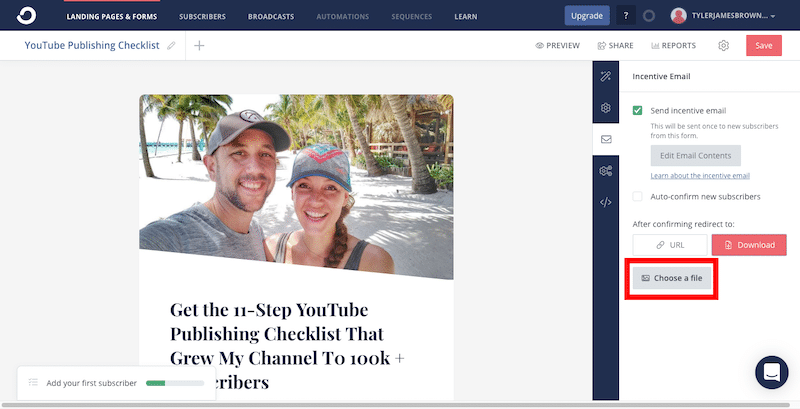
Now, let’s click on “Choose a file” and upload our download file.
Once you click on “Choose a file”, it will ask you to find the file you need to upload from your computer, like so:
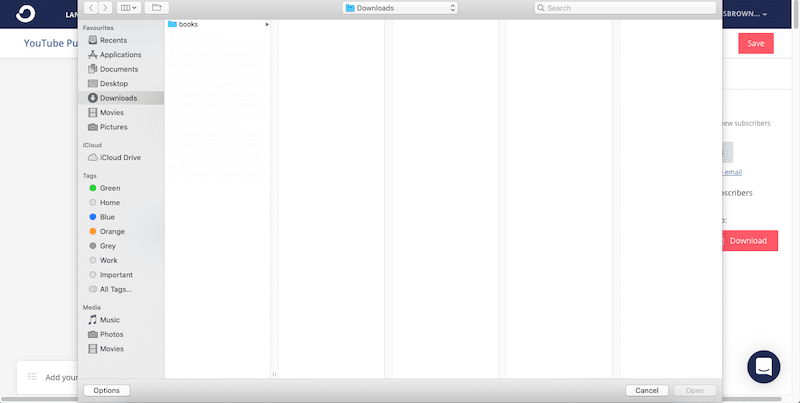
Find the download file on your computer and then click “open”… This will start the upload to ConvertKit.
Now you just need to wait for the upload to finish and click “Save”, this is VERY important… Then you can move onto step 9.
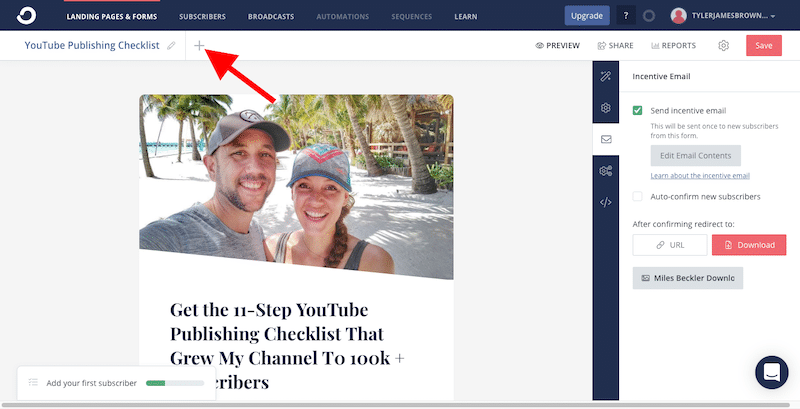
Step 9: Writing Your Incentive Email
Now that we have added our download file, we need to write the email that will be sent to all new subscribers, and give them the free “thing” they requested from you.
To start editing your incentive email, first click on “Edit Email Contents” in the right sidebar, like this:
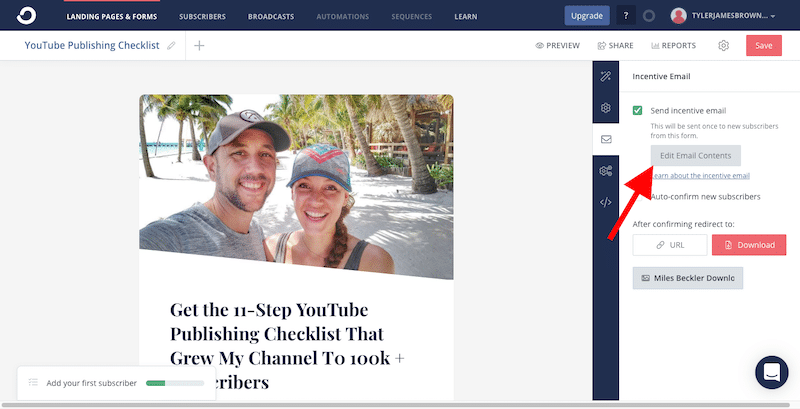
Clicking that button will bring up the email editor. It will look like this:
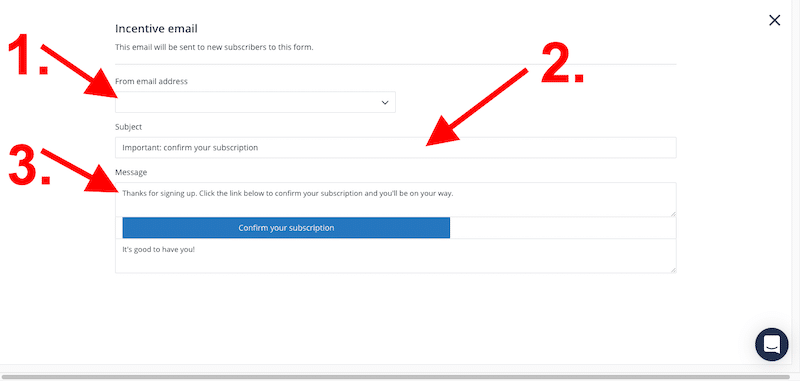
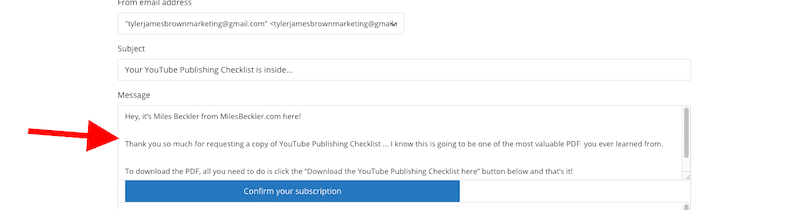
The first thing we need to add is our “From email address”… We do this by clicking on the “From email address” dropdown box (shown as #1 on the image above)…
Clicking this dropdown box will bring up the email address you opened your ConvertKit account with… Choose that email address.
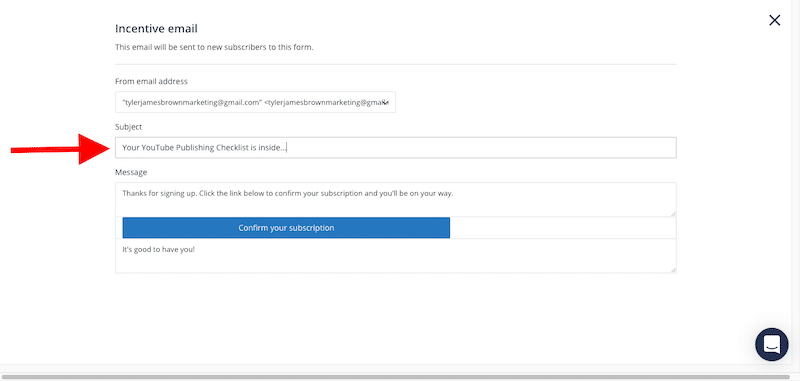
Next we need to add our Subject Line (step #2)…
We want to write a subject line that gets your new leads to open the email. One of the best ways to do this is by simply stating that their free “thing” is inside.
One of my favorite templates for this is: “ Your [name of free thing] is inside…”
Like this:
Now that this is done… Let’s move on to the email body (step #3)…
For the email body, we want to keep it simple, to-the-point and quickly deliver them what they requested from you.
Something like this:
“Hey, it’s [your name] from [your website] here!
Thank you so much for requesting a copy of [your free thing]… I know this is going to be one of the most valuable [book/pdf/mp3/video/webinar] you ever learned from.
To download the [book/pdf/mp3/video/webinar], all you need to do is click the “Download the [name of your free thing] here” button below and that’s it!
This first part of the email will be writing into the top section of the email editor, just above the button. Like this:
The next part of the email will be placed underneath the button. Like so:
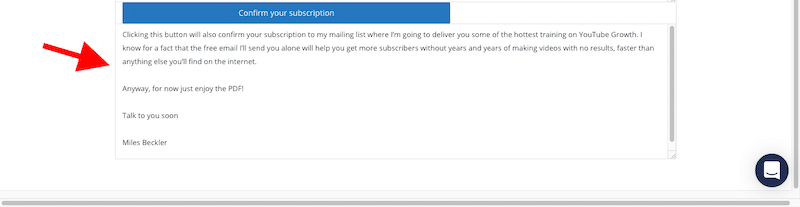
Clicking this button will also confirm your subscription to my mailing list where I’m going to deliver you some of the hottest training on [insert topic]. I know for a fact that the free email I’ll send you alone will help you achieve [desired result] without [pain] faster than anything else you’ll find on the internet.
Anyway, for now just enjoy the [book/pdf/mp3/video/webinar]!
Talk to you soon
[Your Name]
This would be a very good first email to start building the relationship between you and your leads.
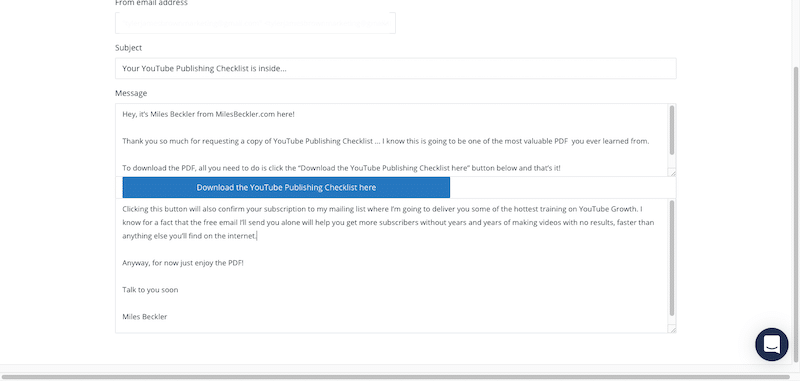
When done, let’s change the text of our button.
As default, the button will say “Confirm Your Subscription” but we need to make it more about the thing they’ve requested from you…
So instead, let’s write something more like this… “Download the [name of free thing] here”…
It’s simple to edit your button text, simply click on the button and highlight the text and hit backspace… Then enter your new button text.
When you’ve finished all of these steps, your email will look something like this:
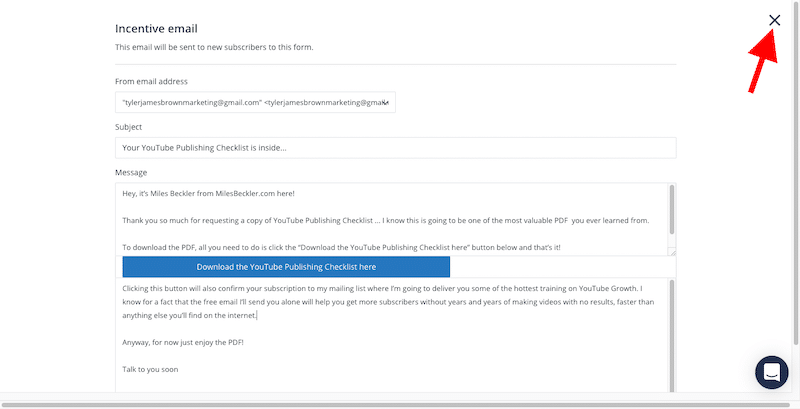
All of your changes to the email will be automatically saved so there is no “save” button to click…
Instead just click the “X” in the corner to close down the editor…
Step 10: Adding a Thank You Page
The next thing we need to do is create our thank you page. To start this process, you need to click the + icon next to your landing page name (shown below)…
Once done, it will look like this:
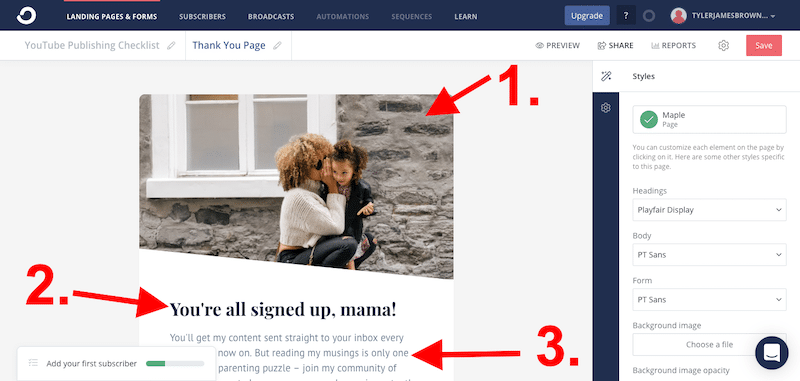
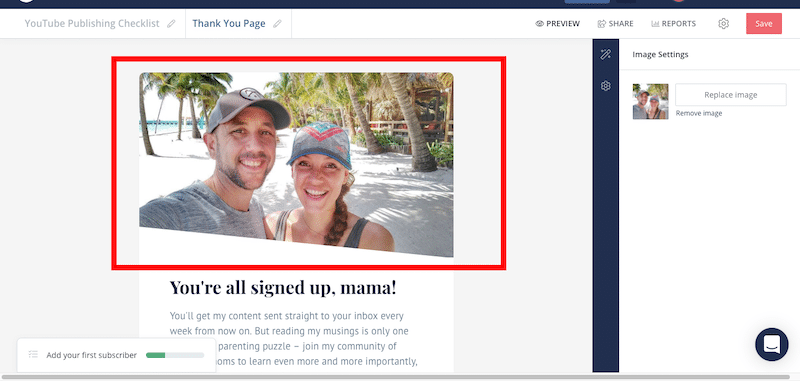
- The image
- The headline
- The sub headline
The editing process for this is EXACTLY the same as the landing, so you should be able to whip through this really quickly.
For the image, just use the same image as you used on the Landing page:
For the headline… You need to thank them for signing up for your free thing “free” so that your leads know they are still in the right place…
Like this:
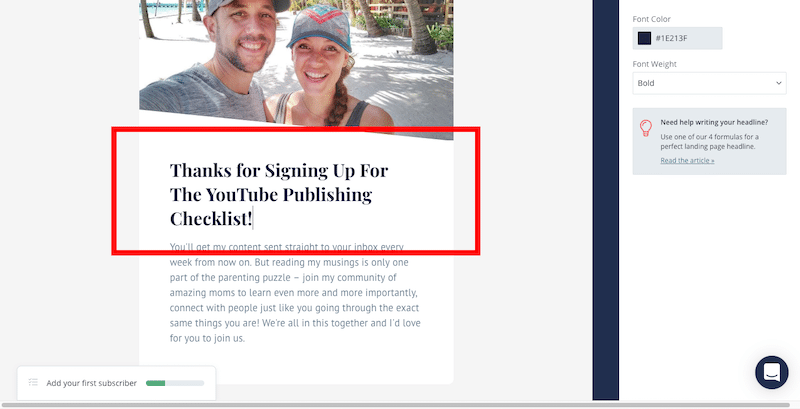
Finally, for the sub headline… You need to let your new lead know how they’re going to receive the free thing and when they will receive it.
Like this:

Once you’ve completed these three steps, REMEMBER to click “SAVE”:

The final step of step 10 is making sure that we get ConvertKit sending all your leads to your new thank you page…
First, click on the name of your landing page… This will bring your landing page editor back up:
Once you’ve done that, you need to click on the singular cog icon on the blue sidebar and then click “redirect to thank you page”. Like this:
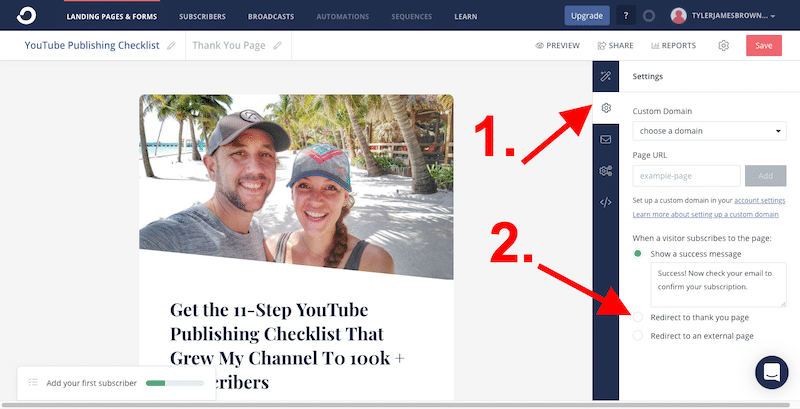
Then click SAVE.
Step 11: Your Custom Domain
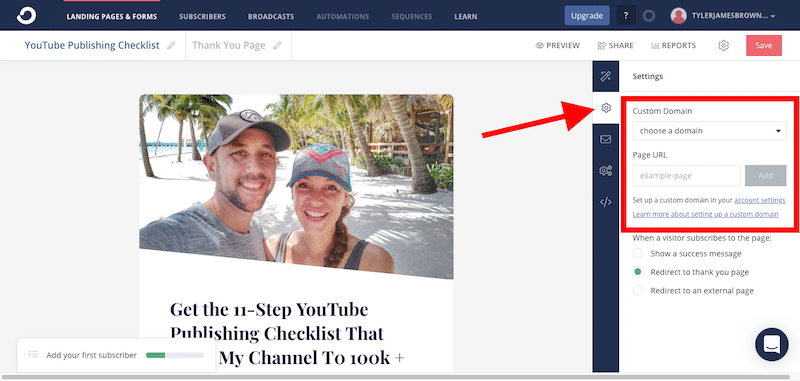
Now that we have created the landing page, the thank you page and set up the delivery of your free thing, we need to set up our domain.
Convertkit give you two options:
- We can host our page on Convertkit and get their free domain name or…
- If you have your own hosting and domain, you can connect that domain.
In order to start setting this up, click on the cog wheel in the blue sidebar, and you’ll see the domain options, like this:
Hosting on ConvertKit:
In order to host it on ConvertKit and use their free domain, it’s incredibly simple to set up… Simply click on the dropdown box that says “Choose a domain” and select the automatically created custom domain name from Convertkit.
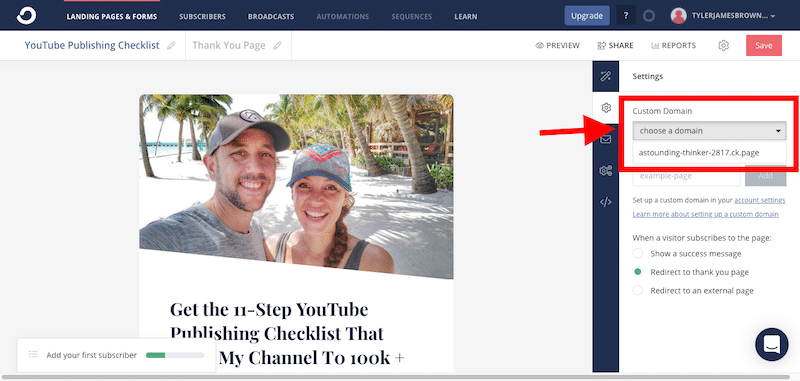
Once done, remember to click SAVE.
Setting up your custom domain using your own hosting:
If you are looking to host this page on your own domain, then ConvertKit has some step-by-step instructions on how to do so. In order to find those you need to click on the associated link in the sidebar (shown below):
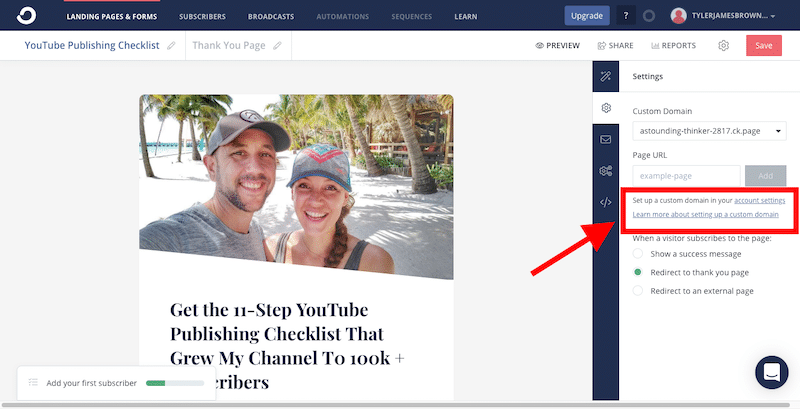
Again once completed, click SAVE.
That’s it. Your landing page is complete and ready to be promoted and build your email list.
Here’s how to get the link to your page that you can send to your audience:

BONUS Step: Broadcasts
At this point, it is important to note that with the Free ConvertKit account you will not have access to autoresponders. That feature is locked for paid accounts…
That means that in order to send emails to your new list, you will need to send broadcasts…
Here’s how:
First click on “Broadcasts” in the top navigation menu.
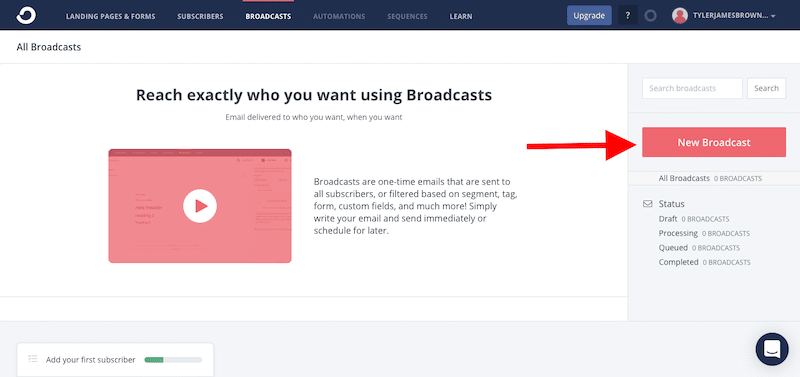
Then click on “New Broadcast”… it’s the big pink button on the right sidebar.

On the next page, you can keep most of the setting as they are…
The only thing you’ll need to add is your broadcast description (shown as #1)… This will be displayed throughout ConvertKit alongside your subject line, but your subscribers won’t see it.
It’s more of a note for you, so you can quickly see what the email was about.
Then click NEXT STEP.
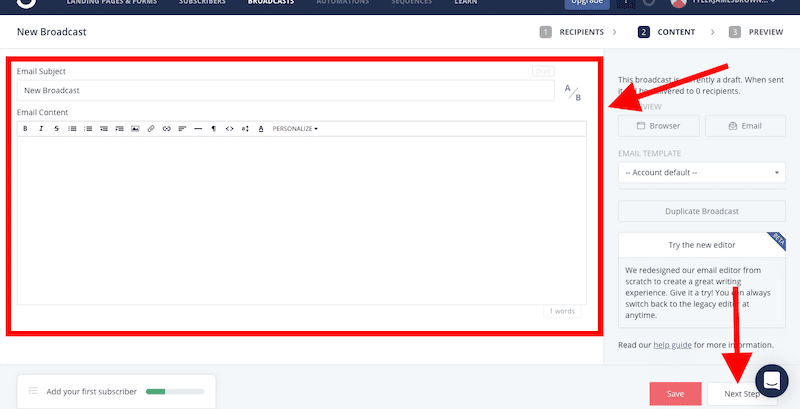
The next two steps are very simple.
Step one… Add your email subject and your email content in the boxes shown in the image above.
Then click SAVE and then NEXT STEP.
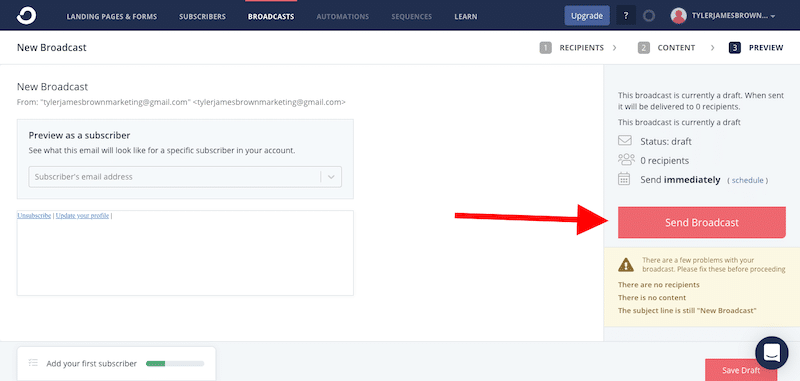
On the next page, your only job is to click the “Send Broadcast” button in the right sidebar and you are all done!
If you’d like some help in knowing what to send in your broadcast, you should take a look at a course from one of my mentors, Terry Dean, and it’ll give you access to his proven collection of million dollars emails – Click here to learn more about it.
Conclusion
Now it is easier than ever to start building your email list without spending a single penny… And as this post has just shown you, ConvertKit is at the forefront of the marketplace, making it super easy for you to get started.
With ConvertKit there is absolutely nothing holding you back from growing your email list and starting to build your online business.
You now have this post that shows you exactly how to do it…
There’s literally nothing stopping you from getting going.
Why not start today?
To your future success,
Miles “Forever Helping” Beckler
P.S. If you don't have your own blog up and running yet… Personally I think that should be priority #1 for you right now.
And I've got a free training that walks you step-by-step through setting up your blog in this post here.
Ultimately you want to have a blog based sales funnel that can attract visitors from the search engines.
Then you get those visitors on your list based on what you learn here…
That is the most sustainable online business I know of and it is not only simple it is EXTREMELY effective once you get it all setup!